
Flipper Zero Hacking Tool: The Complete Beginner's Guide

The Flipper Zero is a portable multi-tool for pentesting, hacking, and hardware exploration. It's a powerful Swiss Army knife for radio signal analysis, access card cloning, and network testing. Designed for both security professionals and hobbyists, Flipper Zero offers a wide range of features, including:
RFID/NFC Reading and Emulation
Sub-GHz Signal Analysis
Infrared (IR) Remote Control
Bluetooth Device Scanning and Attacks
WiFi Hacking (with optional WiFi Dev Board)
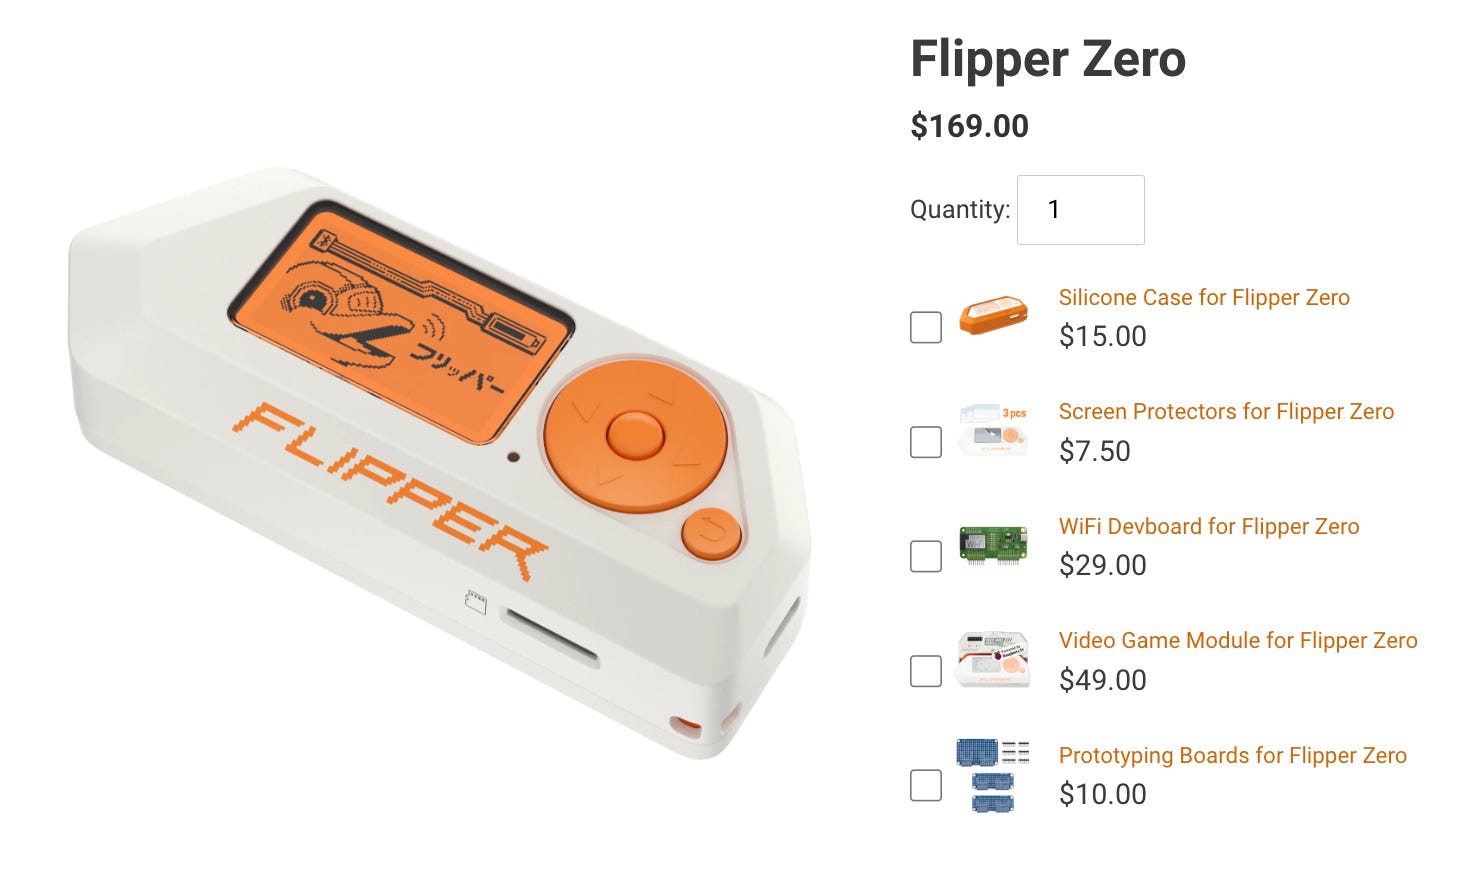
Where to Buy
You can purchase the Flipper Zero from official and trusted sources to avoid counterfeits or tampered devices.
Recommended Sources:
Authorized Distributors listed on the official website.
Why You Need a microSD Card for Flipper Zero
A microSD card is essential for your Flipper Zero to store firmware updates, keys, remotes, signal databases, and more. Choose a reliable card to avoid slow performance or data errors.
Flipper Zero supports FAT12, FAT16, FAT32, and exFAT file systems and works with microSD cards up to 256 GB. A 4 GB card is sufficient, but 16–32 GB (Class 10) is recommended for future-proofing. Larger cards may take longer to be recognized.
Use high-quality branded microSD cards (like SanDisk or Kingston) to avoid performance issues or device damage.
A 32 GB Class 10 card offers the best balance of speed and capacity. While larger cards (up to 256 GB) are supported, they may take longer to load.
Recommended microSD Card Specs:
Capacity: 16–32 GB (up to 256 GB supported)
Speed Class: Class 10 or UHS-I
File System: FAT32 or exFAT
Simple Steps to Install and Format a microSD Card for Your Flipper Zero
Step 1: Insert the microSD Card
Locate the microSD card slot on the bottom of your Flipper Zero.
Hold the microSD card with the metal pins facing up.
Align the card with the slot and gently push it in until you hear a click.
Turn on your Flipper Zero and check if it recognizes the microSD card.
Step 2: Format the microSD Card (if needed)
If your Flipper Zero does not recognize the card, you may need to format it. Here’s how:
On your Flipper Zero, go to Main Menu > Settings > Storage.
Select Format SD Card and press RIGHT to start formatting.
Wait for the process to complete. The card will be formatted to FAT32, compatible with Flipper Zero.
Learn More About Flipper Zero SD Card:
Flipper Zero SD Card Docs
Step 1: Setting Up Your Flipper Zero
Before you can unlock the full potential of your Flipper Zero, you need to set it up by installing the official firmware. To do this, you’ll use a tool called qFlipper, which helps manage your device from your computer.
What is qFlipper?
qFlipper is the official software for updating, managing, and customizing your Flipper Zero. It acts as a bridge between your Flipper and your computer, allowing you to:
Update Firmware: Keep your device up-to-date with the latest features and bug fixes.
Transfer Files: Move custom scripts, signal recordings, and payloads from your computer to the Flipper.
Manage Apps and System Storage: Install new apps or delete unnecessary ones to customize your Flipper’s capabilities.
Backup Configurations: Save your Flipper’s settings and files to avoid losing important data.
In short, qFlipper is essential for managing your Flipper Zero and ensuring it stays optimized. Now that you know what it does, let’s get started with the installation process.
Installing the Official Firmware
Firmware is the low-level software that runs directly on your Flipper Zero’s hardware, controlling everything from reading RFID signals to managing apps. It’s different from regular apps or operating systems—it’s essential for your device to function properly. Think of firmware as the "brain" of the Flipper Zero, telling it how to work and what features it can access.
Why Start with the Official Firmware?
The official firmware is the most stable and well-tested version. It ensures your device works as expected and has access to the core set of tools, making it the best starting point for new users. Once you’ve set up the official firmware, you’ll have a solid foundation and can later upgrade to custom firmware like Unleashed to unlock advanced features and expand its capabilities.
Steps to Install the Official Firmware:
Download qFlipper: Go to https://flipp.dev/upd and download qFlipper for your operating system (Windows, macOS, or Linux).
Connect Your Flipper Zero to Your Computer: Use a USB-C cable to connect the device. Make sure your Flipper is powered on.
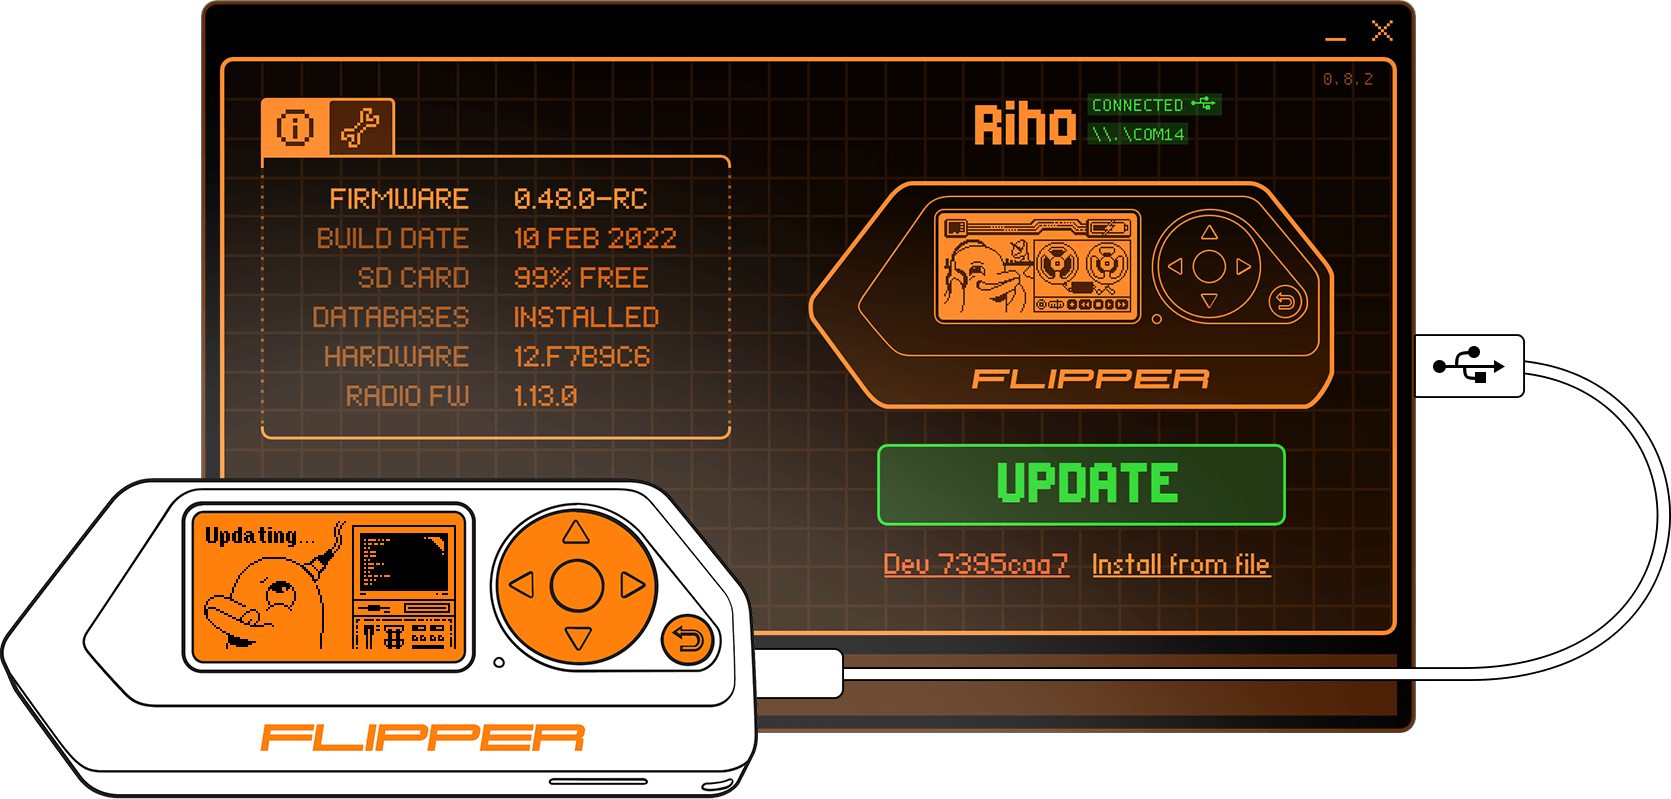
Launch qFlipper: Open the qFlipper app. It will automatically detect your device and check for a firmware update.
Click “Update Firmware”: Follow the on-screen instructions to install the latest firmware version.
Wait for the Flipper to Reboot: Once the update completes, the Flipper Zero will restart automatically, ready to use with the latest features.
With the official firmware installed, your Flipper Zero is now set up and ready to explore its full range of tools. Later, you can upgrade to custom firmware for additional features, but starting with the official firmware ensures a smooth and reliable experience.
Step 2: Upgrading to Custom Firmware (Recommended)
While the official firmware is fine for basic use, custom firmware unleashes the full power of your Flipper Zero. The most popular option is Unleashed Firmware, which adds advanced tools, extended frequency ranges, and more apps for WiFi, NFC, RFID, and Bluetooth experimentation.
Custom Firmware Options
No longer supported firmware:
❌ MuddleBox Firmware
❌ SquachWare Firmware
❌ v1nc Firmware
❌ Wetox Firmware
❌ Xtreme Firmware (ClaraCrazy)
❌ Xvirus Firmware (Dexv)
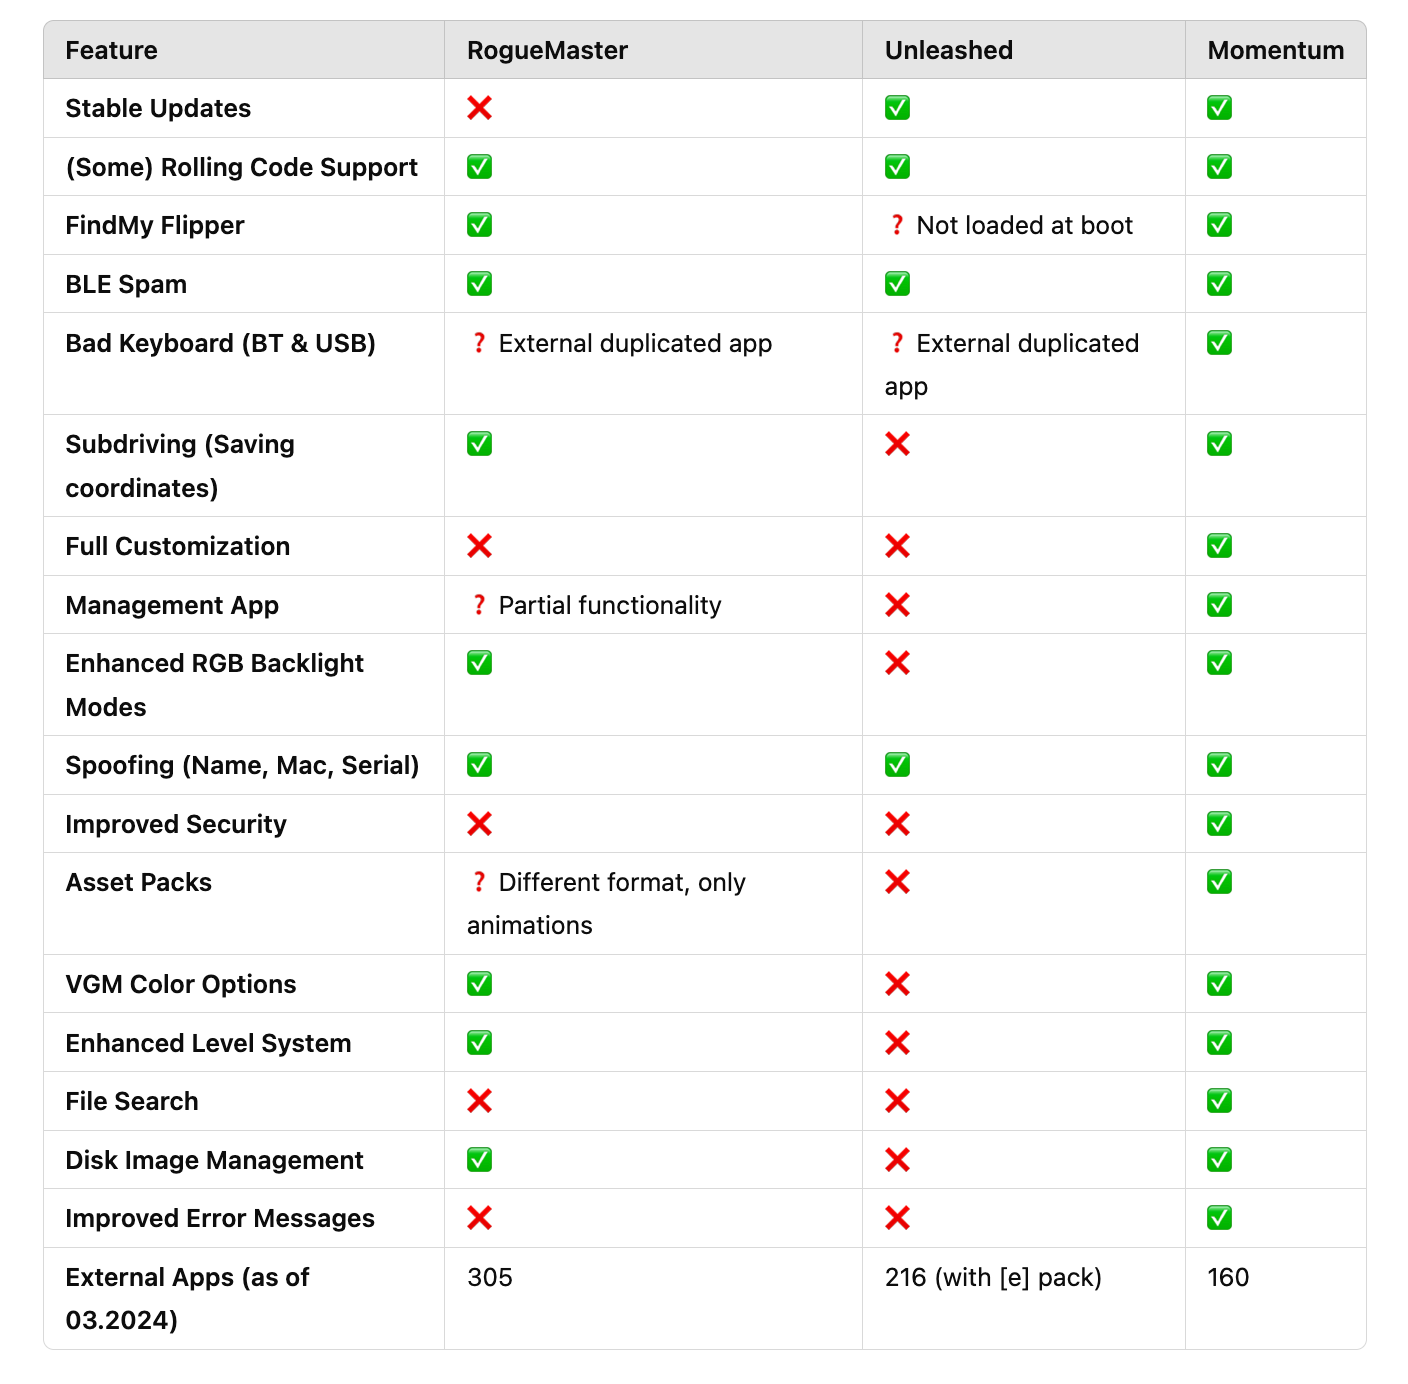
FAQ: If Momentum has more features, why choose Unleashed?
Momentum, released in May 2024, was created by former Xtreme firmware developers—a project known for unlocking most features but also for its instability. Born from a split between Xtreme’s core developers, Momentum’s future is uncertain, with stability being the trade-off for new features and faster updates.
Unleashed, released in August 2020, is a proven and reliable option with a strong track record, consistent updates, and a large community for support. This makes it a better choice for most users—especially beginners or those who prioritize reliability.
Key Differences:
Release Date: Unleashed (August 2020) vs. Momentum (May 2024).
Stability: Unleashed is highly stable; Momentum may experience bugs and crashes.
Development History: Momentum stems from a developer split, making its future less predictable, while Unleashed has a cohesive and established team.
Features: Momentum prioritizes unlocking advanced features, like Xtreme, but often at the expense of stability.
Community & Support: Unleashed has a larger community, better documentation, and more reliable support resources.
For beginners or those seeking reliability, Unleashed is the safer option. Momentum is best for advanced users willing to take risks for cutting-edge features.
Installing Unleashed Firmware (Web Flasher Method)
For this guide, we’ll focus on Unleashed Firmware, one of the most popular options for its flexibility, stability, and powerful features. If you want to unlock your Flipper Zero’s full potential without sacrificing reliability, Unleashed is a solid choice.

Step-by-Step Installation:
Go to the Unleashed Firmware Releases Page
Start here: https://github.com/DarkFlippers/unleashed-firmware/releasesFind and Open the Latest Release
At the top of the page, look for the release labeled “Latest” (Ex: unlshd-080). Click the title of the release to visit the release page.Search for the Web Installer
On the release page, press CTRL + F and search for “Install FW via Web Updater” to locate the Web Installer instructions.Choose Your Firmware Option
You’ll see three options: Default, Extra Apps, and No Apps. I recommend Default, as it includes everything you need. You can also check the release page for a full list of apps in each version.Open the Unleashed Firmware Web Installer
Click the link provided under the Web Installer section for the option you want to launch it in your browser.Connect Your Flipper Zero
Use a USB cable to connect your Flipper Zero to your computer.Follow On-Screen Instructions
The Web Installer will guide you through the process. Select the latest Unleashed release and follow the prompts to flash the firmware.Restart Your Device
Once the process is complete, restart your Flipper Zero to finalize the installation.
With Unleashed Firmware installed, your Flipper Zero will have access to powerful tools, such as: WiFi Scanning and Deauthentication Attacks Evil Portal for rogue access points Bluetooth tools like BLE Spam and BadUSB payloads Sub-GHz unlocks for expanded signal manipulation.
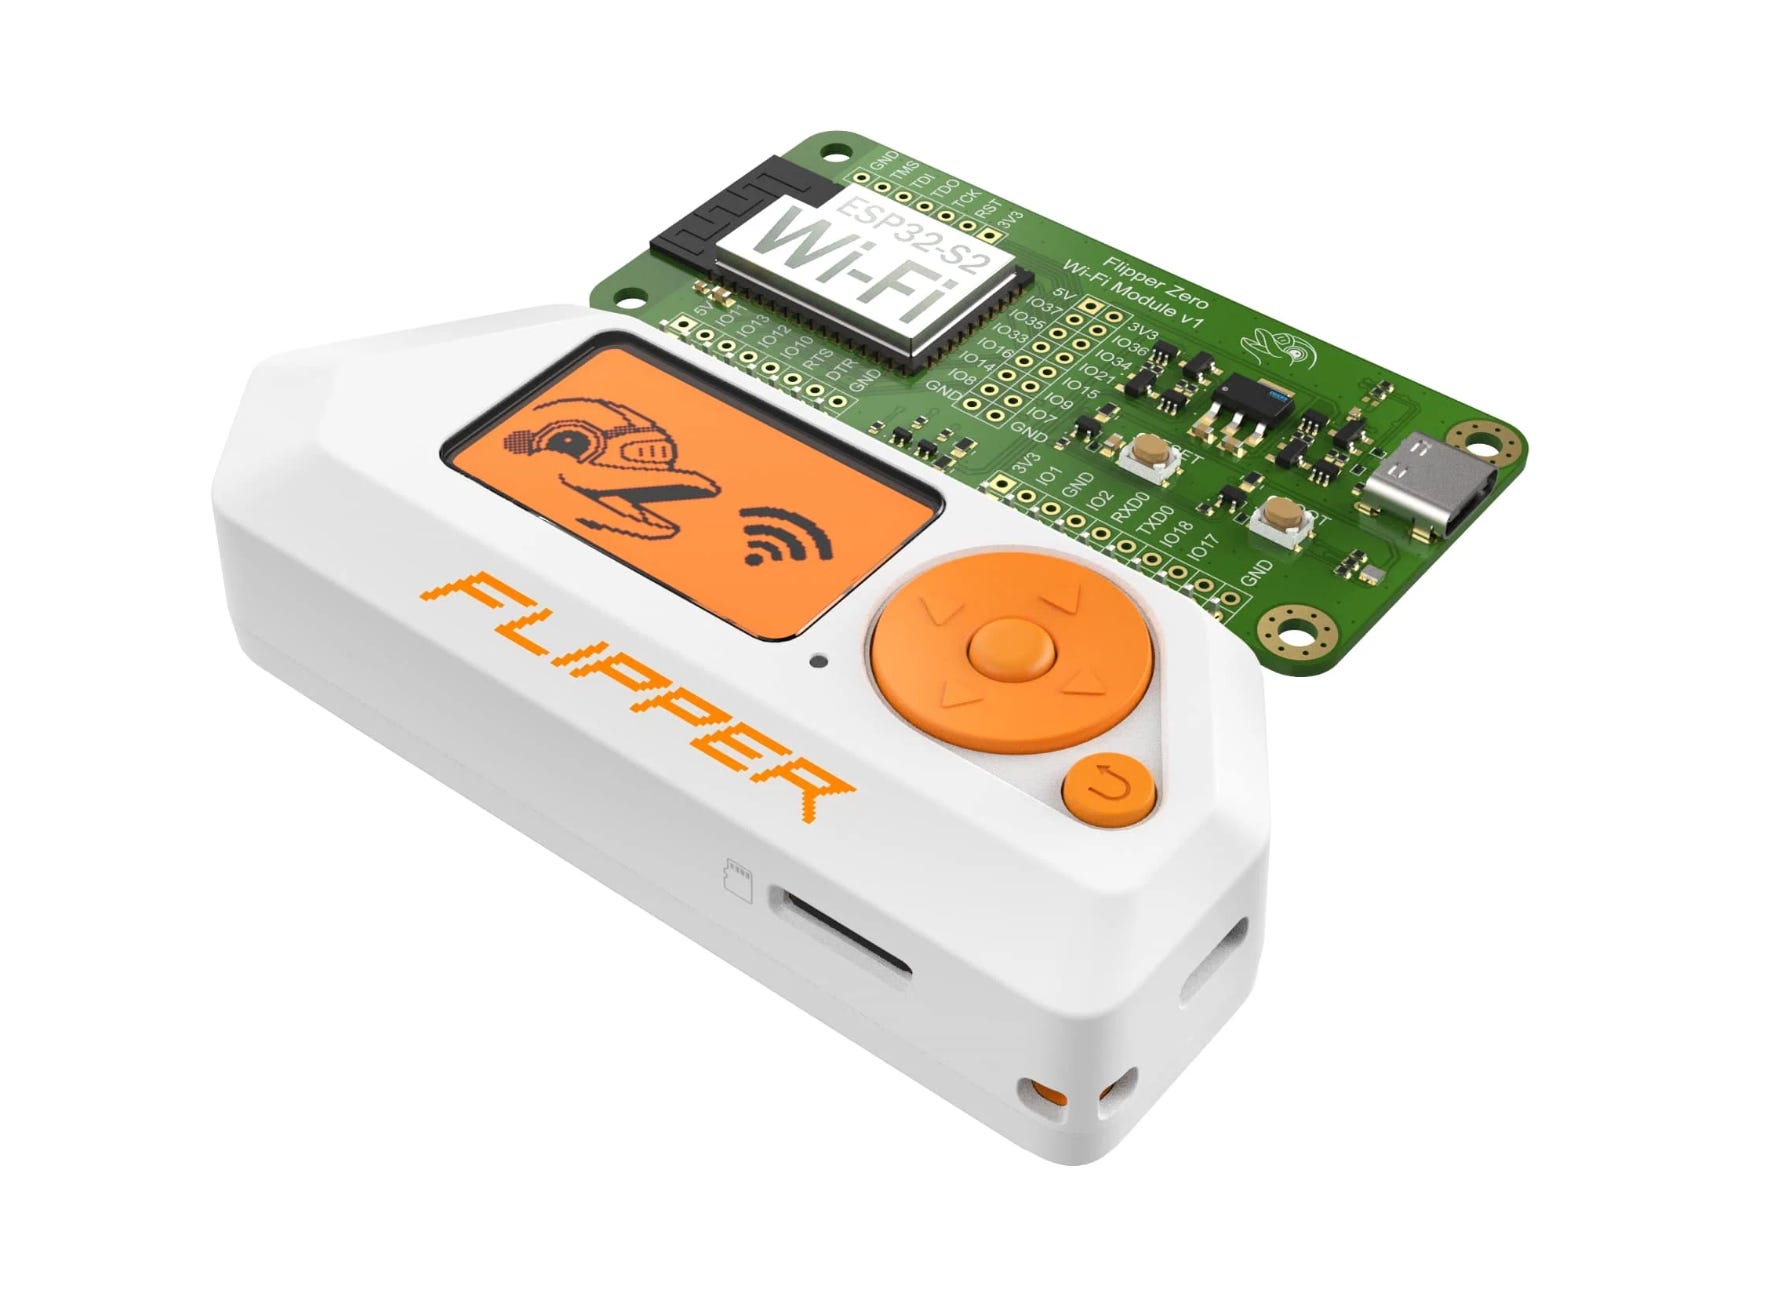
Step 3: Setting Up the WiFi Module
The WiFi Dev Board (ESP8266/ESP32) is an optional module that enables WiFi-related hacking tools on your Flipper Zero. This module allows you to run advanced tools like Evil Portal, network scanning, and deauthentication attacks. If you want to unlock the full potential of your Flipper Zero for wireless security testing, this board is essential.
Out of the box, the WiFi Dev Board doesn’t have the powerful tools you need. That’s where Marauder firmware comes in. Marauder transforms your board into a robust tool for WiFi penetration testing, adding capabilities like packet injection, deauth attacks, beacon spam, and more.
What You’ll Need
WiFi Dev Board (ESP8266/ESP32)
Python Installed on your computer (for manual flashing)
Important Note: How to Properly Connect the Board
To flash the firmware, you must connect the USB-C cable directly to the WiFi Dev Board, NOT the Flipper Zero itself.
Why? The Flipper’s GPIO port can only power the module and interface with it; it cannot flash firmware onto the module.
Firmware flashing requires a direct connection between your computer and the WiFi Dev Board to upload the necessary files and firmware.
How to Install Marauder Firmware
Download the Firmware:
Go to the FZEasyMarauderFlash GitHub and download the repository.Unzip the File:
Extract the firmware files to a folder on your computer.Install Python Requirements:
Open a terminal or command prompt, navigate to the folder, and run:
pip3 install -r requirements.txtConnect the WiFi Dev Board:
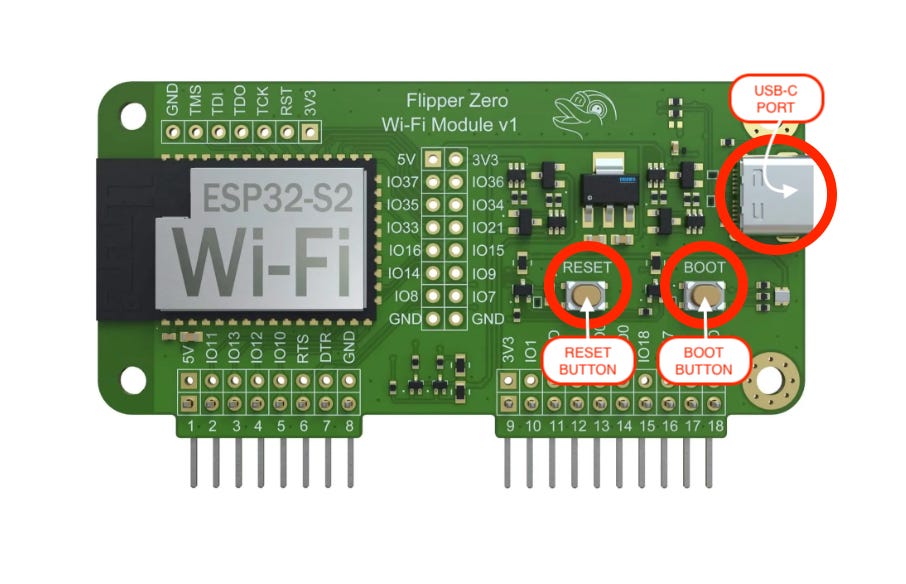
Hold the BOOT button on the board.
While holding BOOT, connect the board directly to your computer via USB-C.
Press and release the RESET button, then release the BOOT button.
Where to Find the Boot and Reset Buttons?
Refer to this image to identify the Boot and Reset buttons on your WiFi Dev Board. These buttons are crucial for putting the board into flashing mode during setup.
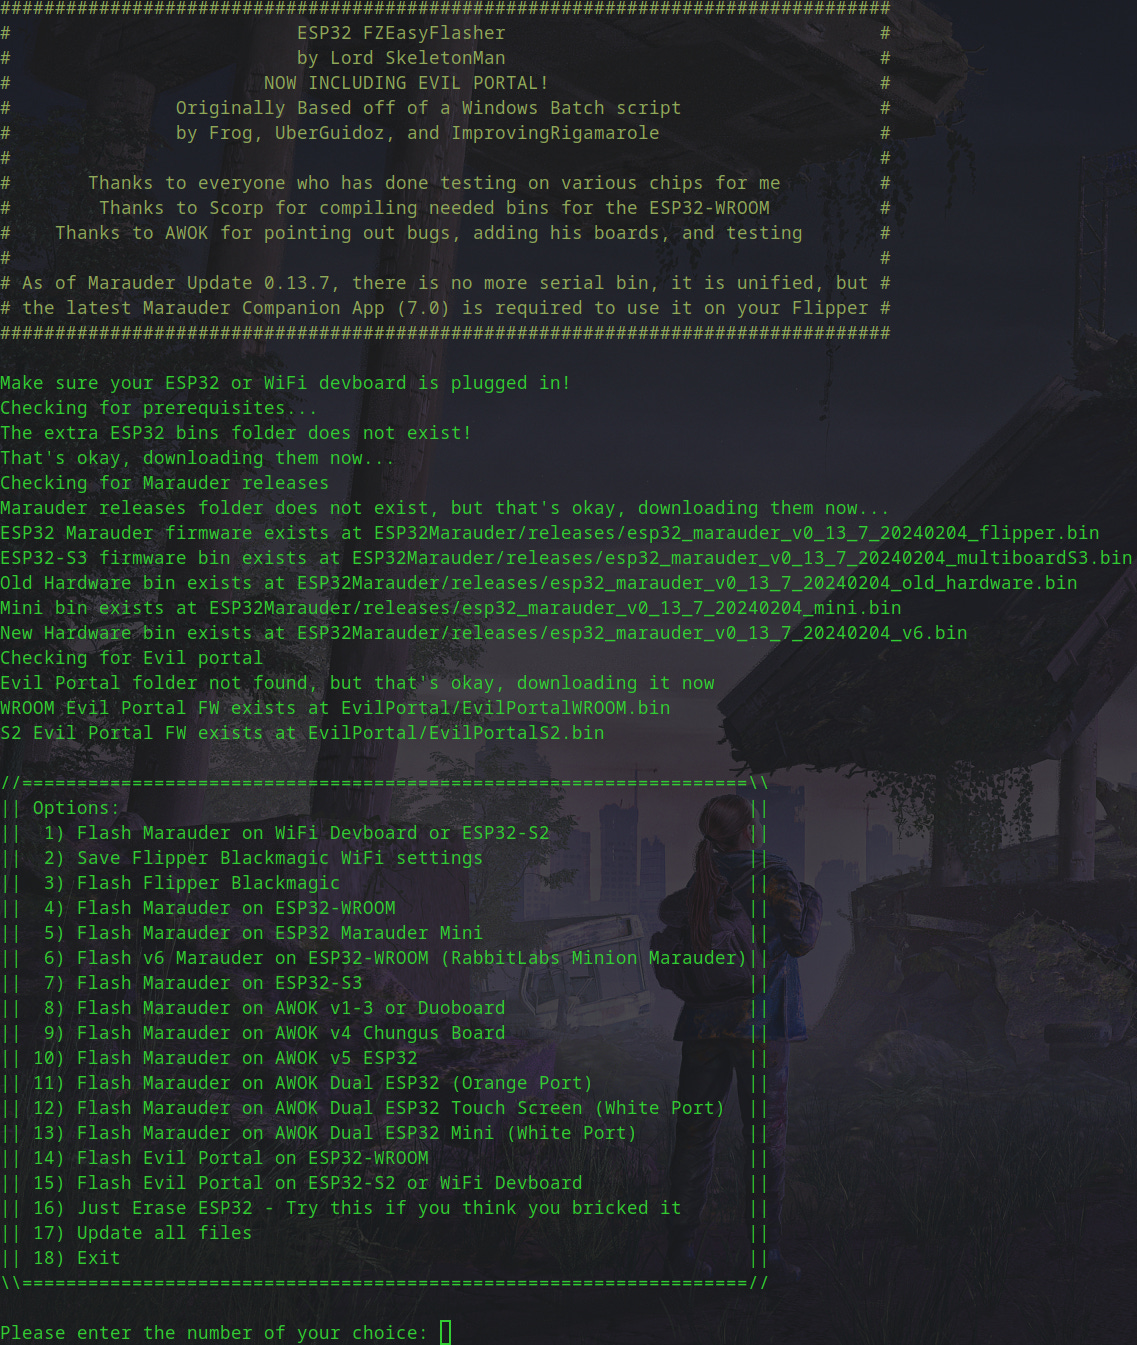
Run the EasyInstall Script:
Start the script to flash the firmware:
python3 EasyInstall.pyFollow the on-screen instructions and select the firmware you want. For the WiFi Dev Board basic installation, choose option #1 by entering 1 and pressing Enter.
Wait for the Flashing Process to Finish:
Once completed, the board will reboot with the Marauder firmware installed.
Best Flipper Zero Features
Once you’ve installed Unleashed Firmware and set up your WiFi Dev Board, you gain access to several powerful tools. Here are the most useful features and how to use them.
Evil Portal
Evil Portal is a powerful feature that allows you to set up a fake login page (also known as a captive portal). When users connect to your WiFi network, they’re automatically redirected to this page.
It’s commonly used in phishing simulations to demonstrate how attackers can trick users into entering credentials on unsecured networks.
Note: This tool is designed for educational purposes and controlled security testing only. Unauthorized use on public networks may violate local laws.
Step-by-Step Guide: How to Use Evil Portal
Open Evil Portal
On your Flipper Zero, go to Apps > GPIO > ESP32 WiFi Marauder.
Scroll through the menu and select Evil Portal.
Start the Portal
Tap Start to launch the Evil Portal.
Your device will begin broadcasting an open WiFi network with a default login page.
Customize the Login Page (Optional)
The default page is basic, but you can modify it for a more convincing look. If you're using Unleashed Firmware, access the HTML files and customize
How Evil Portal Works
When Evil Portal is active, it broadcasts an open WiFi network. When someone connects, they are redirected to the fake login page, which you can customize to look like a public hotspot or company network. If the target enters their credentials, the information is captured and stored for analysis—demonstrating how easily attackers can collect sensitive data on public WiFi.
Useful Resources:
WiFi Scan & Deauth Attack
The WiFi Scan & Deauth Attack tool on the Flipper Zero allows you to discover nearby WiFi networks and disrupt their connections by sending deauthentication packets. This method forces devices connected to a network to disconnect, which can be useful for penetration testing and evaluating the security of wireless environments.
What is a Deauth Attack?
A deauthentication (deauth) attack works by exploiting a vulnerability in the 802.11 WiFi standard. Instead of breaking encryption, it sends deauth packets to devices connected to a specific network, tricking them into disconnecting. This type of attack doesn’t require the target’s WiFi password, making it a favorite tool for penetration testers to simulate denial-of-service (DoS) attacks on wireless networks.
Note: You’ll need a WiFi Dev Board (ESP8266 or ESP32) to use this feature. This board adds WiFi capabilities to your Flipper Zero, enabling tools like WiFi scanning, deauthentication, and Evil Portal.
Steps to Perform a Deauth Attack
Connect the WiFi Dev Board to your Flipper Zero’s GPIO pins. Ensure it’s securely connected and properly configured.
Open the WiFi Marauder App: This app is part of custom firmware such as Unleashed or RogueMaster.
Scan for Available Networks: The app will display a list of nearby WiFi networks and connected devices.
Select a Target Network: Choose a network you want to test. You’ll see connected devices listed under the network.
Launch the Deauth Attack: Select the device or the entire network, then start the attack. The connected devices will lose their connection to the network.
Phone Bluetooth Spam
The Bluetooth Spam feature on the Flipper Zero allows you to send repeated messages or requests to nearby Bluetooth devices. While this can be a fun way to experiment, it’s also useful for Bluetooth penetration testing and stress-testing devices. It demonstrates how Bluetooth-enabled devices respond to unexpected traffic and helps identify vulnerabilities.
How It Works:
The Flipper Zero sends multiple connection requests or message packets to visible Bluetooth devices in the area. Depending on the target device, this can:
Trigger notifications repeatedly, causing annoyance or distraction.
Interrupt active Bluetooth connections such as audio playback or file transfers.
Test how devices handle high traffic loads for research or debugging purposes.
How to Use Bluetooth Spam:
Open the Bluetooth Spam Tool on your Flipper Zero.
Scan for Nearby Devices and select a target device from the list.
Choose the Spam Type: This could be sending a standard pairing request or a specific spam message.
Run the Tool and watch the results. The target device may receive continuous requests or notifications.
Universal Remote
Control TVs, projectors, and more using the Flipper Zero’s infrared transmitter. You can turn TVs off in public spaces or change channels as a prank.
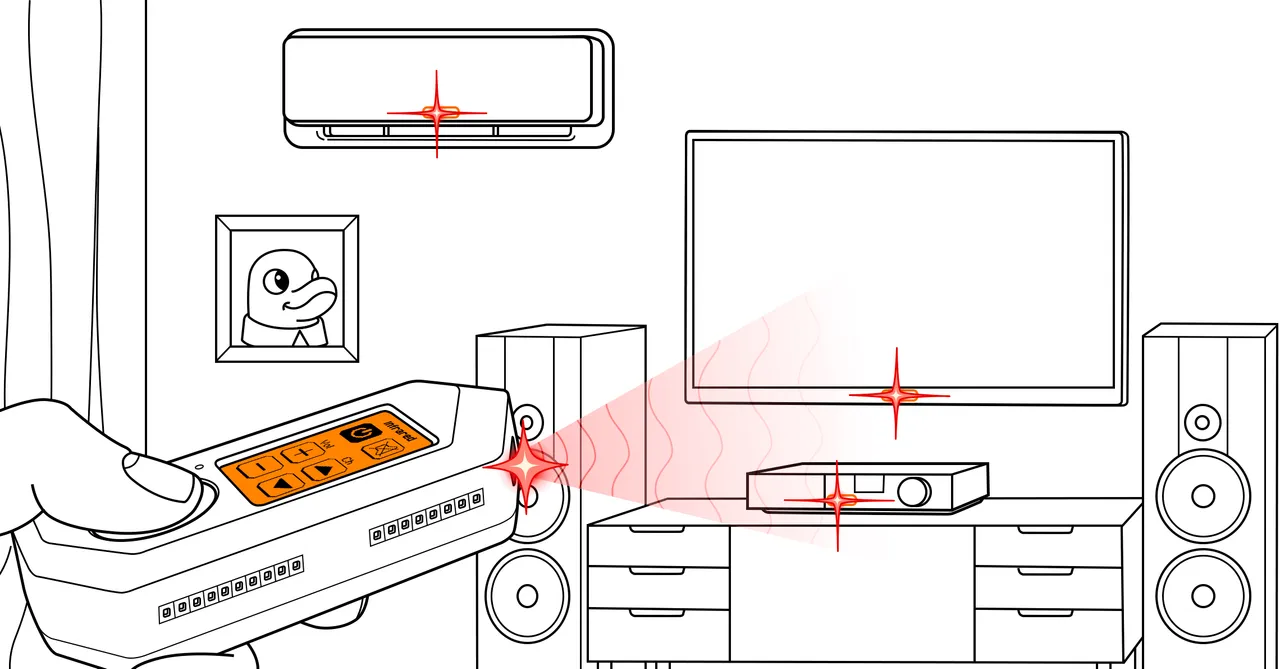
Learn More: Infrared on Flipper Zero Docs
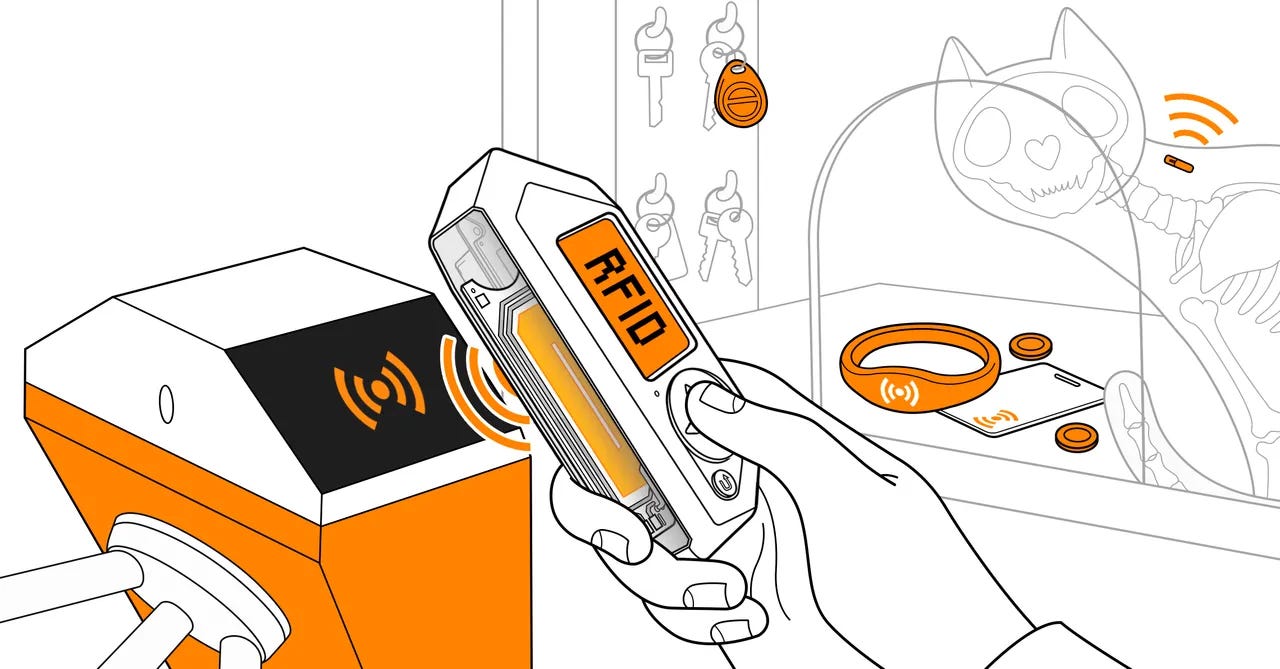
RFID & NFC Tools
The Flipper Zero comes equipped with powerful RFID (Radio Frequency Identification) and NFC (Near Field Communication) tools, allowing it to read, emulate, and clone various types of RFID and NFC devices.
These tools can be used for learning about wireless communication, testing security systems, or automating tasks.
What Can You Do with RFID & NFC on the Flipper Zero?
Copy Garage Door Clickers: Clone RF-based remotes to control devices like garage doors or gate openers. By recording and replaying the RF signals, you can make a copy for backup or testing purposes.
Scan RFID-enabled Credit Cards: Flipper Zero can read certain types of RFID-based credit cards, giving you a chance to explore how contactless payments work. However, always check local laws before experimenting with payment cards.
Emulate Access Badges: The device can emulate common access control badges, like those used for building entry systems, to test how secure they are.
Store and Replay NFC Data: Store NFC data from devices like smart locks or public transit cards and replay them later for testing and automation.
Learn More: RFID on Flipper Zero Docs | NFC on Flipper Zero Docs
Bad USB: Rubber Ducky Script Runner
The Flipper Zero can act as a Bad USB device, which means it can imitate a USB keyboard and send keystrokes to a connected computer. Since computers trust keyboards by default, a Bad USB can be used to quickly type commands, open programs, or even run automated tasks without user input. This is useful for automation and penetration testing to check for vulnerabilities.
What is a Rubber Ducky Script?
A Rubber Ducky script is a set of instructions that tells the Flipper Zero what to "type" when it connects to a computer. It can simulate anything from typing a password to running more advanced commands. These scripts are commonly used by penetration testers to demonstrate how attackers might exploit a system.
How to Use Rubber Ducky Scripts:
Write or download a Ducky Script (a plain text file with specific commands).
Load it onto your Flipper Zero using the microSD card.
Connect the Flipper to a computer via USB.
Run the script, and it will execute the commands as if typed manually.
Learn More: Bad USB on Flipper Zero Docs