
How to Create Virtual Machines for Cybersecurity Labs

Virtual machines (VMs) are software-based emulations of physical computers. They let you run multiple operating systems on one physical machine, providing an effective and safe environment for training and testing.
In cybersecurity, virtual machines are widely used to simulate different systems, run security tools, and practice various techniques.
In this lab exercise we’ll walk you through the process of setting up two virtual machines: one for Windows and one for Kali Linux. This will enable you to create dedicated cybersecurity lab spaces tailored to your learning needs.
Lab Objectives:
Understand the concepts of Virtual Machines and Hypervisors
Select a Hypervisor
Set up two virtual machines: one for Kali Linux and one for Windows
Prerequisites:
Basic proficiency with computers
Access to a Mac or Windows host
What is a Virtual Machine?
A virtual machine is an independent computing environment that acts like a physical computer. Each VM has its virtual hardware, including CPU, memory, and storage.
This setup lets you run different operating systems on one device without conflicts, crucial for secure testing in cybersecurity labs.
How is a virtual machine different than a partition?
A partition allows one physical machine to switch between different operating systems, but it can only run one OS at a time.
In contrast, a virtual machine (VM) creates multiple environments on that same physical machine, each with its own OS (like macOS, Windows, Linux, etc.).
This setup provides more flexibility and allows for simultaneous usage of different systems, making VMs ideal for testing and development.
Virtual machines are powered by software applications known as hypervisors. In the next section, we will explore the role of hypervisors in creating and managing these virtual machines.
What is a Hypervisor?
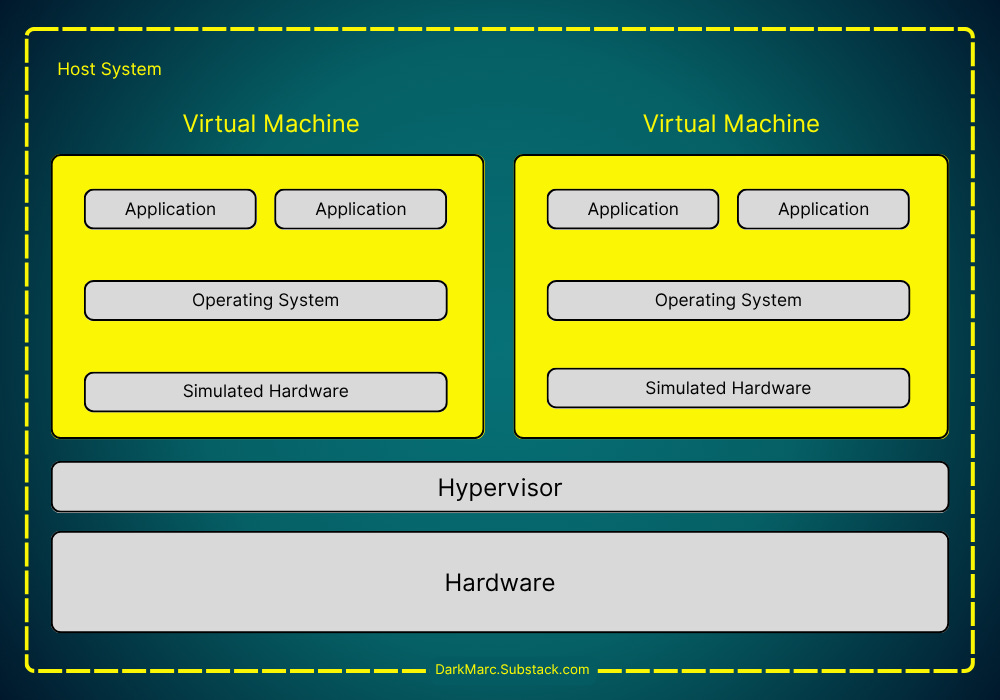
A hypervisor is a software application that creates and manages virtual machines. It acts as an intermediary between the virtual machines and the physical hardware.
Type 1 Hypervisor (Bare-Metal): Runs directly on the hardware of the host machine without an underlying operating system. This direct access to hardware usually results in better performance and efficiency. Type 1 hypervisors are commonly used in enterprise environments where high performance is crucial.
Type 2 Hypervisor (Hosted): Operates on top of an existing operating system. This type is easier to install and use, making it suitable for casual users or developers but may not perform as well as Type 1 hypervisors.
The hypervisor manages resource allocation among VMs, ensuring that they operate in isolation from each other for security and stability. In cybersecurity, hypervisors allow you to create environments where testing can be done safely.
Hardware Acceleration
Some hypervisors offer hardware acceleration features, such as GPU passthrough, which allows VMs to use the physical graphics hardware directly.
While this is beneficial for gaming or graphic-intensive applications, it’s generally unnecessary for tasks in cybersecurity labs.
How to choose a hypervisor?
When choosing a hypervisor for setting up cybersecurity labs, we can focus on Type 2 hypervisors. They are user-friendly, compatible with most systems, and sufficient for training and testing environments.
Type 2 hypervisors allow for easy management and experimentation with multiple operating systems on a single machine, making them ideal for our purposes. Some popular options include:
Parallels Desktop
VMware Fusion
UTM
Oracle VirtualBox
Microsoft Hyper-V

Most of them offer similar core functionality, so feel free to try a few of them out to see which you prefer.
Lab Exercise: Setup Your First Virtual Machines
In this lab exercise, we will set up two virtual machines on the hypervisor of your choice: a Windows machine and a Linux machine.

This exercise establishes a stable baseline for future testing.
By updating both machines to the latest versions and creating restore points, we ensure that we have a reliable state to return to. This way, we can quickly clone the VMs or restore them to their baseline configuration—only the required updates installed and no additional configurations.
This method allows for efficient management of virtual environments and reduces the time spent on setup in subsequent activities.
Step 1: Install Hypervisor
To get started, download and install a hypervisor:
Parallels Desktop (Mac)
VMWare Fusion (Mac)
UTM (Mac)
Oracle VirtualBox (Mac and Windows)
Microsoft Hyper-V (Windows)
Once you have chosen a hypervisor, follow the specific instructions provided by the developer for installation. Each developer offers documentation that guides you through the setup process, ensuring a smooth installation.
Step 2: Install Windows and Kali Machines
To set up your lab, you’ll be installing both Windows and Kali Linux as virtual machines. This process begins with acquiring the necessary ISO files for each operating system and configuring the network settings to ensure your virtual machines function effectively.
Obtaining the ISO Files
ISO files are disc image files that contain the complete contents of an optical disc. In the context of setting up virtual machines, these files serve as the installation media for the operating systems.
Windows ISO: For Windows, you can obtain the ISO file directly from the Microsoft website for Windows 10 or Windows 11. The site guides users through downloading a legitimate copy to ensure you have the latest updates and security patches.
Kali Linux ISO: Similarly, for Kali Linux, visit the Kali Linux official website to download the latest version. Choose the ISO file that corresponds to your system architecture, typically 64-bit.
Setting Up the Virtual Machines
Once you have your ISO files ready, the next step involves creating the virtual machines in your chosen virtualization software.
Create a New Virtual Machine: Launch your virtualization program, whether it’s UTM, Parallels, VMware, or Hyper-V. Select the option to create a new virtual machine and specify the ISO file you just downloaded as the installation medium.
Allocate Resources: During the setup process, assign enough resources to the VM. A minimum of 2 GB of RAM and 20 GB of disk space is typically recommended for both Windows and Kali Linux.
Network Settings: This is a crucial step in ensuring your VMs operate effectively. Set the networking to Bridged Mode. This configuration allows each virtual machine to act as a standalone entity on your network, obtaining its own IP address. This setup mimics a physical machine connecting directly to the network, enabling realistic network interactions when running scans or testing configurations.
Installing the Operating Systems
Now that your virtual machines are configured, boot from the ISO files to start the installation processes.
Boot the VM: Start your virtual machine, which will initiate the installation from the specified ISO file.
Follow Installation Prompts: For both Windows and Kali Linux, you'll be guided through a series of installation prompts. This includes selecting your preferred language, keyboard layout, and installation type. Opt for a custom installation to initiate the fresh setup.
Completing the Installation: Follow through with the installation instructions specific to the operating system. This process usually involves partitioning the virtual disk and configuring basic settings.
Updates and Finishing Touches: After installation, ensuring that both operating systems are updated is vital for security and performance enhancements.
Step 3: Create Snapshots
Creating snapshots of your virtual machines is a vital step that allows you to save the current state of your VMs at any point in time. This feature lets you revert to a previous state if issues arise.
Steps to Create Snapshots:
Open Your Virtual Machine Manager: Launch the hypervisor software you are using to manage your virtual machines.
Select the Virtual Machine: Choose the Windows or Kali Linux virtual machine for which you wish to create a snapshot.
Create a Snapshot:
For VMware: Right-click on the VM and select "Snapshot" > "Take Snapshot." Provide a name and description for the snapshot to help you remember its purpose.
For VirtualBox: With the VM selected, click on "Snapshots" in the toolbar and then select "Take Snapshot." Fill in the name and description.
For UTM: Select the VM, click on the "Virtual Machine" menu at the top, then select "Take Screenshot." Alternatively, use the sidebar to right-click on the VM and select "Take Screenshot" from the context menu.
For Parallels: Select the VM, then click on the "Actions" menu in the top menu bar, and select "Take Snapshot." Enter a name and description as needed.
For Hyper-V: Right-click on the VM in Hyper-V Manager, then select "Checkpoint" to create a snapshot.
Confirm Creation: Wait for the snapshot process to complete. You should see the new snapshot listed alongside any existing ones.
Snapshots serve as essential recovery points.
If you make significant changes or run experiments that do not yield the desired results, you can easily revert your virtual machine to the snapshot state, ensuring that you do not lose your baseline configuration or any important data.
Creating snapshots regularly will help maintain the stability and functionality of your virtual machines as you advance in your learning and experimentation.
With your virtual machines now set up and updated, you have an excellent environment to practice your cybersecurity skills.
Using both Windows and Kali Linux allows you to explore features, configure networks, and conduct security tests safely.
collection between snapshots and VBNs is the neighborhood for doing work. The work is the set of points detected by the hardware