
How Hackers Use NMAP to Analyze Network Vulnerabilities

When a hacker gains entry into a computer network, the focus swiftly shifts to probing deeper into the environment.
Understanding the devices present on the network is essential for strategizing subsequent actions—whether that involves executing further attacks, moving laterally within the system, escalating privileges, or identifying pathways to high-value targets that hold sensitive data.
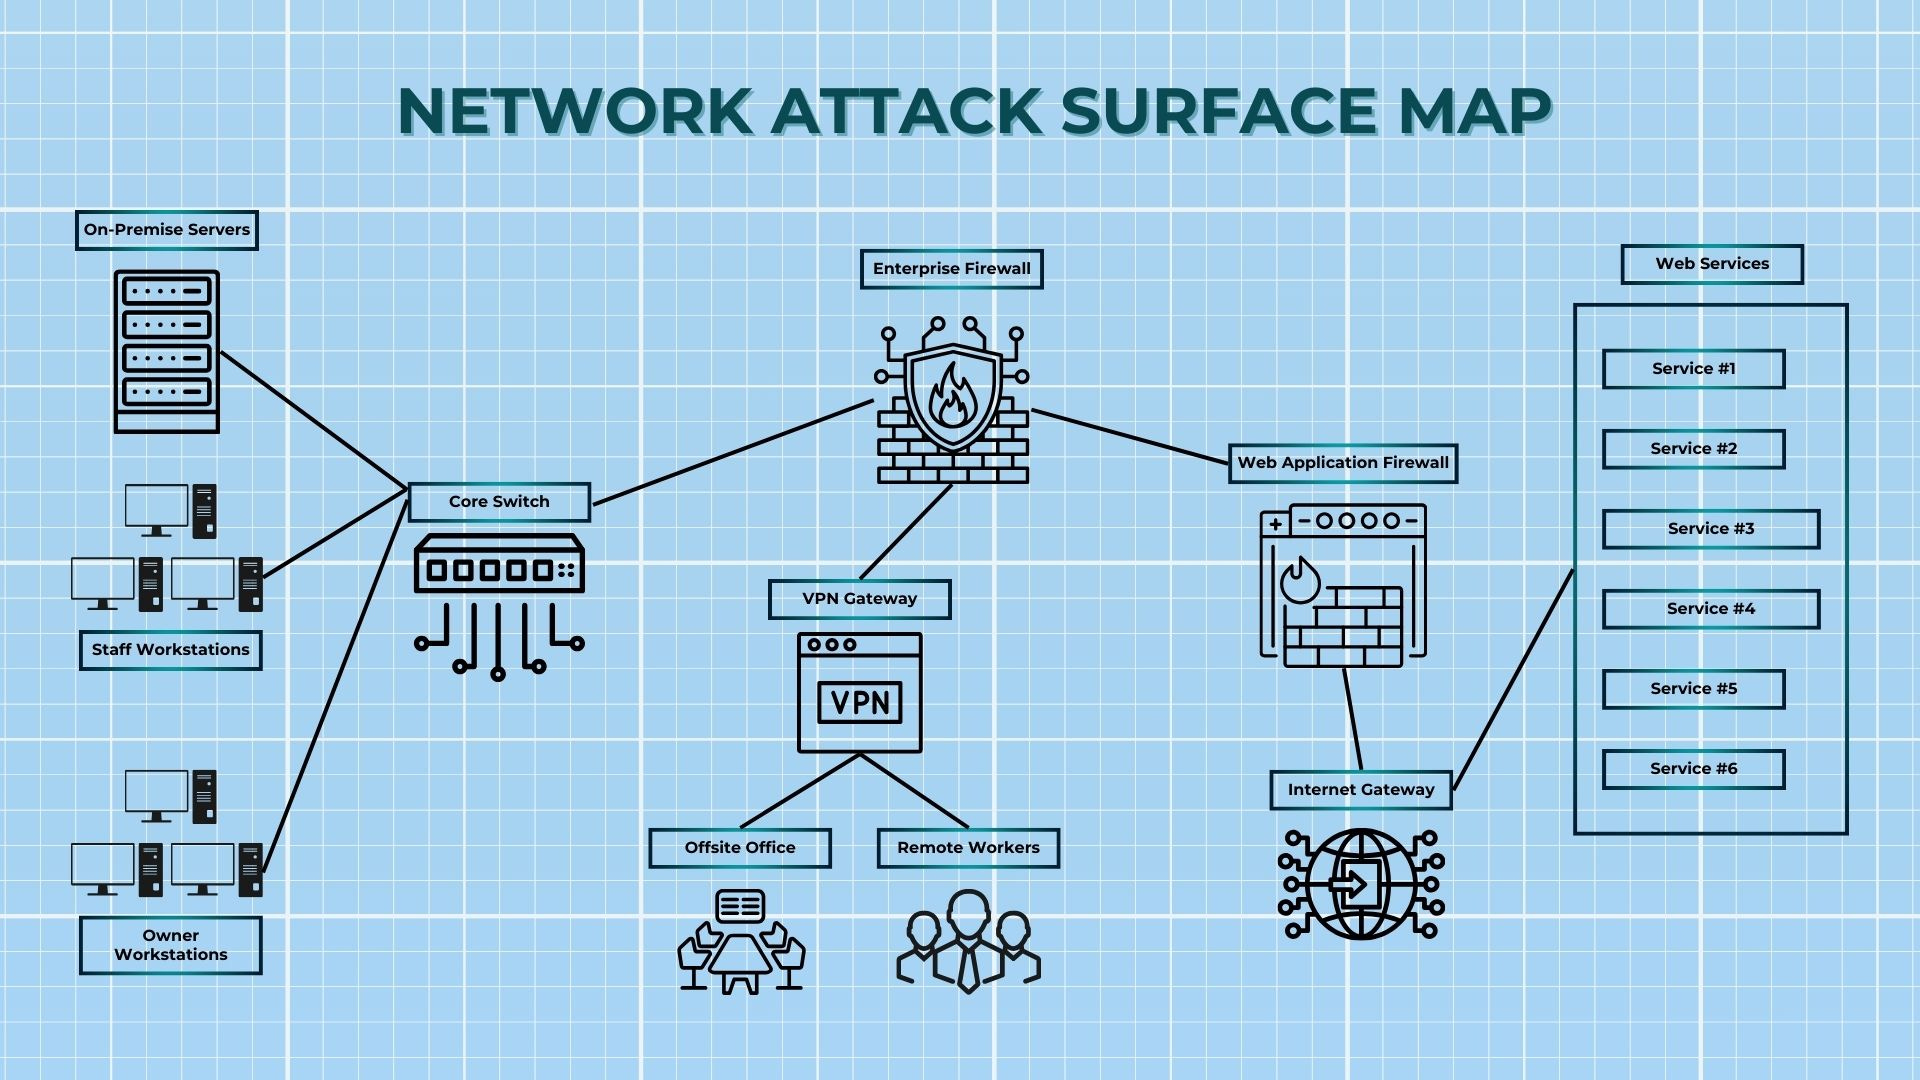
This is where NMAP comes into play. Short for Network Mapper, NMAP is a powerful, open-source tool specifically designed for network exploration and security auditing.
Since its inception in 1997 by Gordon Lyon, NMAP has become an invaluable asset for network administrators, cybersecurity experts, and ethical hackers.
Its versatility and reliability have earned NMAP a prominent place in the toolkit of those committed to safeguarding networks, making it an essential resource for anyone looking to understand and secure their digital environments.
What is NMAP?
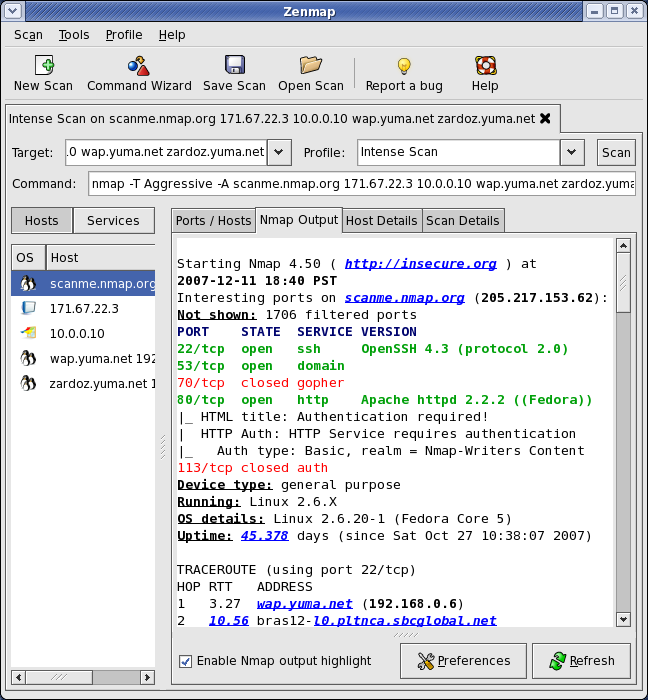
NMAP is a powerful network scanning tool used for discovering devices and assessing security vulnerabilities in networks, and it is available in two formats: a graphical user interface known as Zenmap and a command line version.
NMAP GUI Version: Zenmap
The graphical user interface version of NMAP, called Zenmap, provides an accessible way for users to conduct network scans and visualize results.
NMAP Command Line Version:
The command line version of NMAP offers advanced users powerful options for network discovery and security auditing through its terminal interface.
How does NMAP Work?
NMAP operates fundamentally as a network discovery tool by sending specifically crafted packets to devices on a network and meticulously analyzing their responses.
This technique opens a window into understanding the devices within a network, shedding light on crucial information such as their operational status, the services they support, and any potential vulnerabilities that could be exploited.
At its core, NMAP utilizes a principle familiar to those with a bit of networking knowledge: devices communicate through a series of requests and responses enabled by protocols like TCP/IP. Each device on a network has a unique Internet Protocol (IP) address, akin to a street address that helps identify and facilitate communication between devices.
When engaging with NMAP, users send different types of packets to targeted devices. The response to these packets provides insights into the device's operational state, along with the services it runs, and the operating system it utilizes.
Scanning Techniques
NMAP employs two fundamental approaches for scanning:
Stealth scans and noisy scans.
Stealth Scans:
One of the most popular stealth techniques is the SYN scan. In this method, NMAP sends a SYN packet—a request to establish a connection—without completing the TCP handshake. If the port is open, the device responds with a SYN-ACK packet, indicating readiness to establish a connection. However, NMAP does not complete the handshake; instead, it resets the connection. This process is elusive to many intrusion detection systems (IDS), making it more challenging for security systems to flag the activity as suspicious.
Other stealth techniques, like idle scans, similarly evade detection by manipulating packet timing and using other devices as intermediaries to gauge responses.
Noisy Scans:
In contrast, noisy scans, such as TCP connect scans, involve completing the TCP handshake. This method sends SYN packets to initiate the connection, followed by the SYN-ACK response from the target, and finally the ACK packet to establish the connection.
While this provides reliable and clear information about the device's response, it is also more detectable by IDS due to the complete handshake process. The visibility of this method can trigger alerts within the security systems monitoring the network.
Packet Types and Their Functions
NMAP's strength lies in its varied packet types, which can be tailored based on the scanning approach selected. These include:
Ping Scans: Used to identify live hosts on the network. A basic ping scan uses ICMP echoes to determine if devices respond, allowing users to discover active IPs.
Port Scans: Once live hosts are identified, NMAP can probe for open ports. Each open port can be seen as a potential entryway into the device. Once an open port is found, further investigations can be conducted to see what services are operating on those ports.
Service and Version Detection: After identifying open ports, NMAP can probe these services to determine the specifics of what is running, including service type and version, which is crucial for vulnerability assessments.
Aggressive Scans: Uses the
-Aoption, which combines several scanning techniques into one command. This includes host discovery, service version detection, operating system fingerprinting, and even running scripts to gather more data.
The elegance of NMAP lies in its ability to adapt to user needs, balancing stealth and noise based on the goal at hand.
This flexibility is what makes it an invaluable tool for cybersecurity professionals, ethical hackers, and network administrators who need to understand the intricacies of their network environment to safeguard it effectively.
How Hackers Use NMAP
The first task the hacker must undertake is to identify the IP address of the device they are operating from.
This could either be the compromised machine or their personal computer connected to the same network. Each device connected to a network is given a unique IP address, which acts like a digital address, facilitating communication between devices.
Just as a home address allows for accurate mail delivery, an IP address enables devices to locate and interact with one another. The structure of an IP address consists of four sets of numbers separated by periods, for instance, 192.168.1.10. In this sequence, the last three digits pinpoint the specific device within a broader network, with the first segment indicating the network itself.
Step 1) Finding Your IP Address
Depending on your operating system, the method to find your IP address will vary. Here’s how you can do it on different platforms:
For macOS and Linux Users:
Open the Terminal application. You can find this in your Applications or by searching for "Terminal."
Type the command
ifconfig | grep "inet"and hit Enter.Look for lines containing "inet." The address next to it will usually be your IP address, again formatted similarly to 192.168.1.10.
For Windows Users:
Open the Command Prompt by searching for "cmd" in the Start menu.
Type the command
ipconfigand press Enter.Look for the line that reads "IPv4 Address" under your active network connection. It will appear as a series of numbers similar to this: 192.168.1.10.
This number is your device's unique identifier on the network. It’s essential information that you will use with NMAP for scanning purposes.
Step 2) Finding Your Network Range
To understand your network range, consider your full IP address as your home address. The first three segments of your IP address, known as ‘octets’ because there are four in total, represent the neighborhood. This format allows you to see the structure of your local network.
To define your network range, take your device’s IP address and replace the last segment with '0,' then add '/24.'
This adjustment indicates the pool of addresses within your local network, which allows for a total of 256 addresses. However, in practical use, two of these addresses are reserved.
The address ending in '.0' (for instance, 192.168.1.0) identifies the network itself, and the address ending in '.255' (such as 192.168.1.255) is used for broadcasting messages to all devices on that network.
This structure leaves you with 254 usable addresses. For example, if your IP address is 192.168.1.10, you would denote your network for scanning as 192.168.1.0/24.
This notation signals NMAP to scan all devices within the range of 192.168.1.0 to 192.168.1.255. By examining this entire range, you can identify your device and any others connected to the same network.
Step 3) Ping Scan: Find Connected Devices (nmap -sn)
The first scan a hacker typically performs is the ping scan. This type of scan reveals a list of all devices on the network without triggering any intrusion detection systems because the computers that are being pinged do not fully establish a connection.
nmap -sn 192.168.1.0/24
When NMAP initiates a ping scan, it sends out a SYN packet. Think of this SYN packet as a friendly invitation, signaling the target devices, “Hello, does anyone want to talk?” This packet contains essential information, such as the source IP address, which identifies where the request is coming from.
The computers that receive this SYN packet check whether they are active and respond with an ACK packet, short for “Acknowledgment.” This response essentially says, “I see your invitation, and I’m ready to connect.” However, rather than completing the connection with further communication, NMAP abruptly terminates the process after receiving the ACK.
This intentional drop prevents establishing a full connection, which is crucial. By not finalizing the handshake process, NMAP avoids creating log entries that might alert network security systems. In simpler terms, it’s like saying, “I’m here, but let's not go any further,” allowing the hacker to gather information about active devices quietly.
Step 4) Port Scan: Discover Open Ports (nmap -sS)
After identifying live systems on the network, the next logical move is to explore which ports on these devices are open.
Visualize a port as a door to a building; an open door suggests that there's a potential way to enter, while a closed door indicates no access. Understanding which ports are open on these machines gives insight into potential communication pathways.
This time, rather than scanning the entire network, we will focus on the specific devices identified during the ping scan, omitting our own device’s IP address from the results.
A common method for uncovering open ports is through a SYN (Stealth) scan, executed with the -sS option in NMAP.
This type of scan is known as a "half-open" scan because it sends a SYN packet to the target ports and listens for responses without completing the entire TCP handshake. This method is effective for discovering open ports while remaining discreet, as it does not fully establish a connection that might alert monitoring systems.
For illustration, let’s say you've identified three active devices on the network with IP addresses: 192.168.1.1, 192.168.1.58, and 192.168.1.59. The command you would run in NMAP to scan these devices for open ports looks like this:
nmap -sS 192.168.1.1,58,59Step 5: Discovering Services (nmap -sV)
Now that we have identified live systems and determined which ports are open, the next crucial step is to uncover what services are running on these ports.
Knowing the services helps us understand the potential functionalities of the devices on the network and guides our subsequent actions. This is where NMAP comes into play once again.
To begin, we’ll make use of NMAP's service detection feature. By using the command
nmap -sV 192.168.1.1,58Understanding the service version is significant; it provides detailed information about the services being offered, including their names and versions.
This knowledge can be crucial for identifying potential vulnerabilities associated with specific software.
For instance, if port 80 is open and running a web server, the version detail might reveal whether it's an old version of Apache or NGINX, which could expose known security flaws.
Identifying these services allows us to strategize our next steps more effectively, whether that means exploring further exploitation avenues or simply documenting the current state of network services for security assessments.
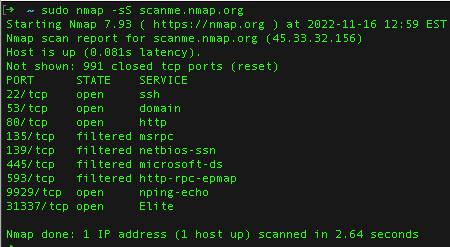
Upon executing this command, NMAP will report back with results that reveal valuable information about each scanned device. Here’s an example of what the output might look like:
Starting Nmap ( https://nmap.org ) at 2025-04-21 21:24
Nmap scan report for 192.168.1.1
Host is up (0.0023s latency).
Not shown: 995 closed ports
PORT     STATE SERVICE
22/tcp open  ssh
80/tcp open  http

Nmap scan report for 192.168.1.58
Host is up (0.0048s latency).
Not shown: 999 closed ports
PORT     STATE SERVICE
443/tcp open  https

Nmap scan report for 192.168.1.59
Host is up (0.0036s latency).
Not shown: 994 closed ports
PORT     STATE SERVICE
3306/tcp open  mysql
In this example output, we can glean several important points:
Open Ports: The results clearly indicate which ports are open on each device. For instance, device 192.168.1.1 has ports 22 (SSH) and 80 (HTTP) open, while 192.168.1.58 has port 443 (HTTPS) open, and 192.168.1.59 has port 3306 (MySQL) open.
Services Running: Each open port corresponds to a specific service running on the device, such as SSH for secure shell access, HTTP for web traffic, or MySQL for database management. Knowing what services are active can help assess their security and relevance to your network's operations.
Connection Type: The output provides clarity on the type of connection each service uses, mainly focusing on TCP, which is common for many internet protocols, but other types like UDP might also be present depending on the services.
This stage of the process allows hackers to identify not only where they can communicate with devices but also potential vulnerabilities that could be exploited.
How does nmap -sV work?
When Nmap performs service version detection using the -sV option, it sends a series of packets specifically designed to elicit responses from the target services. Here’s a detailed look at what happens behind the scenes during this process:
Packet Types Sent:
SYN Packets: Initially, Nmap may send SYN packets to probe the state of ports, especially if it has not already established open ports in prior scans. These packets are requests to initiate a TCP connection.
Service Probes: Once a port is identified as open, Nmap sends tailored application-specific probes. For example:
HTTP GET Requests for web servers.
FTP commands for FTP services.
Custom protocol probes designed to extract service type and version information from various applications.
Response Analysis: Nmap analyzes the responses it receives from these probes. It compares them against its database of known service signatures, allowing it to identify the service type and its specific version.
Intrusion Detection/Prevention System (IDS/IPS) Detection:
Noise Level: Service version detection is generally more detectable than stealthy scanning techniques like SYN scans. The multiple application probes that Nmap sends can be classified as "noisy" by IDS/IPS systems.
Potential for Detection: If a target device receives numerous probes in quick succession, it raises the likelihood of alerts being triggered in security systems. Nmap's probing behavior might be analyzed as suspicious due to unusual patterns or high volume.
Severity of Alerts: Depending on the configuration of the IDS/IPS, a proactive network monitoring system may detect this behavior as potential reconnaissance or scanning activity, especially if it deviates significantly from normal traffic patterns. Alerts could be generated for high probe counts or particular requests that are uncommon in regular traffic.
During Nmap's service version detection, a variety of specific packets are sent to probe open ports, actively engaging services for responses.
Unlike stealth scans, this approach generates more noticeable traffic, increasing the chance of triggering alerts in intrusion detection systems if the activity is perceived as anomalous or excessively verbose.
Step 6: Aggressive Scan (nmap -A)
Before proceeding with an aggressive scan, it's crucial to understand that this method significantly increases the amount of traffic generated on the network.
The noise created by this scanning technique can be easily noticed by Intrusion Detection and Prevention Systems (IDS/IPS), potentially triggering alerts. Therefore, ensure you are prepared and authorized to make noticeable network traffic before executing this next step.
Using an aggressive scan is akin to visiting target machines and aggressively knocking on all their doors. This approach goes beyond merely identifying live systems and open ports; it allows for a deeper examination of the available information about the targets. The command to execute this aggressive scan is straightforward:
nmap -A 192.168.1.1,58,59The -A option is designed specifically for this purpose, initiating a comprehensive enumeration process.
Enumeration is the act of gathering specific details about the target systems, such as their operating systems, usernames, and even various machine identifiers. Given the advancements in Nmap, its scripting engine enriches this process by enabling automated discovery of a wide range of system particulars.
Upon running the command, several key processes unfold:
Host Discovery: Nmap first confirms whether the target device is operational. This is done through ping probes, which establish whether the device can respond before further actions are taken.
Port Scanning: Once Nmap establishes that the target is reachable, it scans for open ports using a TCP SYN scan. This critical step identifies the communication pathways available on the device, giving insight into which services might be accessible.
Service Version Detection: For each open port identified, Nmap probes further to determine the specific services running on that port. It will also attempt to ascertain the version of each service. This information is essential as it helps identify potential vulnerabilities associated with outdated software.
Operating System Detection: Nmap employs multiple fingerprinting techniques to deduce the operating system in use on the target device. This understanding not only informs users about system capabilities but also highlights possible weaknesses.
Script Scanning: A significant advantage of using the
-Acommand is that it leverages Nmap's scripting engine. This feature runs specialized scripts that probe deeper into the network services, checking for known vulnerabilities and extracting additional information about the system configuration.Traceroute: Finally, Nmap performs a traceroute, which reveals the path that packets take to reach the target. This process maps the network route, uncovering details about routing paths and potential bottlenecks.
The combination of these processes allows for an in-depth overview of the target's network services, operating system, and possible vulnerabilities. It is important to recognize that conducting an aggressive scan is more intrusive compared to simpler scans. The increased traffic generated during this scan might attract attention from security monitoring systems.
With this aggressive scan, you obtain a comprehensive understanding of the target system. This can guide your next steps in analyzing the network environment, informing strategies for potential remediation or deeper penetration testing.
The data collected from this scan sets the foundation for making informed decisions about the security posture of the network you are assessing.
How Hackers Exploit This Information
Once you've successfully mapped the network and identified the target machines, the next step is to plan your targeted route through the system, with the goal of increasing access, moving laterally, and gaining persistence if needed.
It's important to consider who has the highest level of access. For instance, the IT department typically possesses elevated permissions that allow them to manage and access sensitive areas. This can include client records, emails, personal notes, images, client files, and account logins for various services and websites.
With your desired path in mind, you can use specialized threat assessment tools to start looking for exploits that can grant you further access and escalate your privileges within the network.
Here are some of the notable exploit tools available to hackers:
Metasploit: Originally created by H. D. Moore in 2003 as a basic Perl script for automated exploitation, Metasploit has evolved into a robust framework known for its flexibility and comprehensive toolkit. Acquired by Rapid7 in 2009, it now offers a user-friendly interface along with numerous exploits, payloads, and modules contributed by a substantial and active developer community. The framework includes commercial versions like Metasploit Pro and Express, catering to business use cases.
OpenVAS: This full-featured vulnerability scanner allows for both unauthenticated and authenticated testing across various internet and industrial protocols. Developed by Greenbone since 2006, OpenVAS is known for its performance tuning capabilities and a powerful internal programming language. The scanner pulls vulnerability tests from a continuously updated feed, making it a valuable resource for identifying exploitable vulnerabilities.
Cobalt Strike: Founded by Raphael Mudge in 2012, Cobalt Strike enables threat-representative security testing. Mudge's background as a security researcher for the US Air Force contributes to the tool's sophisticated capabilities. Cobalt Strike includes features such as advanced post-exploitation and red teaming functionalities, catering to users looking to simulate real-world attacks.
Canvas: Developed by ImmunitySec and led by Dave Aitel, Canvas is a commercial vulnerability exploitation tool that includes more than 370 exploits, often at a lower cost compared to other commercial offerings. It comes with full source code and sometimes includes zero-day exploits, providing a competitive edge in penetration testing.
These tools represent just a fraction of the arsenal that hackers might leverage to exploit vulnerabilities within a network. Understanding both the tools and the strategies behind their use is crucial for promoting a more secure digital environment.
We will not cover specific exploits or techniques in this article, as the subject is extensive and could easily fill a separate series.
How to Get Started with NMAP
To use NMAP, you can choose between the command-line interface or the GUI version known as Zenmap. Below are instructions on how to install NMAP on various operating systems, specifically macOS, Windows, and Linux.
1. Installing NMAP on macOS
For macOS users, installing NMAP is straightforward with the Homebrew package manager. If you do not have Homebrew installed, you can set it up by following these steps:
Open your Terminal.
Install Homebrew by executing the following command:
/bin/bash -c "$(curl -fsSL https://raw.githubusercontent.com/Homebrew/install/HEAD/install.sh)"Once Homebrew is installed, update it by running:
brew updateNow, install NMAP using the following command:
brew install nmapYou can also get Zenmap, the graphical interface for NMAP, through Homebrew by running:
brew install --cask zenmap2. Installing NMAP on Windows
For Windows users, NMAP can be easily downloaded and installed using the installer package. Follow these steps:
Visit the official NMAP download page: NMAP Download.
Download the Windows installer (e.g., the nmap--setup.exe file).
Once downloaded, run the installer and follow the on-screen instructions to complete the installation.
After installation, NMAP can be accessed via the Command Prompt. Use the Start menu to search for "Command Prompt," and once opened, you can type
nmapto confirm the installation.
Zenmap for Windows can be found within the same installer. It is installed alongside NMAP by default.
3. Installing NMAP on Linux
NMAP is readily available in the repositories of most Linux distributions. Here are instructions for popular distributions:
Ubuntu/Debian-based systems:
Open a terminal window.
Update your package list with:
sudo apt updateInstall NMAP by running:
sudo apt install nmapFedora:
Open a terminal.
Run:
sudo dnf install nmapKali Linux: NMAP comes pre-installed with Kali Linux, a distribution tailored for security professionals and ethical hackers. You can verify the installation by typing
nmapin the terminal.
To install Zenmap on Linux systems, official repositories may not always include it. You can download it from the NMAP download page and follow the installation instructions provided there.
Need help with NMAP?
Here are some resources that can help:
#1 Check out the Official NMAP Documentation for a detailed guide on how to install, setup and use NMAP.
#2 Join the ‘Cybersecurity Club’ on Discord and ask your questions in the community, we are a group of hackers, defenders, and tech enthusiasts who support eachother in learning and developing our skills.
NMAP is such a powerful tool. mastering it is key for both defense and attack in today's cyber battlefield. I work with nmap since I was young