
Nmap for Ethical Hackers: Scanning, Scripting, and Stealth (Reference Guide)

Nmap (Network Mapper) is a free, open-source tool used to discover devices and services on a network.

This reference guide covers the core techniques used in professional security testing:
Scanning - Find live hosts, open ports, and running services
Scripting - Automate vulnerability checks and service enumeration
Stealth - Evade detection and bypass security controls
Use this guide to quickly find the right commands for everything from basic discovery to advanced, low-profile scanning.
Nmap Features
Nmap is like a multi-tool knife that can be used for a variety of situations you might find yourself in as an ethical hacker.
It is most commonly used during the ‘Scanning’ phase of ethical hacking, where you are probing machines on a network to determine the best path for gaining access.
Core Features:
which hosts are online
which ports and services those hosts expose
what software versions are running
what operating systems they use
Nmap Scripts:
In addition to the core features, the Nmap Scripting Engine (NSE), which provides custom extensibility for Nmap core can help you:
Identify vulnerabilities
Enumerate services & users
Detect misconfigurations
Audit cryptography & SSL/TLS
Perform brute‑force password guessing
Probe for malware/backdoors
Perform service fuzzing & protocol testing
Gather external intelligence
Create custom scripts
… and much more!
Nmap History
Originally released in 1997 by Gordon “Fyodor” Lyon, Nmap started as a small Linux tool to replace many separate port scanners.
Today, Nmap works on all major operating systems and can be used via the command line or through its graphical interface, Zenmap.
In this guide, we will focus on the command-line version, which provides the most control and flexibility, though the graphical version can be useful for easier visualization later.
⚠︎ Disclaimer: Legal Use Only
Using Nmap without proper authorization can be considered illegal hacking. Always obtain written permission and clearly understand the scope before scanning. Even non-intrusive scans can trigger alerts or accidentally disrupt services.
The writer of this guide assumes no liability for any misuse, illegal activity, or damage resulting from the information provided.
What You’ll Learn:
This guide provides a comprehensive reference for understanding and using Nmap’s commands and techniques. You’ll learn how each option works and when to apply it for effective security assessment.
In this guide you will learn:
Core Scanning & Discovery: Foundational techniques for network reconnaissance, host discovery, and service enumeration.
Advanced Scripting & Detection: Leveraging automated scripts for vulnerability detection, service analysis, and deeper network intelligence gathering.
Stealth Operations & Evasion: Methods for conducting low-profile scanning, bypassing security controls, and avoiding detection during authorized testing.
For detailed technical information, check out the free Nmap book and official docs provided by the tool creators.
Pre-Requisites
This guide assumes you’re already familiar with networking fundamentals and penetration testing basics. If you’re reading this, you should already know:
What You Need to Know
Networking basics: IP addressing, CIDR notation, TCP vs UDP, common ports, and how firewalls work.
Command line: You can navigate terminals and run commands with sudo/admin privileges on your OS of choice.
How to Install Nmap:
Installing NMAP is quick and easy, with support for all operating systems.

Linux
Nmap comes pre-installed on Kali Linux and Parrot Linux. It’s still a good idea to update and install to the latest version with the command:
sudo apt update && sudo apt install nmapWindows
Download the installer from https://nmap.org/download.html and run it.
Run Command Prompt or PowerShell as Administrator for full functionality.
macOS
brew install nmapDetailed Install Instructions
Visit the official Nmap website for detailed install instructions.
Nmap Scan Phases:
When you run an Nmap scan, it executes a series of phases in a specific order.
Each phase builds on the results of previous phases to gather progressively deeper information about your targets.
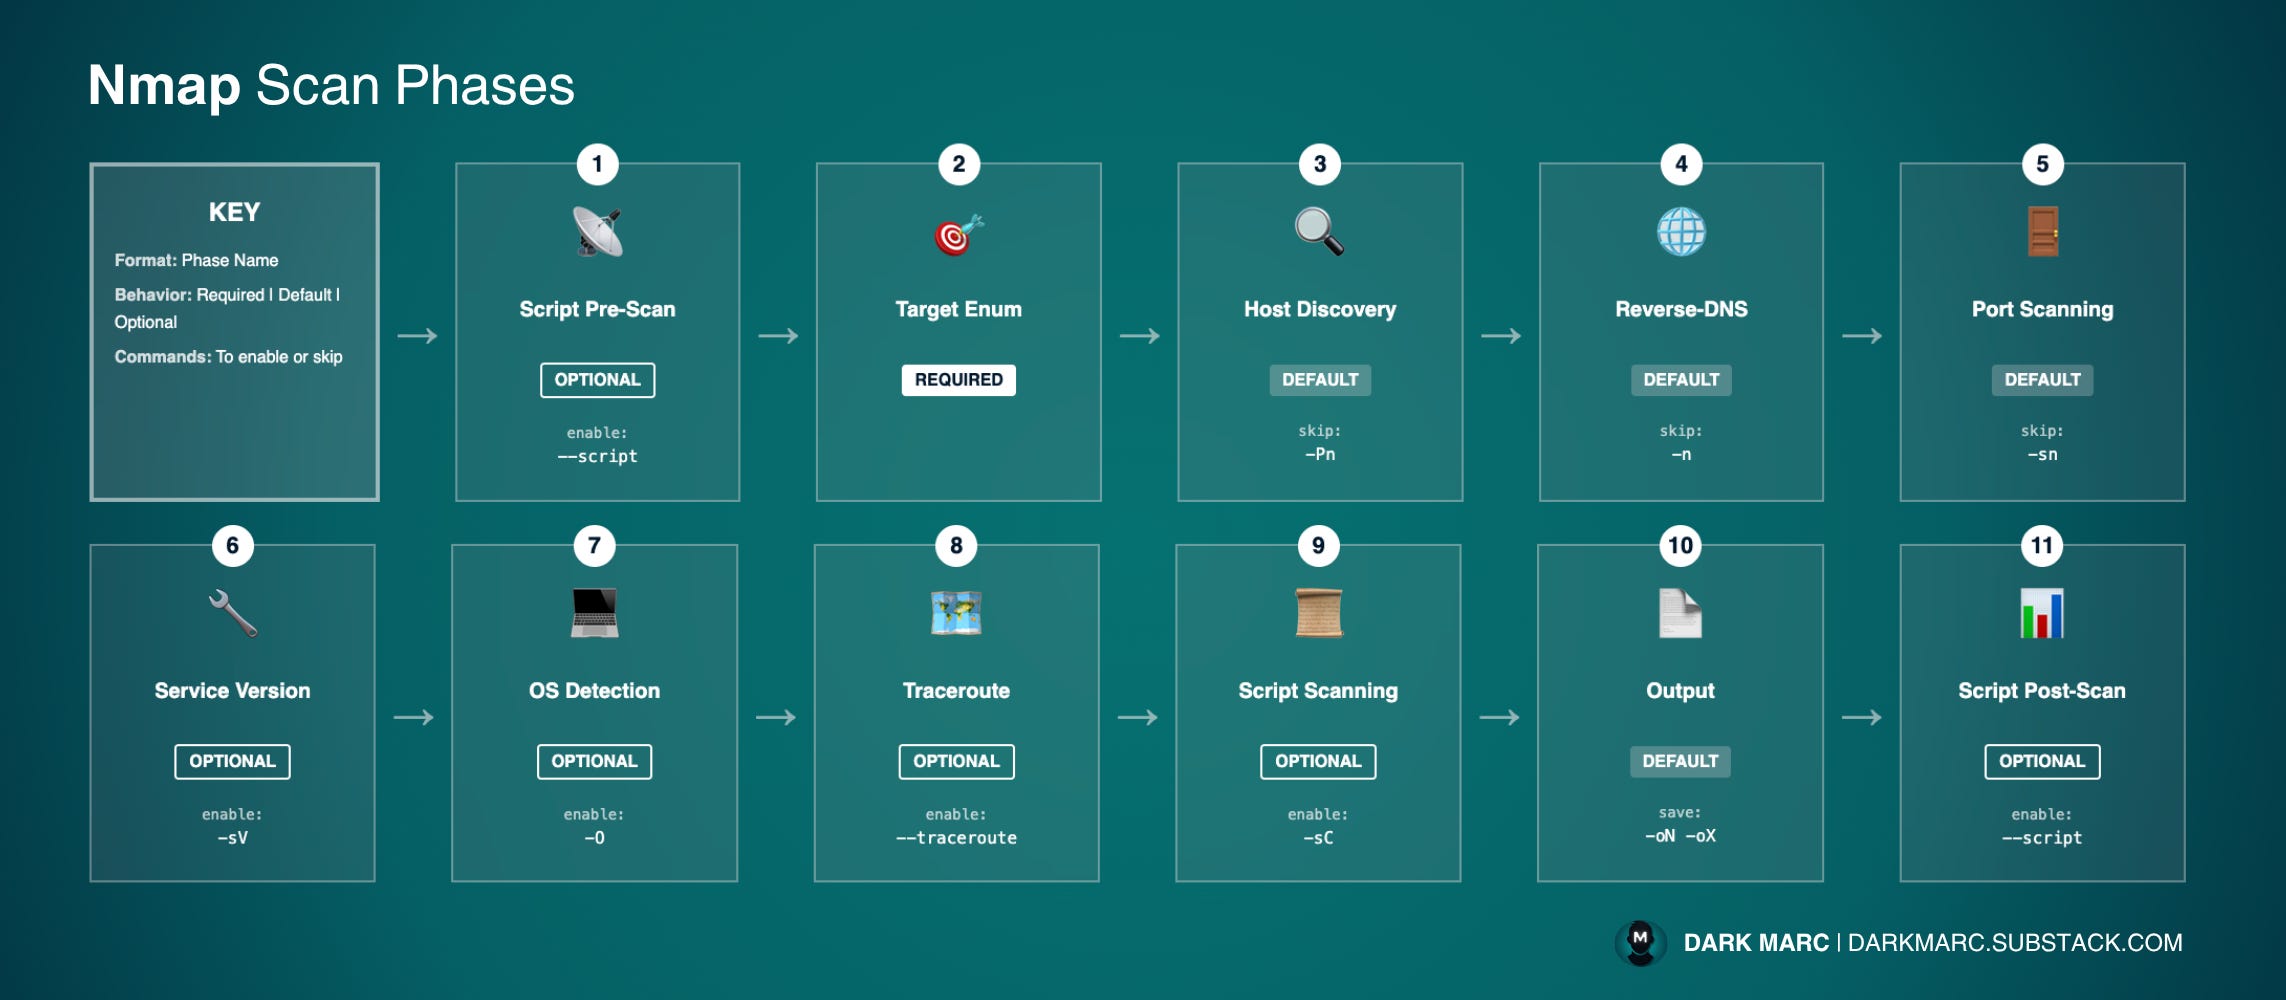
Nmap always processes phases sequentially - it completes one phase entirely before moving to the next. You cannot change this order, but you can skip certain phases or add optional ones using command-line options.
The Scan Phases
Script Pre-Scanning (Optional): Executes NSE scripts once per entire scan, before targeting individual hosts, for network-wide or global tasks (e.g., broadcast discovery, subnet enumeration, or external queries). Runs only when such scripts are selected.
Target Enumeration (Always runs, cannot be skipped): Converts all input (hostnames, IP addresses, ranges, CIDR blocks, or files) into a flat list of individual IP addresses to process. Required for every subsequent phase. A list-only mode exists to show this list without network activity.
Host Discovery (Runs by default, can be skipped): Sends probes (ARP, ICMP echo, ICMP timestamp, TCP SYN/ACK, UDP, etc.) to determine which hosts are online. Depends on Target Enumeration for the target list. Can be skipped (treats all targets as online) or run alone (no further scanning occurs).
Reverse-DNS Resolution (Runs by default, can be skipped): Resolves hostnames for online IPs; if Host Discovery is skipped, attempts resolution for all targets regardless of status. Improves readability and reveals system purpose. Can be disabled or forced even for hosts marked down.
Port Scanning (Runs by default, can be skipped): Sends probes to specified ports on online hosts (or all targets if Host Discovery is skipped) and classifies each as open, closed, or filtered. Skipping Host Discovery does not skip port scanning; it ensures scanning runs on every target. Use discovery-only mode to skip port scanning entirely.
Service Version Detection (Optional): Probes open ports to identify running software and versions by analyzing responses against a database of over 6,500 service signatures. Depends on Port Scanning to find open ports.
OS Detection (Optional): Analyzes TCP/IP stack characteristics from port scan responses to identify OS and version, matching against a database of over 1,000 fingerprints. Requires Port Scanning for data.
Traceroute (Optional): Determines the network path to each target using optimized probe packets based on Host Discovery and Port Scanning results. Runs in parallel for efficiency.
Script Scanning (Optional): Executes NSE scripts against individual hosts and open ports for vulnerability checks, service enumeration, or advanced fingerprinting. Most scripts target open ports, so depends on Port Scanning.
Output (Always runs): Collects all results from prior phases and writes them to screen or file in the chosen format (normal, XML, JSON, grepable, etc.). Depends on completion of all active phases.
Script Post-Scanning (Optional): Runs NSE scripts after all scanning and output are complete for final reporting, aggregation, or custom processing. Rarely used unless custom scripts are written.
Nmap Syntax
NMAP commands use a semi-structured format that make it easy to swap out various functions and features. Nmap commands are made up of three parts:
Scan Type: Defines the probing method and scope for each host, like checking for open ports, identifying software versions, or detecting operating systems.
Scan Options: Additional settings that control scan behavior like speed, output format, or how much detail to show.
Target Specifications: The systems you want to scan, whether that’s a single computer, a website, or an entire network.
The syntax is flexible as long as the command starts with nmap and includes at least one target. You can place scan types, options, and targets in any order after the nmap command. The typical syntax is as follows:
nmap [ Scan Type ] [ Scan Options ] <target specification>Learning Tip: Nmap + Wireshark
When you’re learning Nmap, it can be helpful to run commands on Nmap and watch how they translate to network traffic in Wireshark.
This lets you see exactly what packets Nmap sends and how targets respond, making it easier to understand what each scan type and option actually does at the network level. Use Wireshark filters to view specific traffic:
# Wireshark Filter Cheat Sheet

# Show packets coming from a specific IP
ip.src == <receiver host ip>

# Show packets going to a specific IP
ip.dst == <sender host ip>

# Show all packets to or from a specific IP
ip.addr == <host ip>

# Combine filters with && for more specific traffic
ip.src == <source ip> && ip.dst == <destination ip>

# Filter by protocol
tcp
udp
icmp
arp

# Filter by port number
tcp.port == 80
udp.port == 53

# Combine protocol and IP filters
tcp && ip.addr == <host ip>
Scan Type
Defines the probing method and scope for each host, specifying which ports and protocols are exercised and the depth of enumeration performed.
Use these settings to select the probing technique (e.g., SYN, UDP, version/OS detection, scripts) and control exactly what info you want to collect from every target.
Host Discovery
Determine which hosts are alive on the network before performing detailed port scanning. Nmap offers various discovery techniques including ICMP probes, TCP/UDP packet probes, ARP requests for local networks, or options to skip discovery entirely when needed.
-sn: Disable port scanning; perform host discovery probes (ICMP/TCP/ARP by default depending on privileges). Use when you only want a list of live hosts.-Pn: Skip host discovery entirely and assume all targets are up; proceed directly to port scanning. Useful when ping probes are blocked.-PR: Use ARP requests for discovery on local Ethernet networks; fast and reliable but only works on the same LAN.-PE: Sends an ICMP Echo Request packet (ping) to the target host. If the host is alive and responds, it will send back an ICMP Echo Reply. This is the standard ping method that most users are familiar with. However, many firewalls and hosts are configured to block or ignore ICMP Echo Requests, which can result in false negatives where active hosts appear to be down.-PP: Sends an ICMP Timestamp Request to the target host, which queries the remote system for its current time. If the host is active, it responds with an ICMP Timestamp Reply containing the system time. This method can be useful as an alternative when ICMP Echo Requests are blocked, since some firewalls may allow Timestamp Requests while blocking standard pings. However, Timestamp Requests are less commonly used and may also be filtered.-PM: Sends an ICMP Address Mask Request to the target host, which was originally designed to query routers and hosts for their subnet mask information. If the host responds with an ICMP Address Mask Reply, it indicates the host is active. This is another alternative discovery method when Echo Requests are blocked. Like Timestamp Requests, Netmask Requests are relatively uncommon and may bypass some firewall configurations, though modern systems rarely respond to these queries as they’re largely obsolete.-PS[portlist]: Send TCP SYN probes to the listed ports for discovery (default common ports if none specified); useful when ICMP is filtered.-PA[portlist]: Send TCP ACK probes to the listed ports for discovery; useful to test stateful firewall behavior.-PU[portlist]: Send UDP probes to the listed ports for discovery; can elicit ICMP port unreachable replies that prove a host is up.
# -sn : Disable port scanning; perform host discovery only
nmap -sn 192.168.1.0/24

# -Pn : Skip host discovery, assume all targets are up
nmap -Pn 192.168.1.10

# -PR : ARP ping for local network discovery
nmap -PR 192.168.1.0/24

# -PE : ICMP Echo Request (standard ping)
nmap -PE 192.168.1.10

# -PP : ICMP Timestamp Request
nmap -PP 192.168.1.10

# -PM : ICMP Netmask Request
nmap -PM 192.168.1.10

# -PS[portlist] : TCP SYN probe discovery
nmap -PS80,443 192.168.1.10

# -PA[portlist] : TCP ACK probe discovery
nmap -PA80,443 192.168.1.10

# -PU[portlist] : UDP probe discovery
nmap -PU53,161 192.168.1.10
Privilege note: Privilege affects host discovery: privileged runs use raw packets and ARP for accurate detection, while unprivileged runs use connect-style probes, which rely on the OS to complete TCP connections and may be slower or more detectable.
Scan Techniques
Probe live hosts to find open ports and gather service and system details. Choose scan types to balance speed, stealth, and accuracy; enable detection features only when you need deeper information.
-sS: TCP SYN scan (half-open). Sends SYN packets and resets the connection immediately upon receiving a SYN-ACK. Fast, stealthy, and less likely to be logged. Requires root/admin privileges to craft raw packets.
-sT: TCP connect scan. Uses the operating system’s full TCP connection handshake (SYN, SYN-ACK, ACK). Slower and more visible in logs. Works without elevated privileges but generates more network noise.
-sU: UDP scan. Sends UDP packets to target ports. Many UDP services do not respond, so open ports often appear as “open|filtered.” Slower due to rate limiting and timeouts. Useful for discovering DNS, SNMP, or DHCP services.
-sA: TCP ACK scan. Sends ACK packets to map firewall rulesets. Helps determine whether ports are filtered (stateful firewall) or unfiltered. Does not identify open ports directly.
-sN: Null scan. Sends TCP packets with no flags set. RFC-compliant closed ports send RST; open ports don’t respond.
-sF: FIN scan. Sends TCP packets with only FIN flag set. Same behavior as Null scan.
-sX: Xmas scan. Sends TCP packets with FIN, PSH, and URG flags (lit up like a Christmas tree). Same behavior as Null and FIN scans.
-sO: IP protocol scan. Sends packets with different protocol numbers (e.g., ICMP=1, IGMP=2, GRE=47) to discover which protocols the host supports beyond TCP and UDP.
# TCP SYN scan (half-open), fast and stealthy; requires elevated privileges
sudo nmap -sS 192.0.2.10

# TCP connect scan, uses OS connect call, visible in logs and does not require privileges
nmap -sT scanme.nmap.org

# UDP scan for DNS and SNMP; slower and often returns open|filtered
sudo nmap -sU -p 53,161 192.0.2.20

# TCP ACK scan to map firewall rules and detect filtered ports
nmap -sA 10.0.0.5

# Null scan (no flags) to probe TCP stack responses
nmap -sN 192.168.1.20

# FIN scan to probe TCP stack responses
nmap -sF 192.168.1.20

# Xmas scan (FIN+PSH+URG) to probe TCP stack responses
nmap -sX 192.168.1.20

# IP protocol scan to enumerate supported IP protocols (ICMP, GRE, etc.)
sudo nmap -sO 192.0.2.30
Detection
-sV: Version detection. Sends tailored probes to open ports and analyses responses against a database of over 6,500 known service signatures to identify the exact application name, version, and additional details such as protocol or configuration.-O: OS detection. Analyses subtle differences in TCP/IP stack behaviour, such as sequence numbers, window sizes, and flag responses, to fingerprint the remote operating system, version, and sometimes device type.-sC: Run the default safe NSE script set. Executes a curated collection of non-intrusive scripts for common enumeration tasks like banner grabbing, service discovery, and basic vulnerability checks without risk of disruption.--script=<name|category>: Run a specific NSE script or category (vuln, auth, default, safe). Allows targeted automation for vulnerability scanning, authentication testing, or deep service enumeration. Use with caution on production systems to avoid unintended impact.--traceroute: Maps the network route from your machine to the target host, showing each hop along the path. Depends on host discovery and port scanning completing; useful for network mapping and troubleshooting.-A: Aggressive scan shortcut. Combines OS detection, version scanning, default safe script execution, and traceroute in a single command. Provides comprehensive reconnaissance but generates significant network traffic and is easily detected.
# Version detection to identify service name, protocol, and version
nmap -sV 192.0.2.10

# OS detection to fingerprint remote OS and network stack
sudo nmap -O 192.0.2.10

# Run default safe NSE scripts for common enumeration and checks
nmap -sC 192.0.2.10

# Run NSE scripts in the ‘vuln’ category (use with caution)
nmap --script=vuln 192.0.2.10

# Run a specific NSE script by name for targeted enumeration
nmap --script=http-enum 192.0.2.10

# Traceroute only, mapping the path to the target host
nmap --traceroute 192.0.2.10

# Aggressive scan combining OS detection, version detection, default scripts, and traceroute
sudo nmap -A 192.0.2.10
Port Specification
Choose which ports to probe on each target to control scan scope, time, and noise; port specs can be numeric, ranges, named services, or protocol-prefixed. Use targeted lists or top-port scans for speed, and full sweeps only when authorized and necessary.
-p: Specify ports as single ports, comma lists, numeric ranges, or service names.-p-: Scan all ports (1–65535). TCP is default; use -sU to scan UDP ports.-F: Fast scan; test the top 100 most common ports.--top-ports: Scan the most common N ports by frequency, e.g.-top-ports 50.--exclude-ports: Exclude specific ports from the scan when doing wide sweeps.-p [proto]:[ports]: Protocol-prefixed port list. For example: tcp:22,80 or udp:53,161. Use -sU for UDP probes.
# -p : Single, list, range, or service names
nmap -p 22 192.168.1.5
nmap -p 22,80,443 scanme.nmap.org
nmap -p 1-1024 10.0.0.1
nmap -p http,https example.com

# -p- : All TCP ports
nmap -p- 203.0.113.5

# -F : Fast scan (top 100)
nmap -F 192.0.2.10

# --top-ports : Most common N ports
nmap --top-ports 50 198.51.100.10

# --exclude-ports : Exclude specific ports
nmap -p- --exclude-ports 25,465 203.0.113.5

# -p [proto]:[ports] : Protocol-specific
nmap -sU -p udp:53,161 203.0.113.10
nmap -p tcp:22,80 198.51.100.20
nmap -sU -p udp:53,161 -p tcp:22,80 203.0.113.10
Scan Options
Configure how probes are delivered and results are handled, including timing, retries, rate limits, stealth/evasion, verbosity, and output formats.
Use these controls to tune scan speed, reduce network impact or detectability, and determine how scan data is recorded and reported.
Output:
Control where and how Nmap saves scan results.
Nmap prints a human-friendly report to the terminal by default; output flags let you save that report and machine-readable variants to files so results can be archived, parsed, or piped into other tools.
-oN <file>- Save normal, human-readable output to<file>. This file mirrors the interactive terminal report but begins with the exact nmap command and a timestamp, and is intended for manual review and audit notes.-oX <file>- Save XML output to<file>. Produces structured XML suitable for reliable parsing by programs and scripts; preferred when you need to transform results into reports or import into tools.-oG <file>- Save grepable-style output to<file>. Emits compact, one-line-per-host records with simple delimiters that are easy to process with command-line text tools like grep, awk, and cut.-oS <file>- Save legacy script-style textual output to<file>. An alternate textual format retained for compatibility with older workflows that expect this layout.-oA <basename>- Create three files at once using<basename>:<basename>.nmap,<basename>.xml, and<basename>.gnmap. Convenient when you want both a human-readable copy and machine-friendly copies produced in a single run.--append-output -Append new scan results to existing output files instead of overwriting them; when used, all output files specified in that Nmap run are appended to rather than clobbered (note: appending XML (-oX) often produces invalid XML that must be fixed manually).single hyphen as filename (
-) - Any output format can take a single hyphen instead of a filename to write that format to standard output and suppress the default interactive display. Use this to pipe XML or grepable output directly into other commands.
# Save normal, human-readable output to results.nmap
nmap -oN results.nmap 192.0.2.10

# Save XML output to results.xml for programmatic parsing
nmap -oX results.xml 192.0.2.10

# Save grepable output to results.gnmap for quick shell processing
nmap -oG results.gnmap 192.0.2.10

# Save legacy script-style output to results.scripts
nmap -oS results.scripts 192.0.2.10

# Produce normal, XML, and grepable outputs at once
# Creates: myscan.nmap  myscan.xml  myscan.gnmap
nmap -oA myscan 192.0.2.10

# Write XML to stdout instead of a file (useful for piping)
nmap -oX - 192.0.2.10

# Include a timestamp in the filename using strftime-style tokens
# Example: scan-142530-110525.xml where %T = HHMMSS and %D = MMDDYY
nmap -oX “scan-%T-%D.xml” 192.0.2.10

# Append results to existing files across runs (all specified outputs)
nmap --append-output -oN results.nmap 192.0.2.10

# Combine formats in one run (normal + XML + grepable) and append output
nmap --append-output -oN results.nmap -oX results.xml -oG results.gnmap 192.0.2.10
Output to Database:
Nmap does not support direct database output.
Storing scan results in a database allows tracking historical data, monitoring newly opened ports, identifying vulnerable services, and querying large-scale results efficiently.
This can be done by exporting Nmap results in XML and importing them with a script in Perl or Python, converting XML to CSV for bulk loading, using the nmap-sql MySQL patch, or using tools like PBNJ, which organizes scan data in a database and highlights changes between scans.
Verbosity
Control how much information Nmap shows while scanning. Use -v to increase output detail. Repeat up to three times (-v, -vv, -vvv) to show progressively more information about scan progress, host status, and timing.
-vShows the ports Nmap finds open and a final summary after the scan. You see which services are running on the target and whether the host is up.-vvShows everything from basic plus messages about what Nmap is doing at each step. For example, it tells you when it starts scanning, when each scan phase finishes, and how long certain steps take.-vvvShows everything from medium plus small extra details like statistics about tasks running in the background, such as how DNS lookups were performed or timing details for each phase.
nmap -v 192.168.1.1        # basic progress and host information
nmap -vv 192.168.1.1       # more detailed progress and events
nmap -vvv 192.168.1.1      # maximum verbosity
Diagnostic
Display additional information about scan behavior and results. Use diagnostic flags to troubleshoot scans, understand why ports appear in certain states, monitor progress, or debug unexpected results.
--reason- Show the reason each port is in its current state. Displays which probe or response caused Nmap to mark a port as open, closed, or filtered. Essential for validating results and understanding firewall behavior.--stats-every <time>- Print scan progress statistics every<time>interval (e.g., 30s, 5m). Shows elapsed time, completion percentage, and estimated time remaining. Useful for long scans where you want periodic updates without full verbosity.--packet-trace- Show every packet sent and received during the scan. Displays protocol details, flags, and data for each packet. Use this for deep troubleshooting or learning how Nmap probes work. Generates massive output; best used with limited targets.--open- Only show open (or possibly open) ports in the output. Hides closed and filtered ports to reduce clutter when you only care about accessible services. Does not affect scanning behavior, only what is displayed.-d/-dd- Enable debug output showing Nmap’s internal operations. Similar to verbosity but focused on technical details like timing calculations, probe decisions, and data structure contents. Use-dfor basic debug or-ddfor more detail.
# command format showing diagnostic options
nmap --reason [target]
nmap --stats-every <time> [target]
nmap --packet-trace [target]
nmap --open [target]
nmap -d|-dd [target]

# real examples
# show why each port is open/closed/filtered
nmap --reason 192.168.1.1

# print progress every 30 seconds during a long scan
nmap --stats-every 30s 192.168.1.0/24

# trace all packets for troubleshooting (use with single host)
nmap --packet-trace -p 80,443 192.168.1.1

# only display open ports in results
nmap --open 192.168.1.0/24

# enable debug output to see internal decisions
nmap -d 192.168.1.1

# enable detailed debug output
nmap -dd 192.168.1.1
Timing templates
Set the speed and stealth level of a scan. Nmap provides six templates from T0 (slowest, most stealthy) to T5 (fastest, most aggressive).
T0 Paranoid: 300 s between probes; sends one probe at a time; waits up to 900 s for a reply; retries slowly if no response; does not change delay, timeout, or retry behavior based on target replies
T1 Sneaky: 15 s between probes; sends very few probes at once; waits up to 300 s for a reply; retries cautiously; only makes very small adjustments to delay, timeout, or retries when probes time out or responses differ from expectations
T2 Polite: 400 ms between probes; limits how many probes are in flight; waits around 5 s for replies; moderate retry count; automatically increases or decreases delay, response timeout, and retry pacing when measured reply times are consistently slower or faster than the configured values
T3 Normal: 50 to 200 ms between probes; sends several probes concurrently; waits around 2 to 3 s for replies; moderate retries; continuously measures reply times and adjusts delay, timeout, and retry count to match the target’s observed responsiveness
T4 Aggressive: 10 to 500 ms between probes; sends many probes concurrently; waits around 1 to 1.25 s for replies; fewer retries; alters delay, timeout, or retries within narrow limits if the target is noticeably slower or faster while prioritizing scan speed
T5 Insane: under 5 ms between probes; sends nearly all probes at once; uses a short fixed response timeout of 0.1 to 0.5 s; minimal retries; does not adjust delay, timeout, or retry settings based on target replies
# General command format showing timing template
nmap -T[T0-T5] [target]

# Real examples
nmap -T0 192.168.1.1    # very slow, stealthy scan
nmap -T2 192.168.1.1    # polite scan to reduce network load
nmap -T3 192.168.1.1    # default scan speed
nmap -T4 192.168.1.1    # faster scan, standard aggressiveness
nmap -T5 192.168.1.1    # fastest scan, more likely to be detected
Higher speeds may trigger intrusion prevention or cause network strain. Lower speeds are stealthier but take longer.
Performance
Control scan speed, retry behavior, and resource limits.
Use performance options to balance scan thoroughness against time constraints, network load, and target responsiveness.
Adjust these when default behavior is too slow, too aggressive, or when targets have unusual timeout characteristics.
--min-rate <num>- Send at least<num>packets per second. Forces Nmap to maintain minimum scan speed regardless of target responsiveness. Use when scan time is more important than stealth or network courtesy.--max-rate <num>- Send no more than<num>packets per second. Caps maximum scan speed to avoid overwhelming targets or networks. Use to reduce network load or stay below rate-limiting thresholds.--max-retries <num>- Limit probe retransmissions to<num>attempts. Reduces time spent on unresponsive hosts or ports. Lower values speed up scans but may miss slower targets; higher values are more thorough but slower.--host-timeout <time>- Give up on hosts that take longer than<time>to scan. Prevents extremely slow hosts from delaying entire scans. Use when scanning large networks where some hosts may be rate-limited or heavily filtered.--scan-delay <time>- Wait at least<time>between probes to the same host. Useful when targets rate-limit or when you need to slow down for stealth without using full timing templates.--max-scan-delay <time>- Cap the maximum delay between probes at<time>. Prevents Nmap from slowing down too much when it detects rate limiting. Balances responsiveness against target behavior.
# command format showing performance options
nmap --min-rate <num> [target]
nmap --max-rate <num> [target]
nmap --max-retries <num> [target]
nmap --host-timeout <time> [target]
nmap --scan-delay <time> [target]

# real examples
# force minimum 100 packets/second
nmap --min-rate 100 192.168.1.0/24

# limit to 10 packets/second for polite scanning
nmap --max-rate 10 192.168.1.1

# only retry each probe once
nmap --max-retries 1 192.168.1.0/24

# skip hosts that take longer than 5 minutes
nmap --host-timeout 5m 192.168.1.0/24

# wait 1 second between probes for stealthy scanning
nmap --scan-delay 1s 192.168.1.1

# don’t let delay exceed 2 seconds
nmap --max-scan-delay 2s 192.168.1.1

# combine multiple performance options
nmap --min-rate 50 --max-retries 2 --host-timeout 10m 10.0.0.0/16
Target Specification
Specifies which systems the scan will include or exclude by listing individual hosts, CIDR ranges, IP ranges, hostnames, or input/exclusion files.
Use this to precisely define the scope of a scan run so probes and options apply only to authorized and intended targets.
-iR: Scan a number of random public IPv4 addresses; use0for endless scanning (research only with authorization).-sL: List scan; resolve names and print the expanded target list without sending probes.-r: Do not randomize host order; scan in the order provided.-6: Force IPv6 mode and resolve IPv6 addresses.--resume: Resume a previously interrupted scan using a saved output file.
# Generic format
nmap [target-specs] [port-specs] [other-options]

# scan a single IP
nmap 192.168.1.1

# scan a hostname that resolves to an IP
nmap scanme.nmap.org

# scan every host in a /24 network
nmap 10.0.0.0/24

# scan a range of IPs from .1 through .100
nmap 192.168.1.1-100

# probe 100 random public IPv4 addresses (research only)
nmap -iR 100

# show the expanded target list without sending packets
nmap -sL 192.168.1.0/24

# scan an IPv6 address explicitly
nmap -6 2001:db8::1

# resume a previously interrupted run from a saved output file
nmap --resume savefile.gnmap
Target Input From File
-iL <file> - The Nmap -iL input file is a plain-text file containing target specifications (one or more per line) that Nmap reads instead of taking hosts directly from the command line.
The file is only for target specifications (IPs, hostnames, CIDR blocks, ranges, etc.). Ports must be specified on the Nmap command line,
Each entry can be any target format Nmap supports on the command line:
Single IP address
Hostname
CIDR notation
IPv6 address or range
Octet ranges
Separation
Entries on the same line must be separated by one or more spaces, tabs, or newlines. A newline simply continues to the next line of input.
Comments
Any text starting with # is treated as a comment and ignored until the end of the line.
Blank lines are ignored. Invalid entries are skipped with a warning. This format works well for scanning large lists from DHCP exports, firewall rules, or custom scripts.
Example Input File (targets.txt)
# Single IP address - one specific host
192.168.1.177

# Hostname - resolvable domain name
scanme.nmap.org

# CIDR notation - block of IPs using subnet mask
192.168.1.0/24

# IPv6 address - single IPv6 host
2001:db8::1

# IPv6 CIDR range - block of IPv6 addresses
2001:db8::/64

# Octet ranges - flexible IP range across any octet
192.168.1-5.1-254
Running the Scan
Run your scan with the input from your file.
# Basic command use
nmap -iL targets.txt

# Command with more flags set
nmap -sS -T5 -iL targets.txt -p 80
Target Exclusions
Skip specific hosts or networks so they are never probed even if they appear in the target set; use exclusions to enforce scope and avoid sensitive systems.
Exclusions accept single IPs, hostnames, CIDRs, and ranges and can be provided directly or via a file for auditability.
--exclude: Skip the specified comma separated list of hosts, IPs, or networks.--excludefile: Read exclusions from a file, one entry per line; supports CIDR, single IPs, and hostnames.
# Generic format
nmap [targets] --exclude [host1,host2,...] --excludefile [file]

# scan a subnet but skip the router and server by IP
nmap 192.168.1.0/24 --exclude 192.168.1.1,192.168.1.10

# scan targets from file but skip hosts in exclude.txt
nmap -iL targets.txt --excludefile exclude.txt

# exclude an entire CIDR while scanning a larger CIDR
nmap 10.0.0.0/16 --exclude 10.0.1.0/24

# combine direct targets with exclusions
nmap 203.0.113.0/24 --exclude 203.0.113.5,203.0.113.10
Stealth & Evasion Techniques
Before employing evasion techniques, first identify the presence of firewalls, IDS/IPS systems, and other security monitoring. Look for these indicators during initial reconnaissance:
Firewall Detection Signs
admin prohibited filter- Explicit ICMP rejections indicating active firewall rulesConsistently
filteredports - Multiple ports showing no response across scansInconsistent port states - Different results between SYN, ACK, and NULL scans
ICMP rate limiting - Delayed or blocked ICMP error messages
TTL variations - Inconsistent time-to-live values in responses
Initial Detection Scans
# Basic port state analysis
nmap -sS -v --reason <target>

# ACK scan for stateful firewall mapping
nmap -sA -v <target>

# NULL/FIN/Xmas scans for rulebase analysis
nmap -sN -sF -sX -v <target>
Evasion Techniques
Once security controls are identified, use these techniques to avoid detection by firewalls, IDS/IPS systems, and security monitoring.
These methods help bypass security controls or obscure scan origins by manipulating packet attributes, timing, and source information.
Use stealth options when authorized testing requires evading detection systems, but be aware that aggressive evasion may violate scope or trigger alerts.
Scan Origination & Attribution
-sI <zombie> : Idle (zombie) scan. Uses a third-party host with predictable IP ID sequences to probe targets indirectly. The scanner’s IP never appears in target logs, making this extremely stealthy. IP ID is the Identification field in IP packets used for fragment reassembly. Requires finding a zombie host with predictable IP ID behavior - test with nmap -p 80 --script ipidseq <host>. Look for “Incremental” (number increases by 1 per packet, ideal) or “All zeros”. Avoid “Random” IP ID sequences.
-D <decoy1,decoy2,ME> : Cloak scan among decoys. Makes it appear that multiple hosts are scanning the target simultaneously. Use ME to specify your real IP’s position in the decoy list, or let Nmap randomize it. Use RND to generate random decoy IPs.
-S <IP> : Spoof source IP address. Makes packets appear to originate from a different IP. Requires raw packet privileges and won’t receive responses unless you can intercept return traffic. Primarily useful for testing firewall rules.
--source-port <port> or -g <port> : Spoof source port number. Some firewalls allow traffic from specific source ports (like 53 for DNS or 20 for FTP-data). Can help bypass poorly configured firewalls.
-e <interface> : Specify network interface to use for sending packets. Useful when you have multiple network interfaces and need to control which one is used for scanning.
--spoof-mac <MAC|vendor> : Spoof MAC address using a specific address, vendor prefix, or random value (0). Only works on local Ethernet networks. Use to bypass MAC-based filtering or attribution.
Packet Manipulation
-f : Fragment packets. Splits TCP headers across multiple small IP fragments to evade packet filters and IDS systems that don’t reassemble fragments. Can bypass simple filters but modern systems often detect this.
--mtu <value> : Set custom Maximum Transmission Unit size for packet fragmentation. Must be a multiple of 8. Allows finer control than -f for evading specific MTU-based filters.
--data-length <num> : Append random data to packets to reach a specific size. Changes packet fingerprint to evade signature-based detection systems that match specific packet sizes.
--badsum : Send packets with invalid TCP/UDP checksums. Legitimate systems discard these, but some firewalls and IDS may process them incorrectly, revealing their presence or forwarding behavior.
Timing & Behavior
--randomize-hosts : Scan targets in random order rather than sequentially. Makes scan pattern less obvious and distributes load across target network.
--scan-delay & --max-rate : Control packet timing to avoid threshold-based detection:
# Slow, stealthy scanning
nmap --scan-delay 5s --max-rate 10 <target>

# Ultra-slow timing template
nmap -T paranoid <target>
Practical Examples
# Idle (zombie) scan using a third-party host
# Test zombie first: nmap -p 80 --script ipidseq <zombie-host>
sudo nmap -sI <zombie-host> <target>

# Fragment packets to evade simple packet filters
sudo nmap -f <target>

# Custom MTU fragmentation (must be multiple of 8)
sudo nmap --mtu 16 <target>

# Cloak scan among decoy addresses
nmap -D decoy1,decoy2,ME,decoy3 <target>

# Generate 5 random decoy IPs, Nmap chooses your position
nmap -D RND:5 <target>

# Generate 10 random decoys with your IP in position 3
nmap -D RND:5,ME,RND:5 <target>

# Spoof source IP (won’t receive responses)
sudo nmap -S <spoofed-ip> -e eth0 -Pn <target>

# Use specific source port to bypass firewall
nmap --source-port 53 <target>

# Append random data to packets
nmap --data-length 50 <target>

# Scan in random order
nmap --randomize-hosts <target>

# Spoof MAC address
sudo nmap --spoof-mac 0 <target>

# Send invalid checksums to detect middleboxes
nmap --badsum <target>

# Combined stealth approach
nmap -sS -f --data-length 64 --source-port 53 --scan-delay 2s --max-rate 5 <target>
Nmap Scripts
The Nmap Scripting Engine (NSE) allows users to write and run scripts for network discovery, vulnerability detection, and advanced scanning techniques.
NSE scripts are written in Lua and extend Nmap’s capabilities.
Script Categories:
auth - Authentication-related scripts (credential testing, brute force)
broadcast - Network-wide discovery via broadcast/multicast
brute - Brute-force password guessing against services
default - Safe, useful scripts run with -sC (recommended for most scans)
discovery - Network and service discovery/enumeration
dos - Scripts that may cause denial of service (use with extreme caution)
exploit - Attempts to actively exploit vulnerabilities
external - Sends data to third-party services (privacy implications)
fuzzer - Sends randomized data to test for crashes
intrusive - Likely to crash services or consume significant resources
malware - Detects malware, backdoors, or compromised systems
safe - Unlikely to crash services or trigger alerts
version - Enhanced version detection beyond Nmap’s built-in -sV
vuln - Checks for specific security vulnerabilities
To see detailed descriptions of all Nmap scripts, visit the official documentation.
View Script Info
# View Info for All Scripts
nmap --script-help all

# View Info for Specific Scripts
nmap --script-help <script name>
nmap --script-help xmpp-info
Update Script Database
nmap --script-updatedbRun Multiple Script Categories
nmap --script “discovery,vuln,auth” targetOfficial Resources
For a deeper understanding of Nmap, the official Nmap documentation and free book are excellent sources. They cover everything from installation and basic scanning to advanced features, scripting, and real-world use cases.
Nmap Book (Free Online): Comprehensive reference, practical examples, and detailed explanations of all Nmap options.
https://nmap.org/book/toc.htmlOfficial Nmap Website: Download the latest versions, view release notes, access the Nmap Scripting Engine documentation, and find community resources.
https://nmap.org
These resources are continually updated by the Nmap project and are considered the most reliable reference for learning and using Nmap safely and effectively.
Happy hacking!
This is an incredibly thorugh reference guide. The breakdown of scan phases is particularly helpful for understanding how to optimize performance and avoid detection. One thing I apreciate is the emphasis on always getting proper authorization before scanning. The combination of scan types with performance tuning really makes Nmap powerful for anyone doing secutity assessments.