
ShellGPT (SGPT): AI-Powered Command-Line Productivity Tool

ShellGPT (SGPT) is a command-line tool that uses AI language models, such as OpenAI's GPT family, to generate shell commands, code snippets, and documentation directly in the terminal.
It is designed for developers, system administrators, DevOps engineers, and security professionals, enhancing efficiency by integrating AI capabilities into the terminal environment and streamlining workflows across various tasks.
Why Use ShellGPT?
While it might feel like AI tools are being shoved into everything these days, often without clear purpose, SGPT stands out with distinct advantages for terminal users.
Once you explore its capabilities, you'll recognize how it enhances productivity and efficiency compared to using ChatGPT or other AI platforms.
Benefits of ShellGPT
Faster Workflows: SGPT integrates AI requests directly with local tasks, allowing users to automate and chain operations seamlessly.
Full Computer Control: SGPT allows users to automate system commands, enabling AI to perform any action your computer can execute.
AI in the Terminal: With a design resembling familiar terminal programs (modeled after Metasploit), SGPT is easy to use.
SGPT is particularly valuable in fast-paced environments like red team engagements, CTF challenges, or rapid prototyping where speed and accuracy are critical.
Important Reminders:
When using ShellGPT, keep the following in mind:
Think Critically: Don’t let AI replace your ability to think critically and write code and commands.
Verify Outputs: Always double-check the AI-generated commands, as they may sometimes be incorrect.
Provide Clear Queries: Specific and clear questions yield more accurate and helpful responses from the AI.
How to Setup ShellGPT
Setting up SGPT is as easy as running a few commands to install the program on your computer, you’ll need Python first.
Requirements:
Before installing ShellGPT, ensure you have Python installed:
Windows: Download from the official Python website
macOS: Install using Homebrew:
brew install pythonLinux: Use your package manager:
sudo apt install python3
Step 1) Install SGPT
You can find detailed installation instructions on the SGPT GitHub repository for different operating systems. A simple way is to use pip in Python.
To avoid confusion, note that there are two commonly used SGPT implementations, and they are slightly different: one programmed in Go language (SGPT by TBCKR) and the original that is implemented in Python (SGPT by TheR1D).
We are using the Python version for this guide.
Mac & Windows:
To install SGPT, it's recommended to create a virtual environment to isolate your project's dependencies and avoid potential version conflicts. After setting up the environment, activate it and proceed to install SGPT.
# Create a virtual environment
python -m venv myenv

# Activate the virtual environment:

# On Windows:
myenv\Scripts\activate

# On macOS/Linux:
source myenv/bin/activate

# Install shell-gpt
pip install shell-gpt
Kali Linux:
On Kali Linux and some other Linux distributions, attempting to use pip directly may not work due to system restrictions on managing Python packages. Instead, use pipx, which installs SGPT in an isolated environment to avoid conflicts.
Run the following commands:
# Update Existing Packages
sudo apt update && sudo apt full-upgrade -y

# Install Pipx and Python Virtual Environments (Venv)
sudo apt install -y pipx

# Install ShellGPT
pipx install shell-gpt

# Set the Path (Option 1)
pipx ensurepath

# Set the Path Manually (Option 2)
echo 'export PATH="$HOME/.local/bin:$PATH"' >> ~/.bashrc
source ~/.bashrc

# Check If Install Worked
sgpt --version
Step 2) Setup OpenAI API Key
SGPT defaults to using OpenAI’s API (GPT-4o model). You need an API key to authenticate requests.
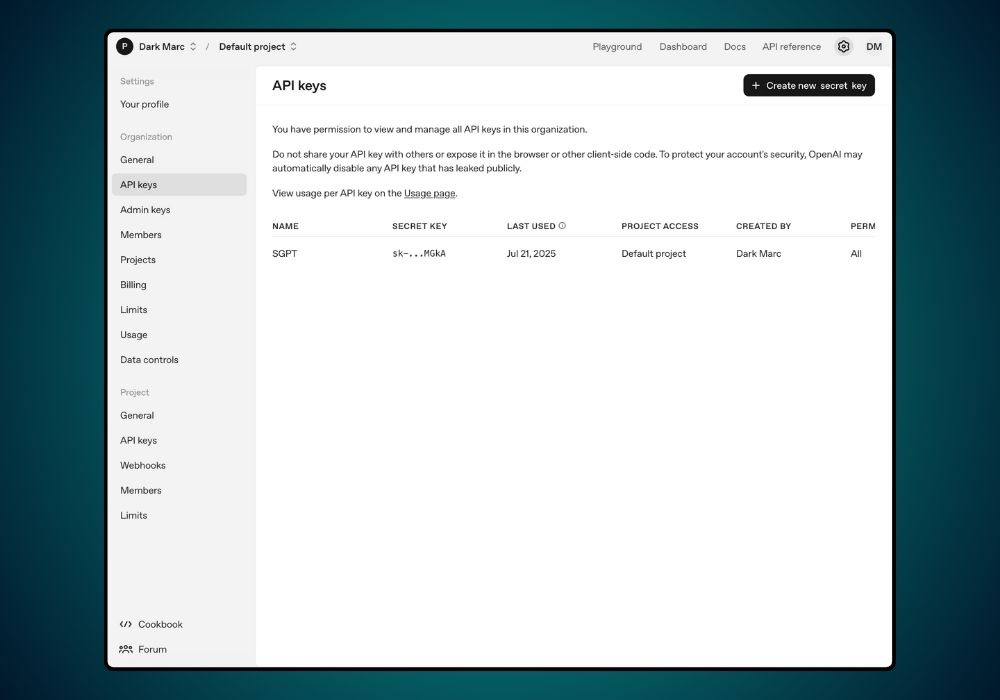
Obtain an API Key
Sign Up for OpenAI:
Visit openai.com to create an account.
Add payment details to the account.
Retrieve Your API Key:
Access the API section in your OpenAI account dashboard.
Generate and copy your API key.
Set the API Key as an Environment Variable:
You will be asked for your OpenAI API key when installing SGPT. If you need to change the API key or any other SGPT settings, you can open the settings file:
nano ~/.config/shell_gpt/.sgptrcYou can also temporarily set your API key for a session until you close the terminal using the command:
export OPENAI_API_KEY=[Your API Key Here]Step 3) Test to Verify Connectivity
Verify that SGPT is responsive and the API key is correctly configured:
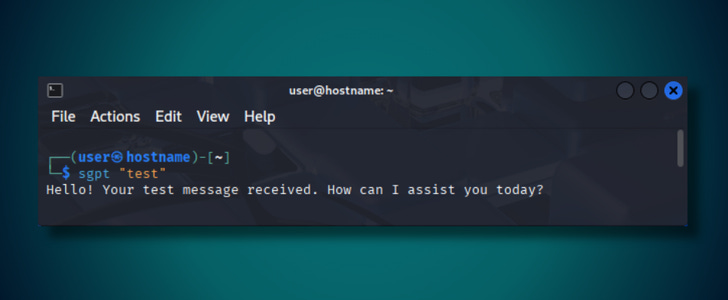
sgpt "test"Step 4) Configure SGPT Settings (Optional)
SGPT allows for customization through a runtime configuration file, enabling users to tailor the tool's behavior and persist various settings across sessions.
To start, you can edit the configuration file located at ~/.config/shell_gpt/.sgptrc with your preferred text editor (e.g., nano, vim, or code), for example:
nano ~/.config/shell_gpt/.sgptrc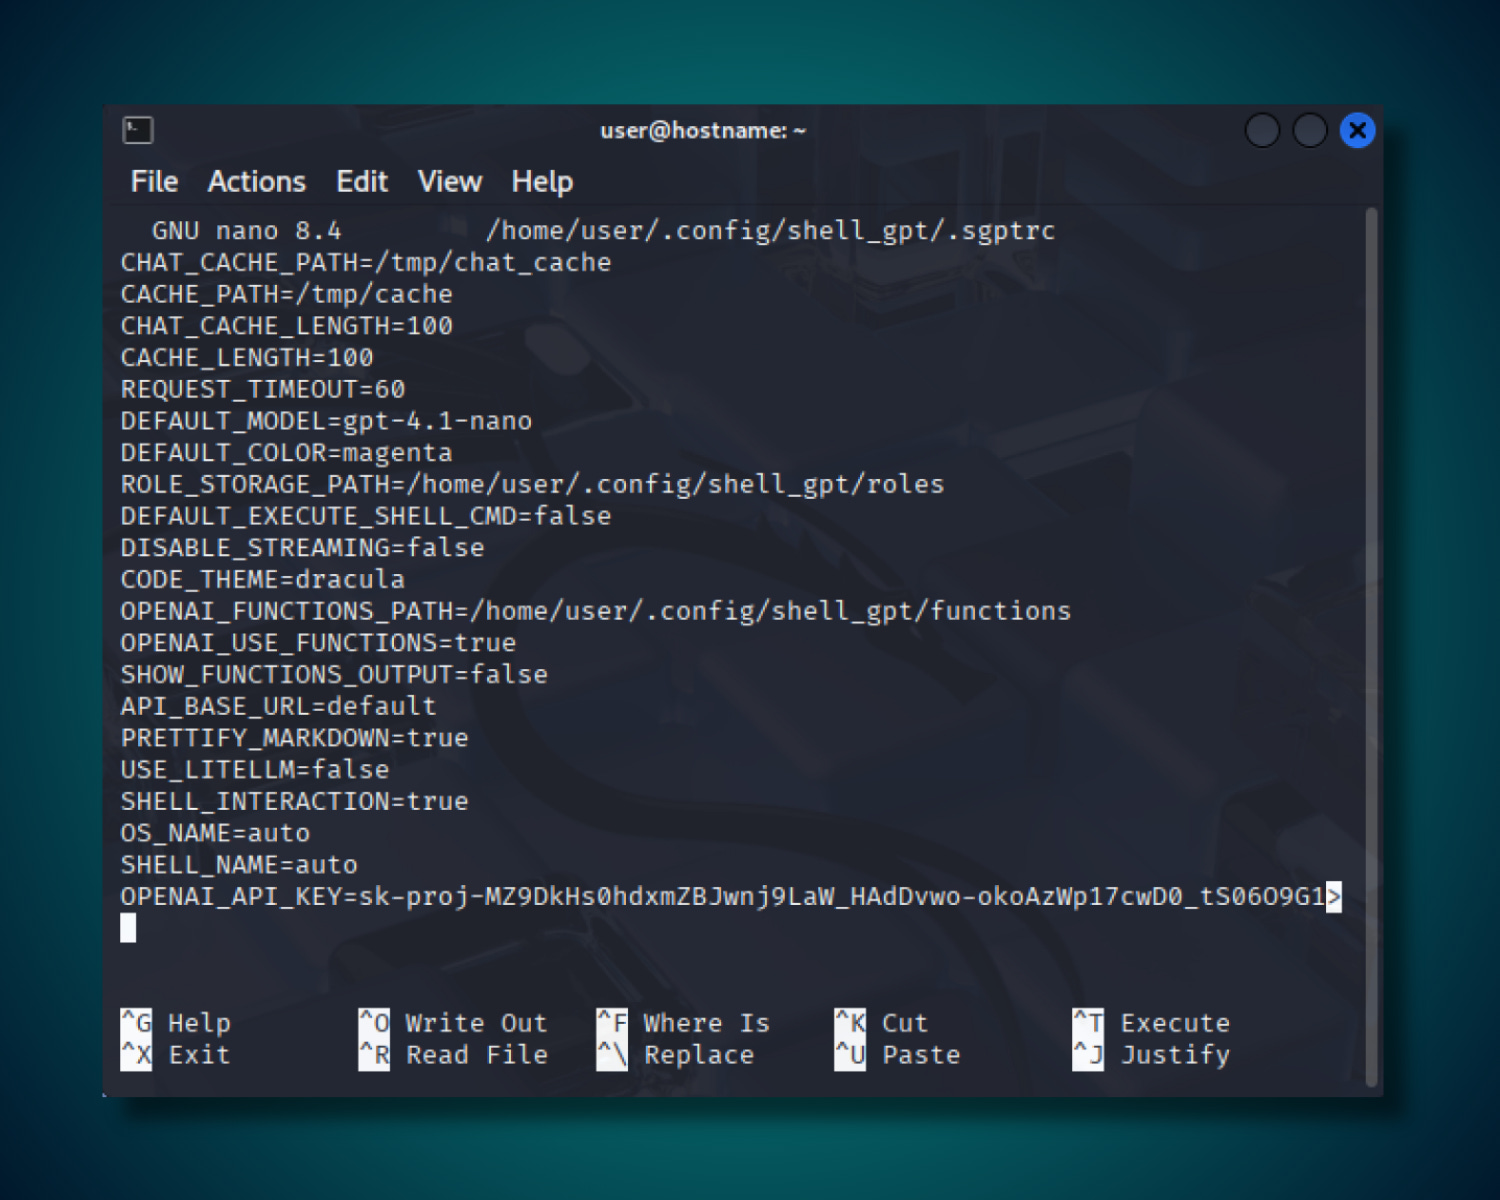
CHAT_CACHE_PATH: Default: /tmp/chat_cache. Can be changed to any valid directory path. Changing it sets the location where chat cache is stored.
CACHE_PATH: Default: /tmp/cache. Can be changed to any valid directory path. Changing it sets the location where general cache is stored.
CHAT_CACHE_LENGTH: Default: 100. Can be changed to any positive integer. Changing it adjusts the number of cached chat entries retained.
CACHE_LENGTH: Default: 100. Can be changed to any positive integer. Changing it adjusts the number of cached entries retained.
REQUEST_TIMEOUT: Default: 60. Can be changed to any positive integer (in seconds). Changing it sets the maximum time to wait for a response.
DEFAULT_MODEL: Default: gpt-4o.Changing it selects the AI model used, affecting performance and cost. When setting the default model, consider both the intelligence and associated costs.
GPT-4.1 (gpt-4.1) - $2.00 / 1M tokens (input)
GPT-4.1 mini (gpt-4.1-mini) - $0.40 / 1M tokens (input)
GPT-4.1 nano - LOWEST COST - (gpt-4.1-nano) - $0.10 / 1M tokens (input)
OpenAI o3 (openai/o3) - $2.00 / 1M tokens (input)
OpenAI o4-mini (openai/o4-mini) - $1.10 / 1M tokens (input)
GPT-4o (gpt-4o) - $5.00 / 1M input tokens
GPT-4o mini (gpt-4o-mini) - $0.60 / 1M input tokens
More information about pricing can be found at OpenAI Pricing.
DEFAULT_COLOR: Default: magenta. Can be changed to black, red, green, yellow, blue, cyan, white, bright_black, bright_red, bright_green, bright_yellow, bright_blue, bright_magenta, bright_cyan, or bright_white. Changing it sets the terminal output color.
ROLE_STORAGE_PATH: Default: /home/user/.config/shell_gpt/roles. Can be changed to any valid directory path. Changing it sets the location for storing role configurations.
DEFAULT_EXECUTE_SHELL_CMD: Default: false. Can be changed to true or false. Changing it enables or disables automatic shell command execution.
DISABLE_STREAMING: Default: false. Can be changed to true or false. Changing it enables or disables streaming of responses.
CODE_THEME: Default: dracula. Can be changed to any theme from https://pygments.org/styles/. Changing it sets the syntax highlighting theme for code.
OPENAI_FUNCTIONS_PATH: Default: /home/user/.config/shell_gpt/functions. Can be changed to any valid directory path. Changing it sets the location for OpenAI function definitions.
OPENAI_USE_FUNCTIONS: Default: true. Can be changed to true or false. Changing it enables or disables the use of OpenAI functions.
SHOW_FUNCTIONS_OUTPUT: Default: false. Can be changed to true or false. Changing it shows or hides the output of functions.
API_BASE_URL: Default: default. Can be changed to any valid API base URL. Changing it sets the base URL for API requests.
PRETTIFY_MARKDOWN: Default: true. Can be changed to true or false. Changing it enables or disables Markdown prettification.
USE_LITELLM: Default: false. Can be changed to true or false. Changing it enables or disables the use of LiteLLM.
SHELL_INTERACTION: Default: true. Can be changed to true or false. Changing it enables or disables shell interaction.
OS_NAME: Default: auto. Can be changed to any valid OS name or "auto". Changing it sets the operating system name or enables auto-detection.
SHELL_NAME: Default: auto. Can be changed to any valid shell name or "auto". Changing it sets the shell name or enables auto-detection.
OPENAI_API_KEY: Default: blank. Can be changed to any valid OpenAI API key. Changing it authenticates API requests.
Step 5) Run SGPT Commands
In this step, we’ll go over some of the most common commands used with SGPT. To view all of the commands available, use the command:
sgpt --help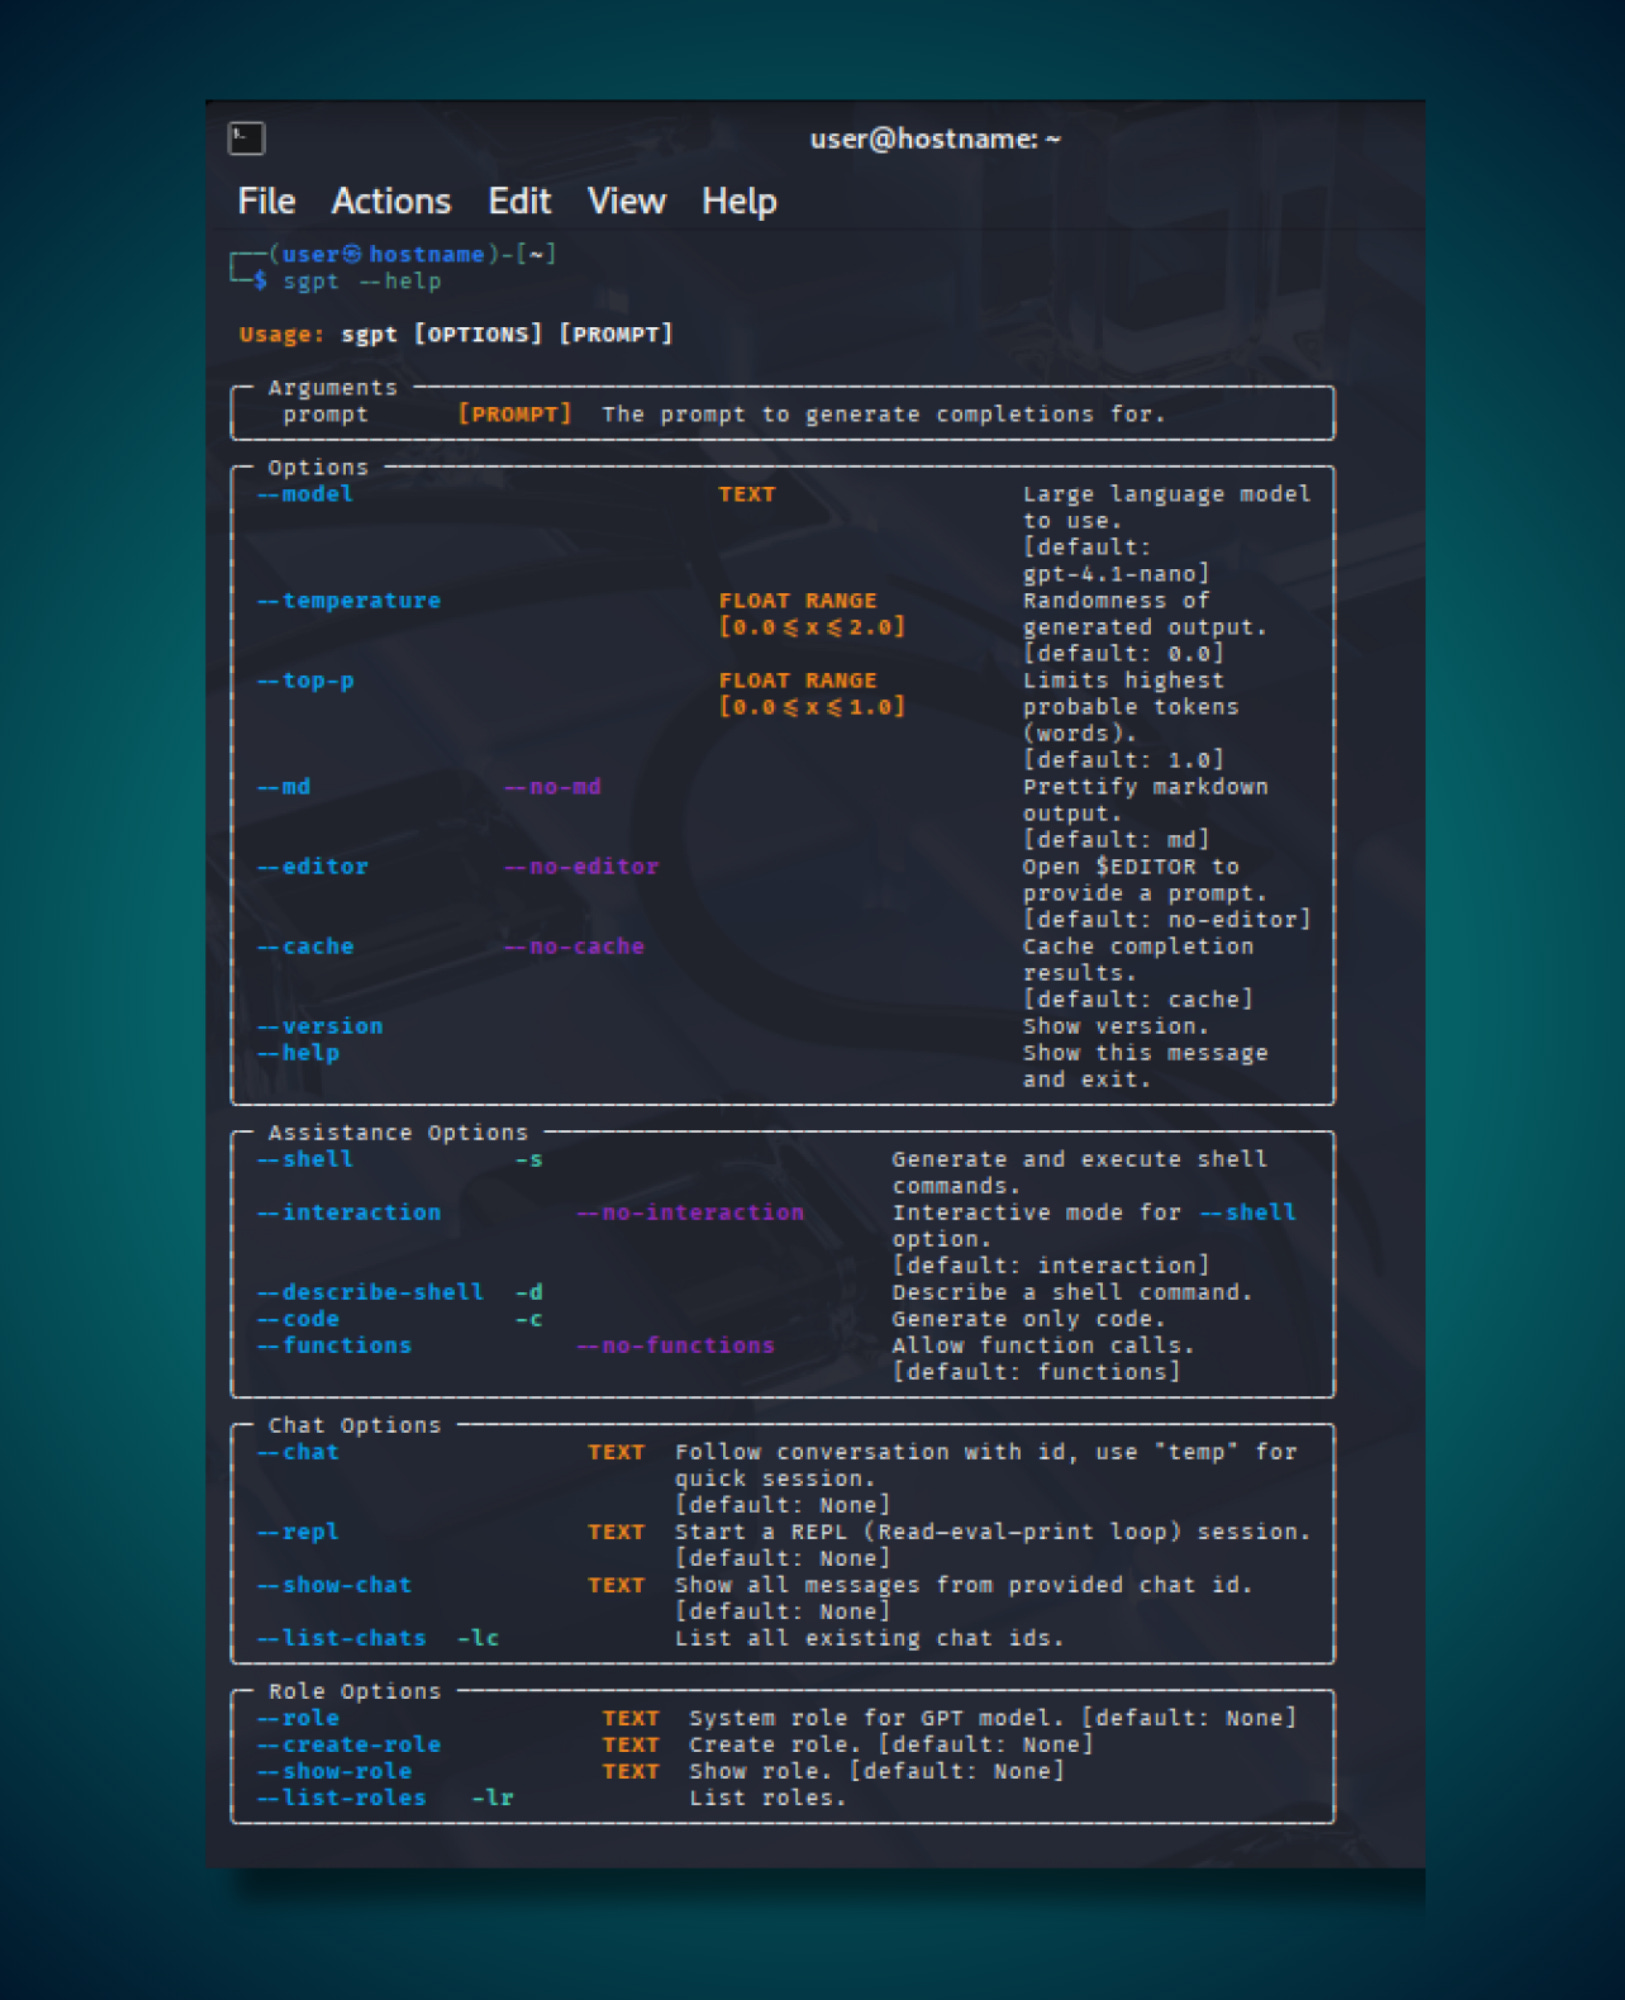
SGPT organizes its functionality into five main categories, each serving specific use cases for different workflows and automation needs.
Arguments
prompt - The text prompt you want to generate completions for, which is the main input to the AI model.
Options
--model - Specifies which AI model to use for generating responses.
--temperature - Controls randomness of output from 0.0 to 2.0, with lower values being more deterministic and higher values more creative. Default is 0.0.
--top-p - Limits token selection to most probable words from 0.0 to 1.0, with lower values creating more focused responses. Default is 1.0.
--md / --no-md - Formats output with markdown styling when enabled or plain text when disabled. Default is markdown enabled.
--editor / --no-editor - Opens your default text editor for writing prompts instead of command line input. Default is no editor.
--cache / --no-cache - Saves completion results for faster repeated queries when enabled. Default is cache enabled.
--version - Shows the current version of the sgpt tool.
--help - Displays the help message with all available options and exits.
Assistance Options
--shell - Generates and executes shell commands directly when the -s flag is added.
--interaction / --no-interaction - Controls interactive mode for shell commands, allowing review before execution. Default is interaction enabled for shell option.
--describe-shell - Describes what a shell command does instead of executing it when the -d flag is added.
--code / --no-code - Controls whether the model can generate code in responses. Default allows code generation.
--functions / --no-functions - Controls whether the model can use function calls during generation. Default is functions enabled.
Chat Options
--chat - Enables conversation mode with persistent context using a specified ID, with "temp" available for quick sessions. Default is no chat session.
--repl - Starts a continuous Read-eval-print loop session with the model using a specified identifier. Default is none.
--show-chat - Shows all messages from a provided chat ID. Default is none.
--list-chats - Lists all existing chat IDs when the -lc flag is added.
Role Options
--role - Sets a system role or persona for the GPT model to adopt during conversation. Default is none.
--create-role - Creates a new role for the GPT model with a text description. Default is none.
--show-role - Displays the details of a specified existing role. Default is none.
--list-roles - Lists all available roles that have been created when the -lr flag is added.
API Key - Required authentication credential to access AI models through the API. Default is blank and must be configured with your OpenAI API key.
» Basic SGPT Commands
Master these fundamental commands to unlock SGPT's core capabilities.
1. Send a Prompt to SGPT
Send any text prompt directly to the AI for processing:
sgpt "Explain NMAP in simple terms"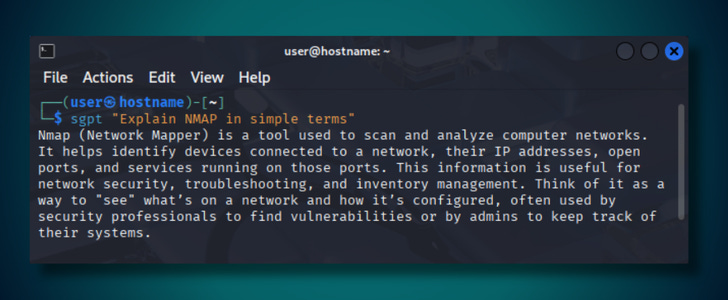
2. Generate a Shell Command
A shell command is a text input used in a command-line interface to perform specific tasks within an operating system. Examples include:
ls: Lists files in a directory.cd: Changes directories.mkdir: Creates a new directory.
In SGPT, you can create a shell command using the -s flag. You’ll receive the options to execute the command, describe it, or abort the command.
sgpt -s "list all files in current directory"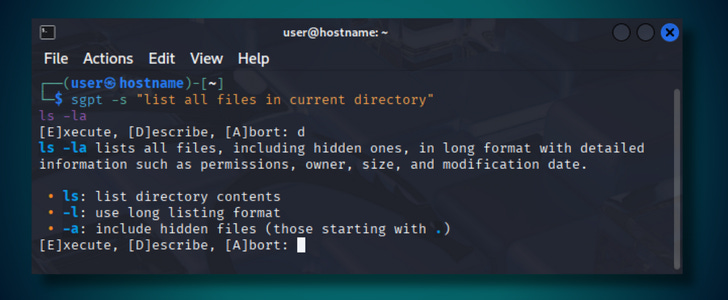
3. Save Output to a File
To save the output of the executed command to a file, use the command:
sgpt -s "ping google.com" > output.txt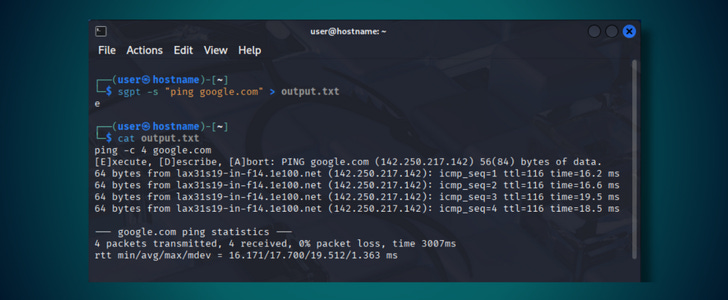
Important: When you run this, ShellGPT generates a command and prompts you to type ‘e’ to execute, ‘d’ to describe, or ‘a’ to abort.
Since the output is redirected to output.txt, this prompt won’t appear in the terminal, but you must still type ‘e’ and press Enter to execute the command and save its output to the file.
4. Generate Code
To generate code, use the —code flag in your command, and specify the code language you want in your prompt. For example, to generate HTML:
sgpt --code "make a html file template with bootstrap 5"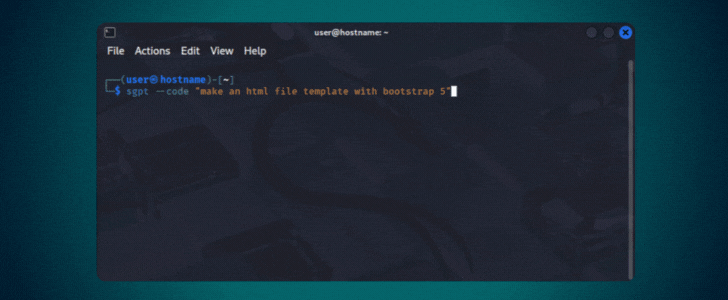
You can get output that is full files, or parts of code.
5. Save Code Output to File:
You can output the contents of your code file by adding the > filename.ext flag (replace .ext with the file extension for the code you’re generating). For example:
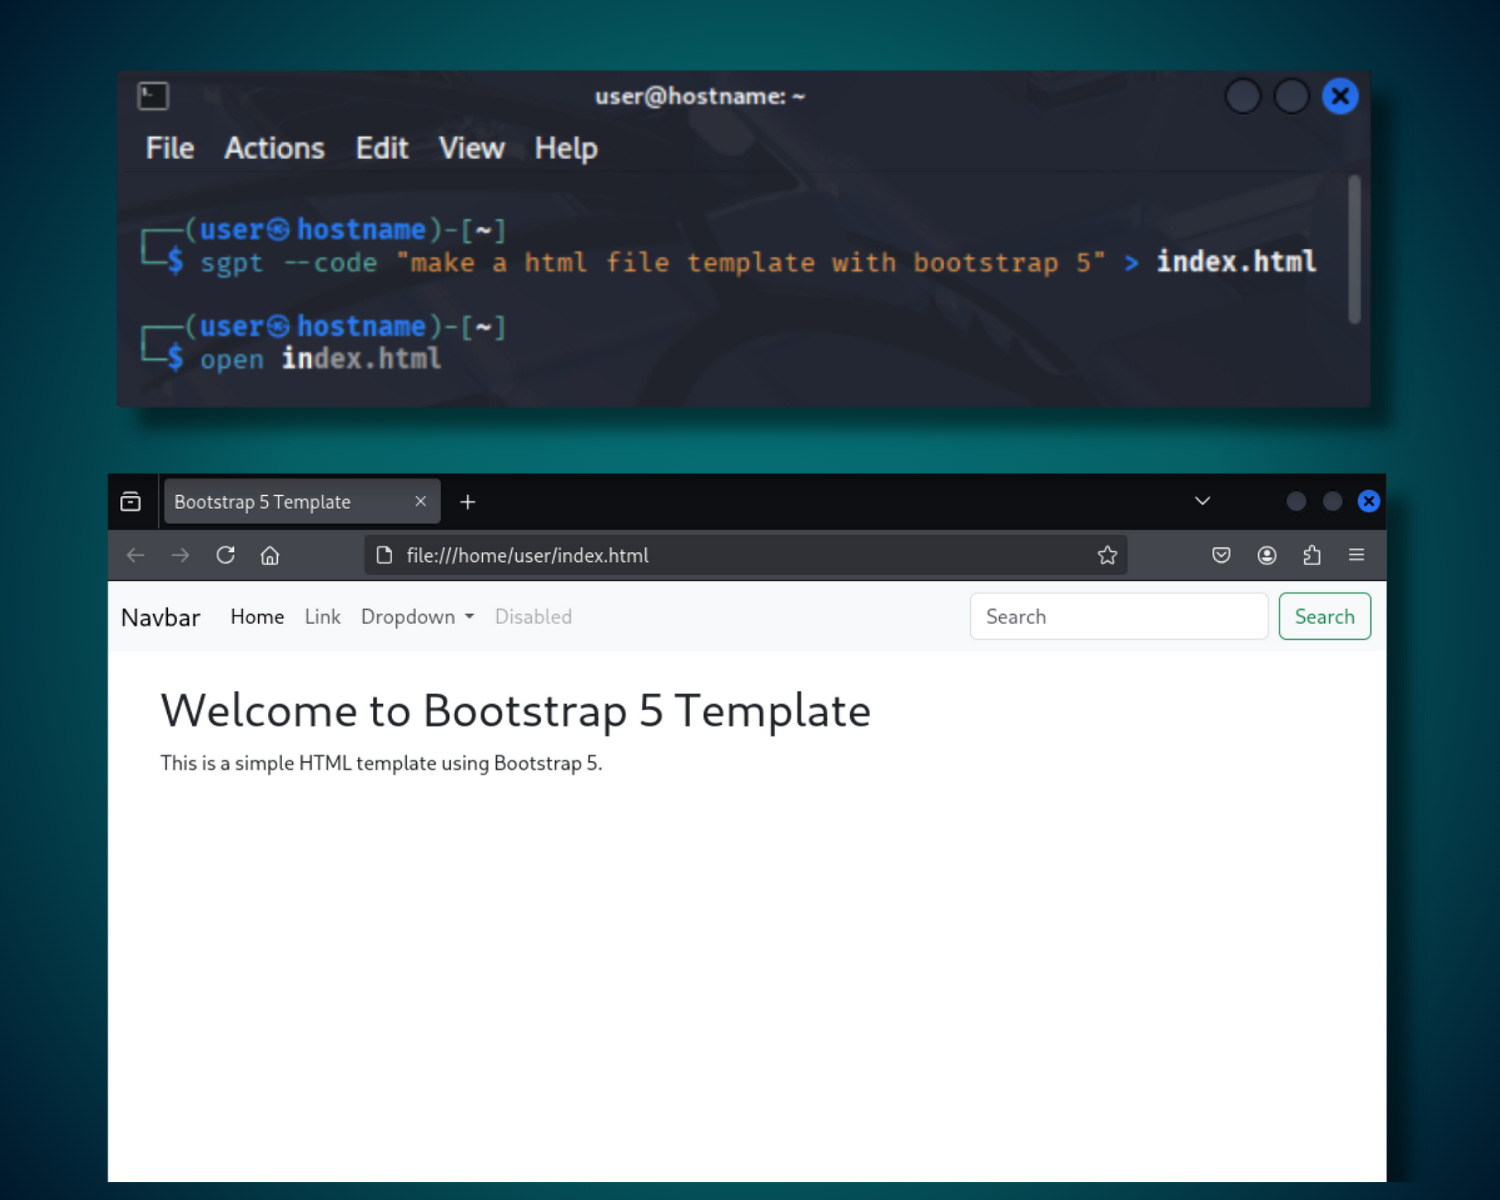
sgpt --code "make a html file template with bootstrap 5" > index.htmlThis command will generate a simple HTML file template using Bootstrap 5 and save the output to index.html. You can open the file with the command open index.html.
» Advanced SGPT Commands:
These commands are slightly more advanced and will help you unlock the full potential of SGPT, allowing for more complex and efficient workflows.
6. Chain Together Multiple Commands
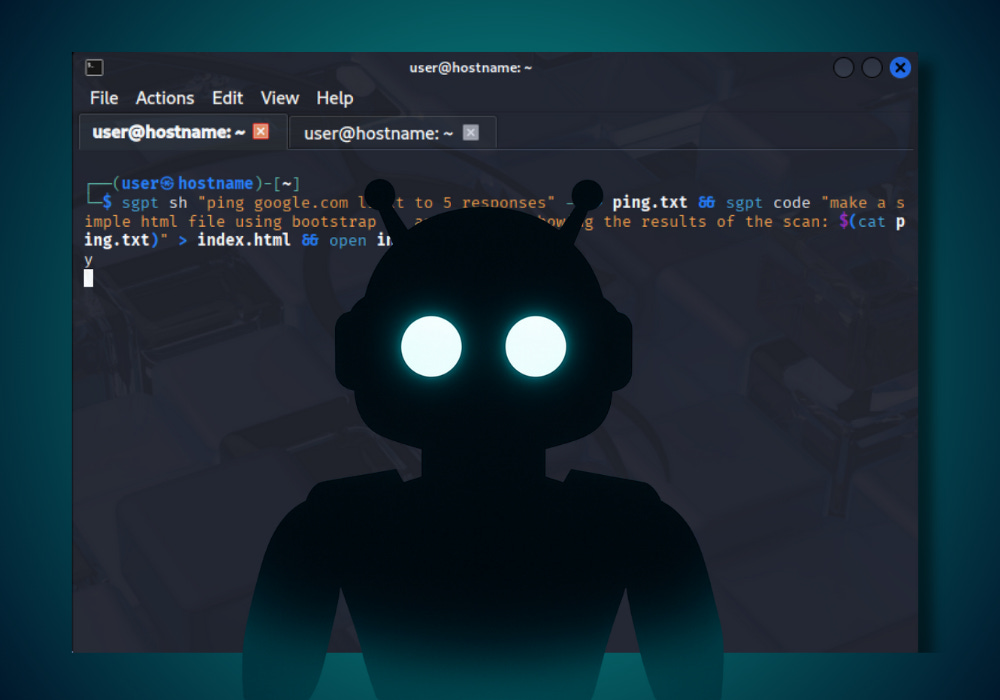
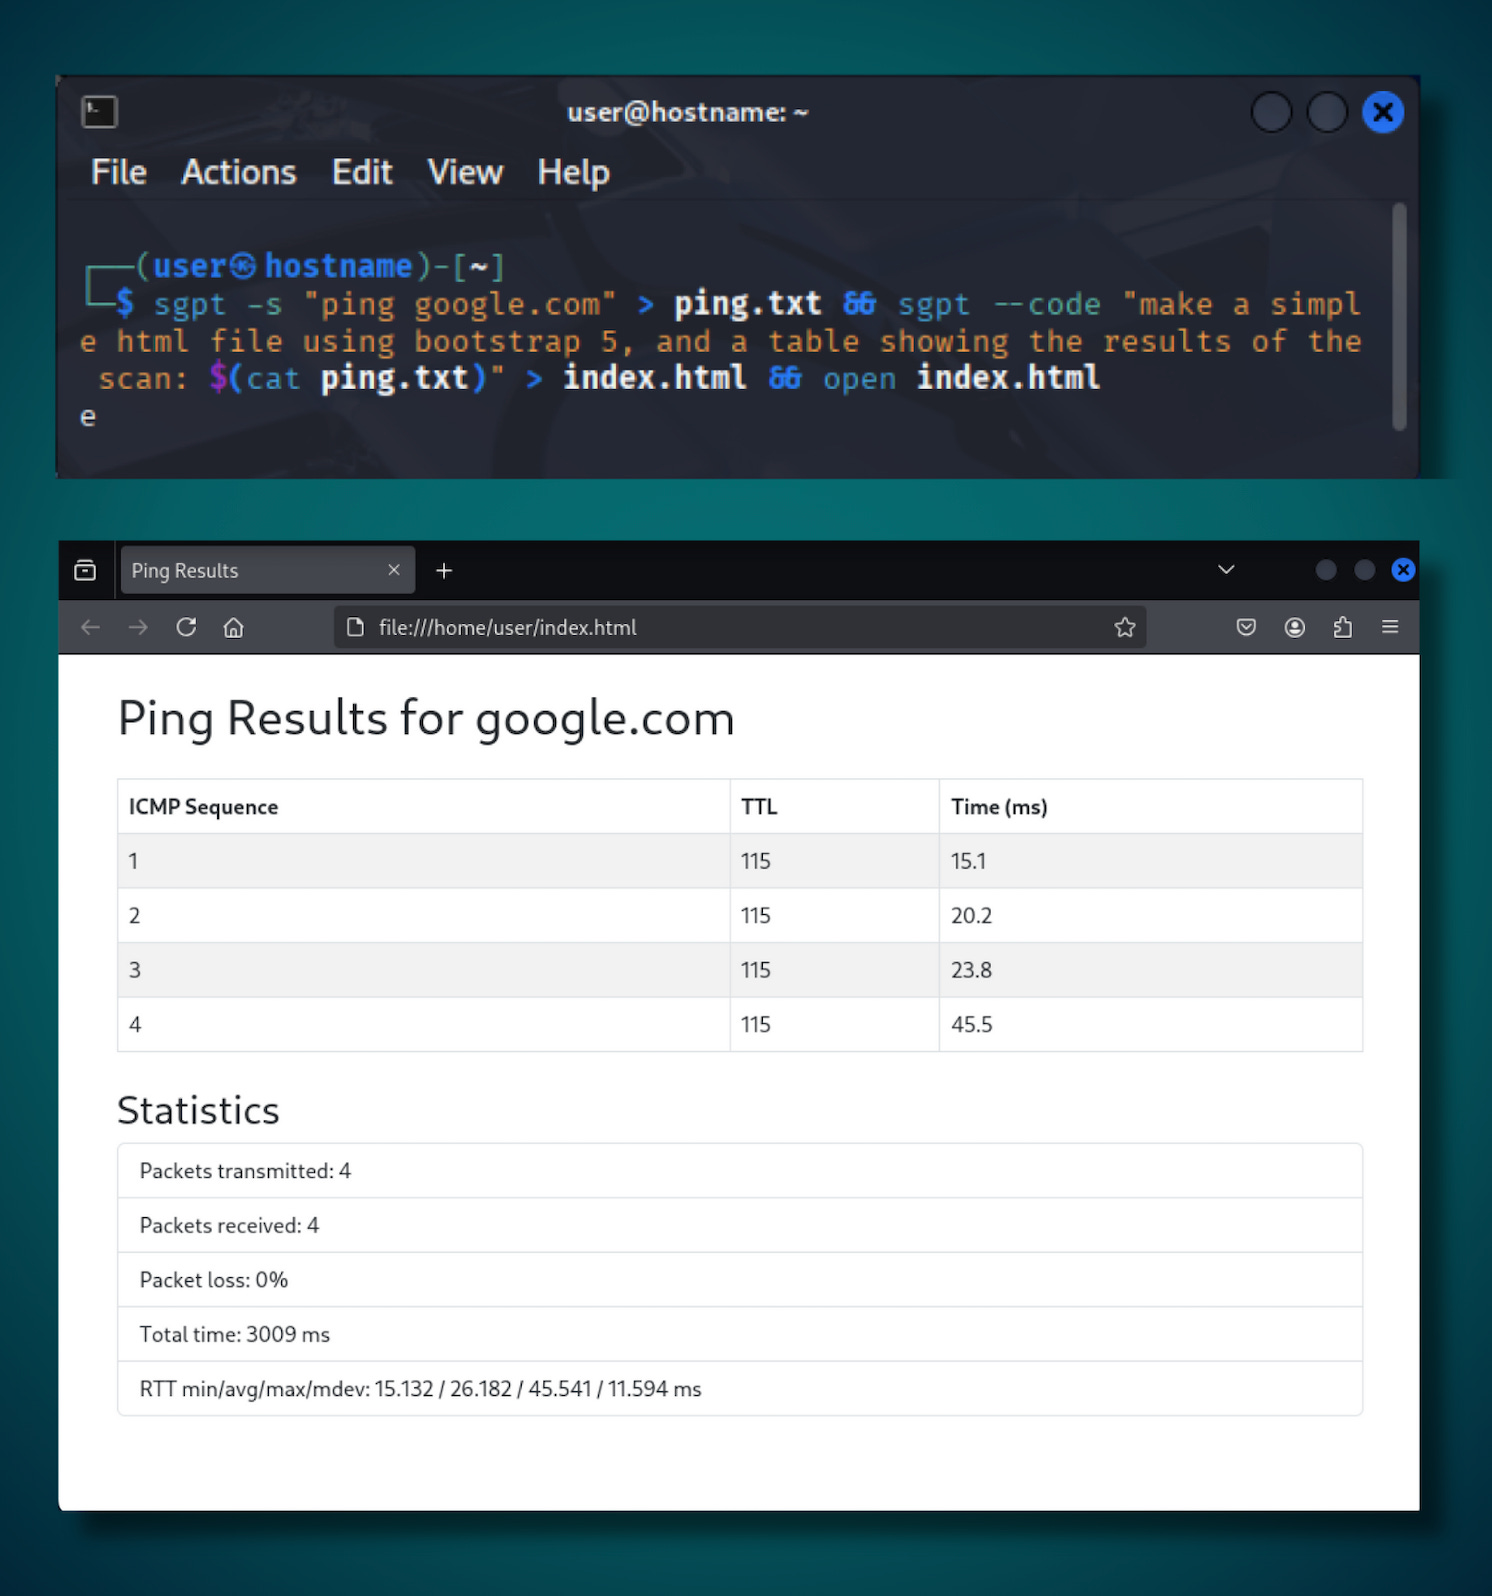
Using the && operator, you can link commands to create multistep processes where the output of one command becomes the input for the next. For example:
sgpt -s "ping google.com" > ping.txt && sgpt code "make a simple html file using bootstrap 5, and a table showing the results of the scan: $(cat ping.txt)" > index.html && open index.htmlThis sequence pings google.com, saves the results to ping.txt, generates an HTML file with a Bootstrap 5 table displaying the ping results, and opens the HTML file in your default browser.
For the first command, SGPT generates a shell command and prompts you to type e to execute, d to describe it, or a to abort.
Important: Since the output is redirected to ping.txt, the prompt won’t appear in the terminal, but you must still type e and press Enter to execute.
7. Manage Chat History
ShellGPT provides the ability to save and access previous interactions with the AI through persistent chat sessions, ensuring seamless continuity for iterative tasks and ongoing conversations.
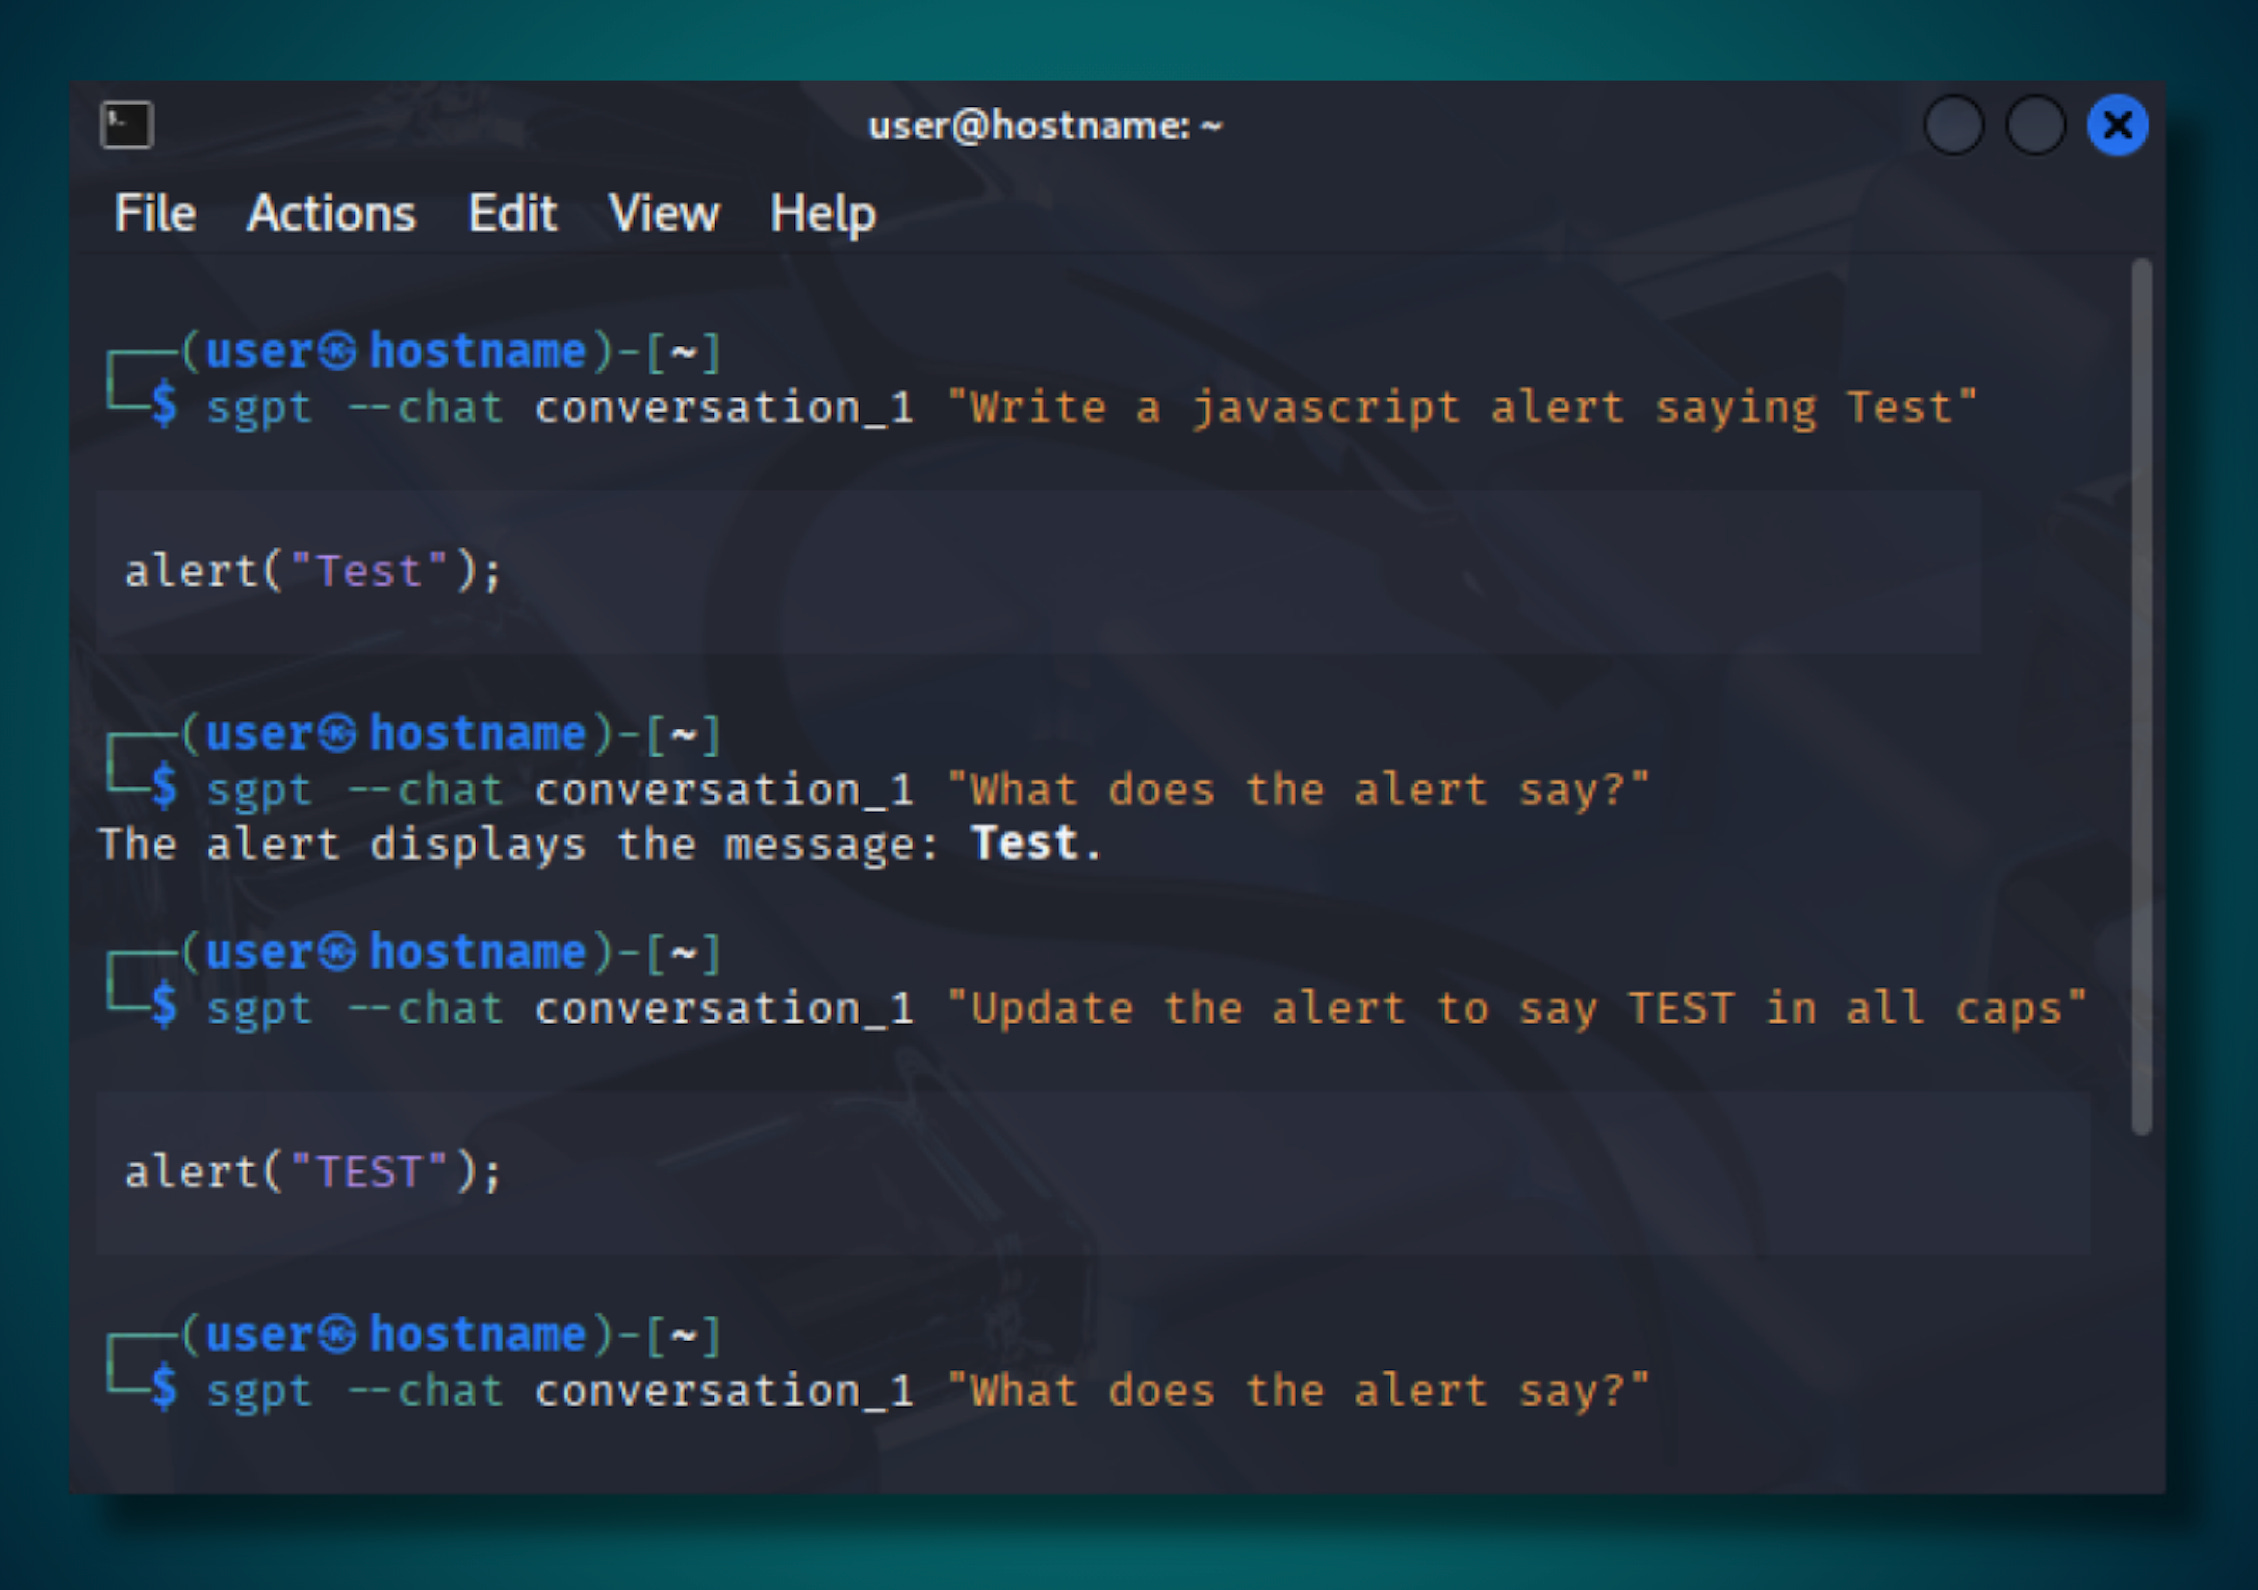
This feature is particularly useful for tracking prompts and responses across multiple sessions, such as during debugging or complex workflows. Commands include:
Add a Message to a Chat Session
Append a new message to an existing chat session to continue the conversation, using the --chat option with the session ID and a new prompt:
sgpt --chat <chat_name> "your new prompt"List All Chat Sessions
Display all available chat session IDs:
sgpt --list-chatsView a Specific Chat Session:
Show all messages from a given chat session by specifying its ID
sgpt --show-chat <chat_name>8. Chat Mode (REPL)
ShellGPT’s REPL (Read-Eval-Print Loop) mode enables real-time interaction with the AI directly in the terminal, ideal for tasks like generating commands, analyzing scripts, or debugging.
You can ask questions, get instant responses, and refine them without leaving the terminal, making it perfect for security professionals needing quick solutions.
Enter Chat Mode (REPL)
Start a session with a unique name to save the conversation or use temp for a temporary session:
sgpt --repl tempAt the >>> prompt, request something like “scan open ports on localhost” to get a command like nmap localhost. Exit by typing exit or pressing Ctrl+D.
You can start a session with --chat and continue it in REPL mode with --repl, as both share the same session object.
Start Chat Mode with File Input
Load a file for context, such as a script to analyze:
sgpt --repl temp < scan_script.shWrite Multiline Prompts in Chat Mode
Use triple quotes for complex prompts, like analyzing a cybersecurity script:
sgpt --repl temp
>>> """
... Explain this script:
... #!/bin/bash
... nmap -sV 192.168.1.0/24
... """
Run Shell Commands in Chat Mode
Generate and optionally execute shell commands:
sgpt --repl temp --shellAfter requesting a command like “check for open ports on 192.168.1.1,” SGPT suggests a command (e.g., nmap -sT 192.168.1.1) and prompts you to type ‘e’ to execute, ‘d’ to describe it, or ‘a’ to abort.
9. Create a Role
ShellGPT’s role feature allows you to define custom personas tailored for specific tasks, delivering consistent and formatted outputs for cybersecurity workflows, such as generating structured data or scripting.
Create a Role
Set up a role to control output formats, like generating valid JSON objects. When prompted, provide a clear description: "Output responses in valid JSON format only."
sgpt --create-role json_generator

# Enter role description: Provide only valid JSON as a response.
Apply the Role
Use the role to generate structured data with a prompt:
sgpt --role json_generator "random: user, password, email, address"This will produce a JSON response like:
{
  "user": "johndoe",
  "password": "password123",
  "email": "johndoe@example.com",
  "address": "123 Main St, Anytown, USA"
}
This role-based customization ensures reliable, task-specific outputs, enhancing efficiency in automated security tasks.
10. Shell integration
Shell integration allows ShellGPT to place AI-generated command suggestions directly into your terminal’s input line, so you don’t need to type sgpt with a prompt.
It works with common terminal environments on Linux and macOS, using a hotkey to insert a suggested command that you can edit before running.
For example, if you need a command to scan network ports, pressing the hotkey might insert nmap -sV localhost into the input line, which you can adjust and execute.
Setup Shell Integration
Install shell integration and restart your terminal to apply the changes:
sgpt --install-integrationThis adds a few lines to your .bashrc or .zshrc file. This updates a configuration file (like .bashrc or .zshrc) in your home directory to enable the feature.
After restarting the terminal, press Ctrl+L (default hotkey) while typing. ShellGPT will replace your current input with a suggested command based on your context. Edit the command if needed and press Enter to execute it.
SGPT: A Powerful AI Tool for Power Users
This guide covered ShellGPT’s key features, from generating commands and code to setting up roles and integrating with your terminal.
It’s a practical tool for cybersecurity tasks, making it easier to work faster and smarter in the terminal. With ShellGPT, you have a reliable helper to simplify and speed up your daily tasks.
ShellGPT is handy for quick one-off commands. I've found though that the terminal emulator underneath matters more than people think, especially when you're running AI tools heavily. Switched to Ghostty a while back and the GPU rendering keeps everything snappy even with multiple sessions open. Did a proper writeup on getting it sorted in about ten minutes: https://reading.sh/ghostty-in-10-minutes-install-configure-and-never-look-back-9ff3037b60c5?sk=802e84658561ce2d27753884ca52a368
... was this article written by AI?