
WiFi Pineapple Hacking Tool: Guide to Setup and First Attack

The WiFi Pineapple is a specialized penetration testing device developed by Hak5, designed to assess and exploit vulnerabilities in wireless networks.

Security professionals and ethical hackers use it to conduct network audits, perform red team operations, and simulate real-world cyberattacks to identify weak points in WiFi security.
At its core, the WiFi Pineapple works by mimicking trusted WiFi networks, allowing it to intercept connections, capture traffic, and execute advanced attacks like Man-in-the-Middle (MitM), deauthentication attacks, and rogue access points.
How does the WiFi Pineapple Work?
The WiFi Pineapple Mark VII mimics trusted networks, tricks devices into connecting, and allows security testers to monitor traffic, capture credentials, and launch targeted network attacks.
Watch this short video by NetworkChuck to see how this tool is used in the real world:
While it is a powerful tool for cybersecurity professionals, it can also be misused if placed in the wrong hands, making it a critical learning tool for both offense and defense in wireless security.
This guide will walk you through setting up, configuring, and using the WiFi Pineapple Mark VII, including a hands-on attack to demonstrate its capabilities.
Where to Buy the WiFi Pineapple
The WiFi Pineapple is sold by Hak5, a cybersecurity company known for its penetration testing tools and hardware. You can purchase it directly from their official store.
WiFi Pineapple Models
The WiFi Pineapple comes in different models, each with varying capabilities to suit different penetration testing needs.
Choosing the right model depends on your use case, whether you're performing basic security assessments or advanced wireless attacks.
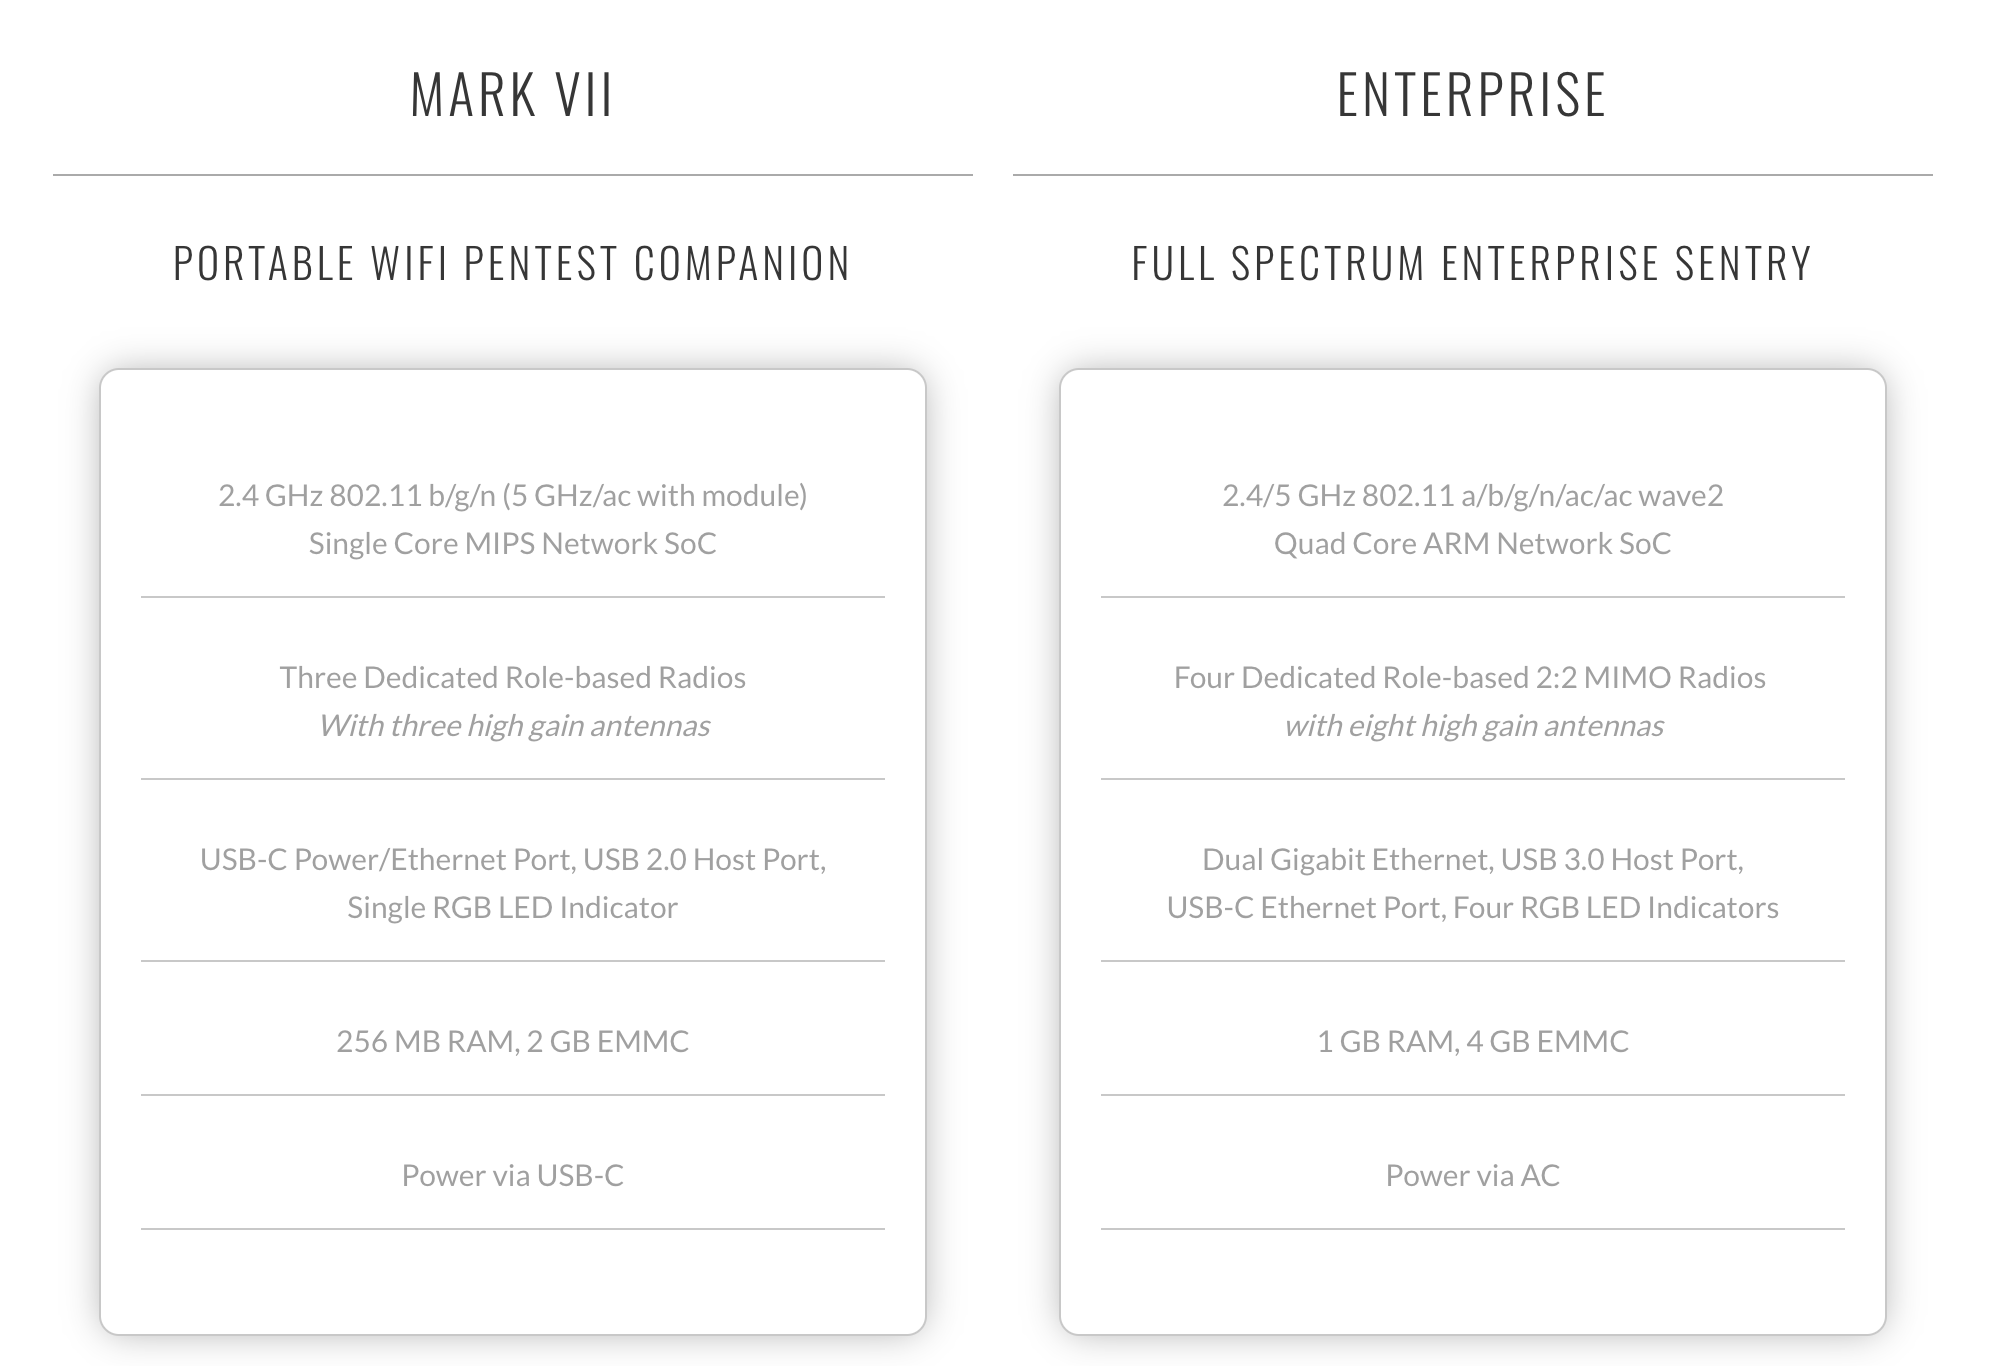
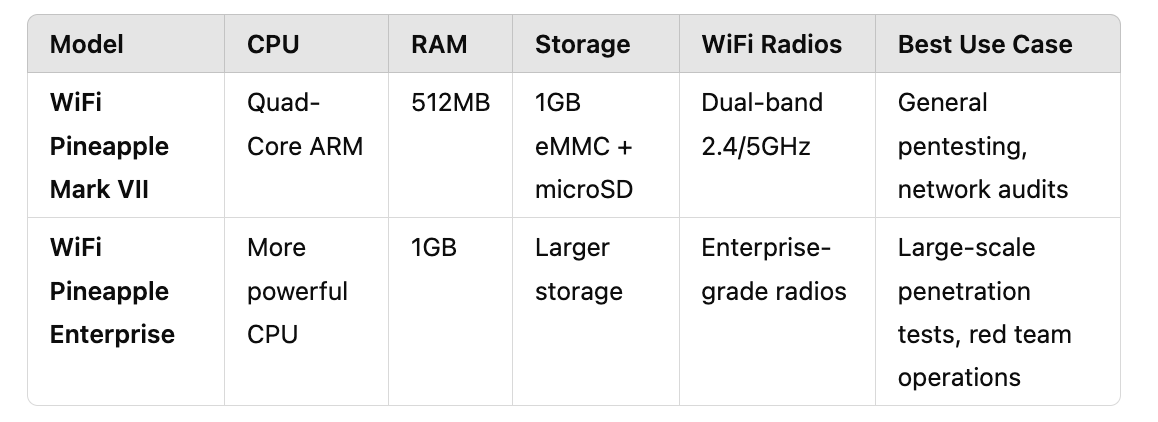
Key Differences
Mark VII: Best for individual security researchers, small businesses, and learning WiFi attacks.
Enterprise Edition: Designed for professionals handling corporate penetration tests and high-volume assessments.
For most users, the Mark VII offers a great balance between power and affordability, making it the go-to option unless you need enterprise-level performance.
Optional Add-Ons:
Add-On #1: Understanding the C2 Cloud Add-On:
The WiFi Pineapple comes with a built-in local command-and-control (C2) interface, allowing you to manage the device directly through a web-based GUI. This is ideal if you only need on-site control and prefer to keep operations within a local network.
Hak5 C2 Cloud, on the other hand, is designed for remote management, automation, and multi-device control. If you need to access and operate your WiFi Pineapple from anywhere, manage multiple devices at once, or automate tasks, then C2 Cloud is the better choice.
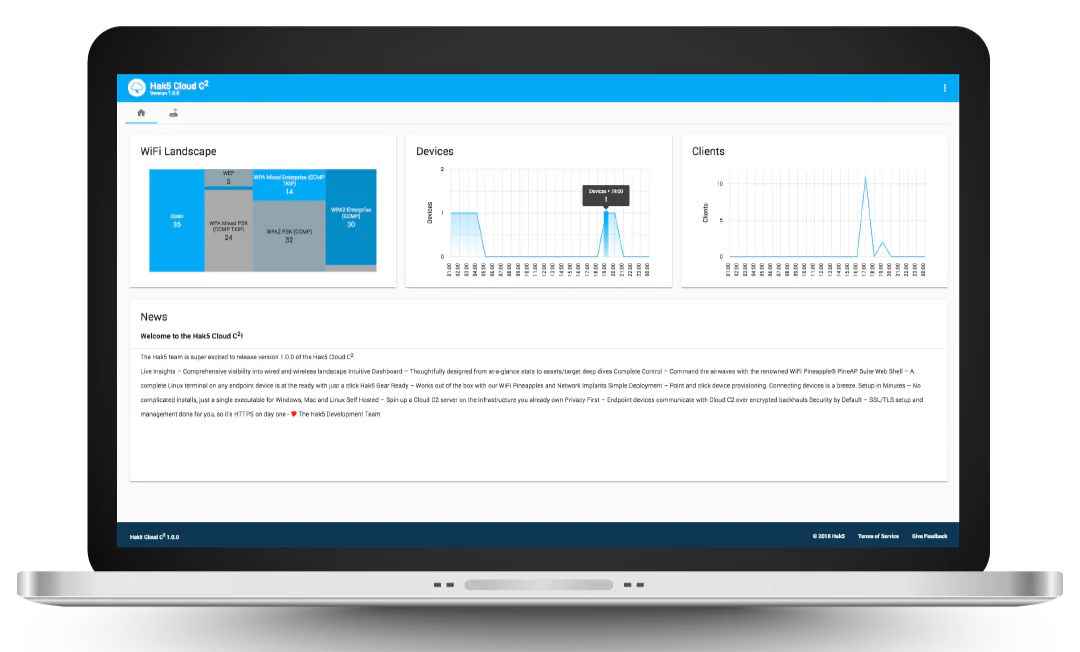
Do You Need C2 Cloud?
C2 Cloud is not required to use the WiFi Pineapple. The device includes a local cloud interface that allows you to configure and run tests without an internet connection. However, C2 Cloud can be useful in specific situations:
✅ When C2 Cloud is useful:
You need to remotely manage the WiFi Pineapple from a different location.
You're conducting a red team operation and need to coordinate multiple devices.
You want to log and store attack results in a centralized location.
❌ When you don’t need it:
You're using the WiFi Pineapple locally for on-site penetration tests.
You don’t need cloud-based logs or automation.
You prefer to keep all data offline for privacy reasons.
If you're just starting, it's best to stick with the local interface until you determine if remote access is necessary for your workflow.
Add-On #2: MK7AC WiFi Adapter
The WiFi Pineapple can send custom network packets (packet injection), which is useful for testing security by simulating attacks like disconnecting devices from a network or capturing data.
However, the built-in hardware only works on 2.4 GHz WiFi, meaning it cannot interact with networks using 5 GHz, which is common in modern routers and hotspots.

The MK7AC add-on unlocks both 2.4 GHz and 5 GHz packet injection, allowing you to test and interact with a wider range of WiFi networks, including high-speed and more secure connections. It also improves signal strength with high-gain antennas, increasing range and reliability. (Learn More)
Resources to Support Your Learning
Before we get started, here are some resources you should know about. If you get stuck, need help, or simply want to connect with others, check these out:
Cybersecurity Club - Learning, Networking & Connecting: A community-focused Discord for cybersecurity enthusiasts to learn, network, and collaborate.
Hak5 Discord: Peer-to-peer support and discussions related to Hak5 tools, including the WiFi Pineapple.
Official Mark VII Documentation: Comprehensive setup and usage guides directly from Hak5.
Setting Up Your WiFi Pineapple Mark VII
Step 1) Download Latest Firmware
First, download the latest firmware from the Hak5 website. We will use this firmware file in a later step, where you may not have internet connectivity, so download it now.
Step 2) Choose Your Setup Type
Before using the WiFi Pineapple, you need to configure it properly. The device must be set up to work with your computer, install any necessary updates, and be secured before use.
There are two ways to set up the WiFi Pineapple, each with different security and technical considerations.
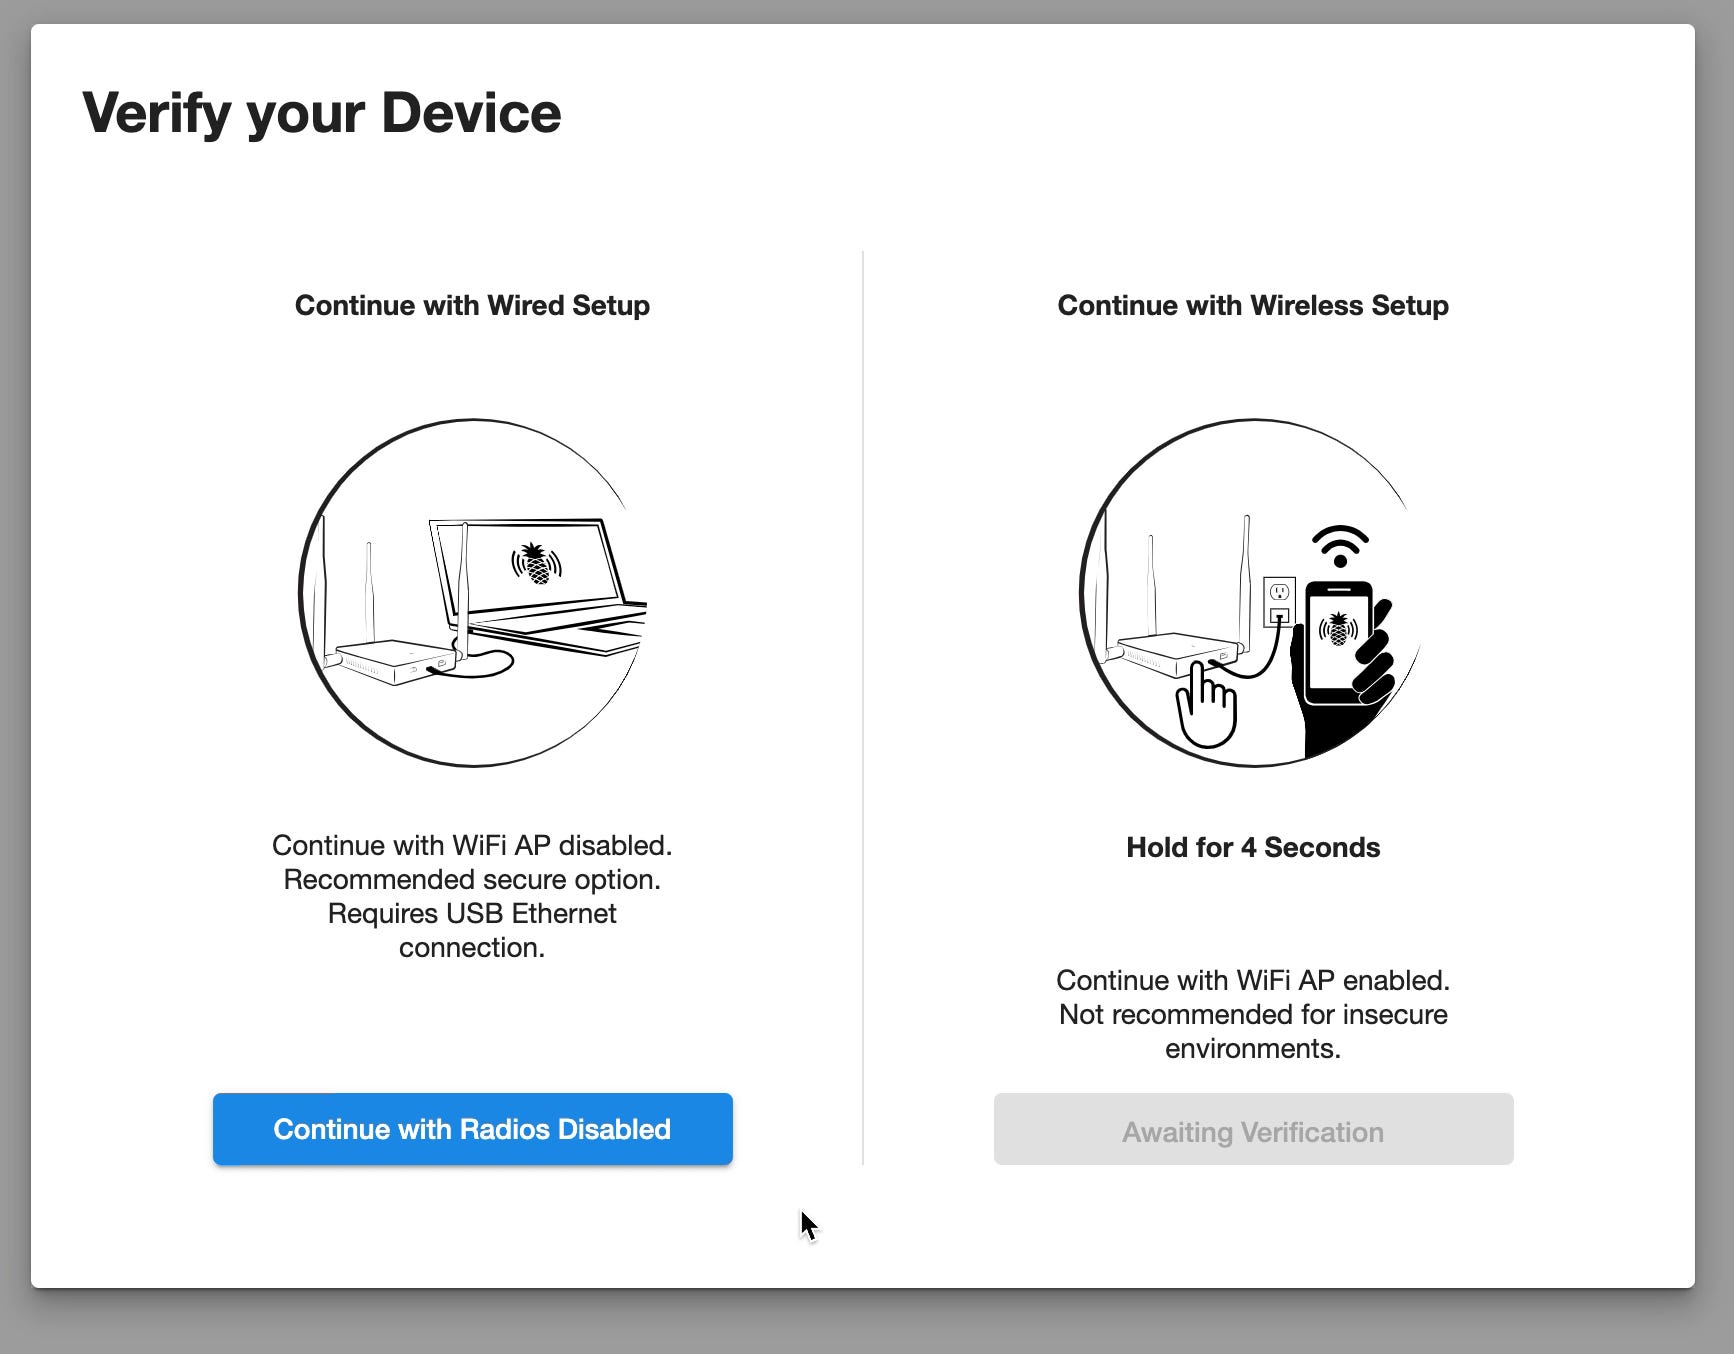
Wired Setup with Radios Disabled – This method does not broadcast a WiFi signal during setup, reducing the risk of unauthorized access. The device is connected directly to your computer using a USB-C cable. This method is more secure and only requires a wired connection between the WiFi Pineapple and your computer.
Wireless Setup with WiFi Access Point Enabled – This method creates a temporary WiFi network that you connect to for setup. This makes it easier to configure the device without needing extra hardware, but it also means that the WiFi Pineapple is broadcasting a network that others nearby may be able to see.
Both setup methods allow you to access the WiFi Pineapple’s web interface, where you will configure basic settings, update the firmware, and ensure the device is ready for use. The main difference between the two methods is whether or not the device is broadcasting a WiFi network during setup.
Option 1: Wired Setup with Radios Disabled
This method is recommended for most users because it is both secure and simple. The WiFi Pineapple is connected directly to your computer via USB-C, which provides both power and data.
When the WiFi Pineapple is set up using a wired connection, its WiFi radios are disabled. This means that the device does not broadcast a WiFi network that could be detected by others nearby. Because the device is connected directly to the computer, there is no risk of someone else attempting to connect to it before you complete the setup and secure it.
1. Power on the WiFi Pineapple
Plug the Pineapple into your computer with a USB-C cable.
The device will power on automatically and be recognized as a network interface on your computer.
2. Connect to the WiFi Pineapple’s Network
Open your device's WiFi settings (on a phone, tablet, or computer).
Look for a network named Pineapple_XXXX (where "XXXX" is a unique identifier).
Select this network and connect to it (no password is required at this stage).
3. Enable Wired Setup Mode
On the "Verify Your Device" screen, click "Continue with Radios Disabled."
Option 2: Wireless Setup with WiFi AP Enabled
Wireless setup allows you to configure the WiFi Pineapple without connecting it directly to your computer for data transfer. Instead of using a USB-C cable to establish a network connection, the device creates a temporary WiFi network (Access Point or AP) that you connect to for setup.
To do this, the WiFi Pineapple must be powered using a USB-C power source, such as a wall adapter, a powered USB port on a computer, or a portable power bank. Since no direct USB data connection is being used, all setup is done wirelessly through a web interface and the Pineapple’s built-in WiFi radio.
1. Power on the WiFi Pineapple
Plug a USB-C power cable into the WiFi Pineapple.
Plug the other end into a wall adapter, powered USB port, or power bank.
The device will turn on automatically and begin booting up.
2. Connect to the WiFi Pineapple’s Network
Open your device's WiFi settings (on a phone, tablet, or computer).
Look for a network named Pineapple_XXXX (where "XXXX" is a unique identifier).
Select this network and connect to it (no password is required at this stage).
3. Access the Web Interface
Open a web browser and enter: http://172.16.42.1:1471 This will load the WiFi Pineapple’s setup page, where you will configure the device.
4. Enable Wireless Setup Mode
On the "Verify Your Device" screen, press and hold the reset button for 4 seconds.
The "Continue with Radios Enabled" button will become active.
Click "Continue with Radios Enabled" to proceed with wireless setup.

Because the WiFi Pineapple is broadcasting a visible WiFi network, this method is less secure than wired setup. Anyone nearby could potentially see the device’s access point before you have secured it. However, it is a good option if you need to set up the device using a phone, tablet, or a laptop that does not have USB-C for data transfer.
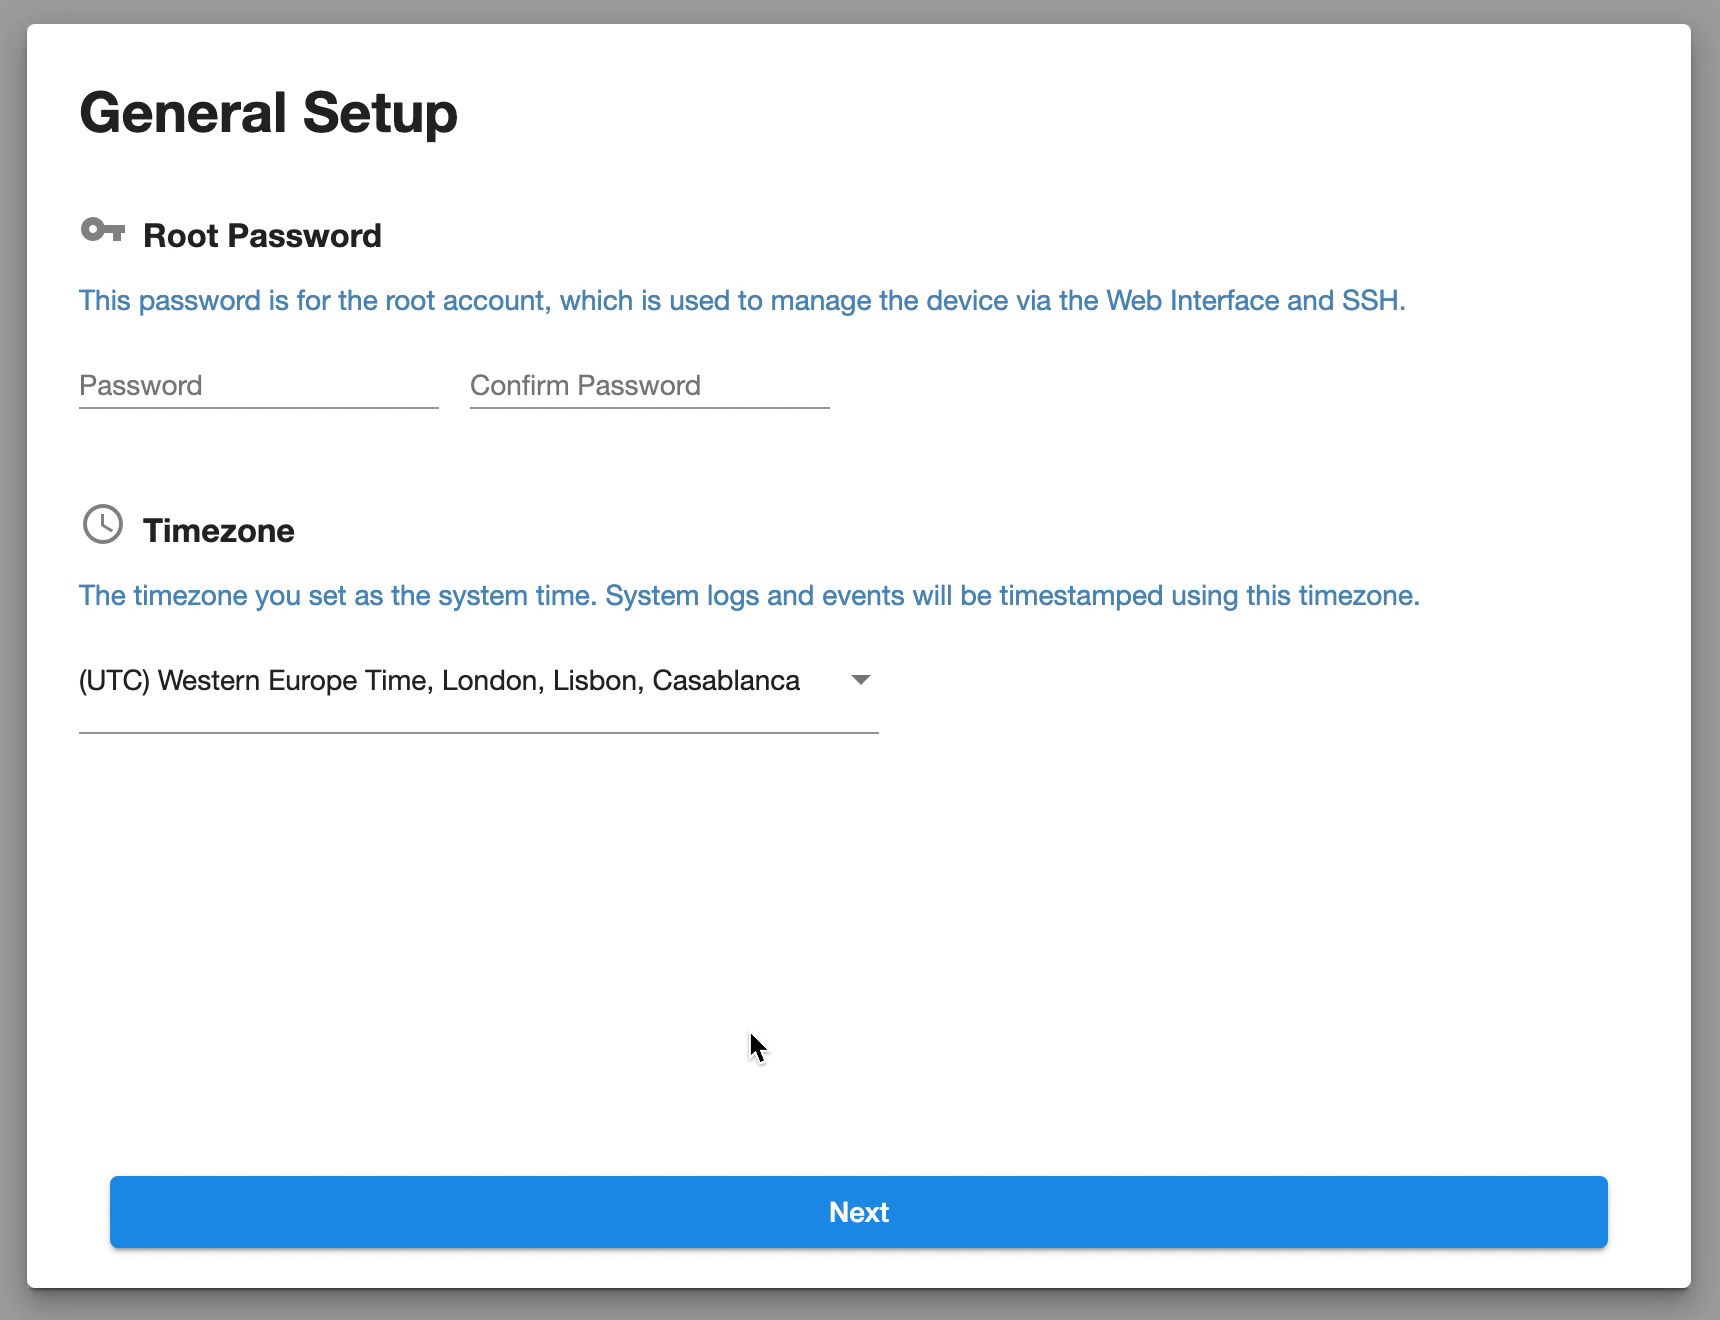
Step 3) General Setup Page
On the General Setup page, configure the root password and select your timezone:
Root Password: Enter a strong password for the root account. This password will be used to manage the WiFi Pineapple via the web interface and SSH. Confirm the password by entering it again in the second field.
Timezone: Select your timezone from the dropdown menu. This ensures that system logs and event timestamps match your local time, making it easier to track activity and troubleshoot issues.
After entering your password and selecting the timezone, click the Next button to continue. Once this step is complete, the WiFi Pineapple will move to the Networking Setup page.
Step 4) Networking Setup Page
On the Networking Setup page, you set up two Wi-Fi networks for the WiFi Pineapple:
Management Network: This is the private Wi-Fi network you use to control the device. You choose the network name (SSID) and set a password so only you can connect. You can also choose to hide this network or turn it off.
If you disable the Management Network: You won’t be able to connect to the Pineapple wirelessly for management. Instead, you’ll need to use a wired connection (Ethernet or USB-C) to control the device.Open Network: This is the public Wi-Fi network that other devices (targets) can connect to. You choose the network name and country and can hide the network from discovery if you want.
This setup controls how you connect to the Pineapple and how other devices see its public Wi-Fi. Connecting the Pineapple to the internet is done in another step. You can change these settings later in the WiFi Pineapple’s web interface.

Step 5) After Setup Complete:
After setup, connect to your Management Access Point (AP) to control the WiFi Pineapple. Open your WiFi settings and select the SSID name you chose during the Networking Setup step. Enter the password you created to connect.
If you chose to hide the Management AP:
Mac: Go to Wi-Fi Settings, click Other Networks, scroll to the bottom, and select Other.... Enter the SSID and password manually.
Windows: Open Network & Internet Settings, click Wi-Fi, then select Hidden Network. Enter the SSID and password when prompted.
Linux: Open your network manager, choose Connect to Hidden Network, select Wi-Fi, then enter the SSID and password.
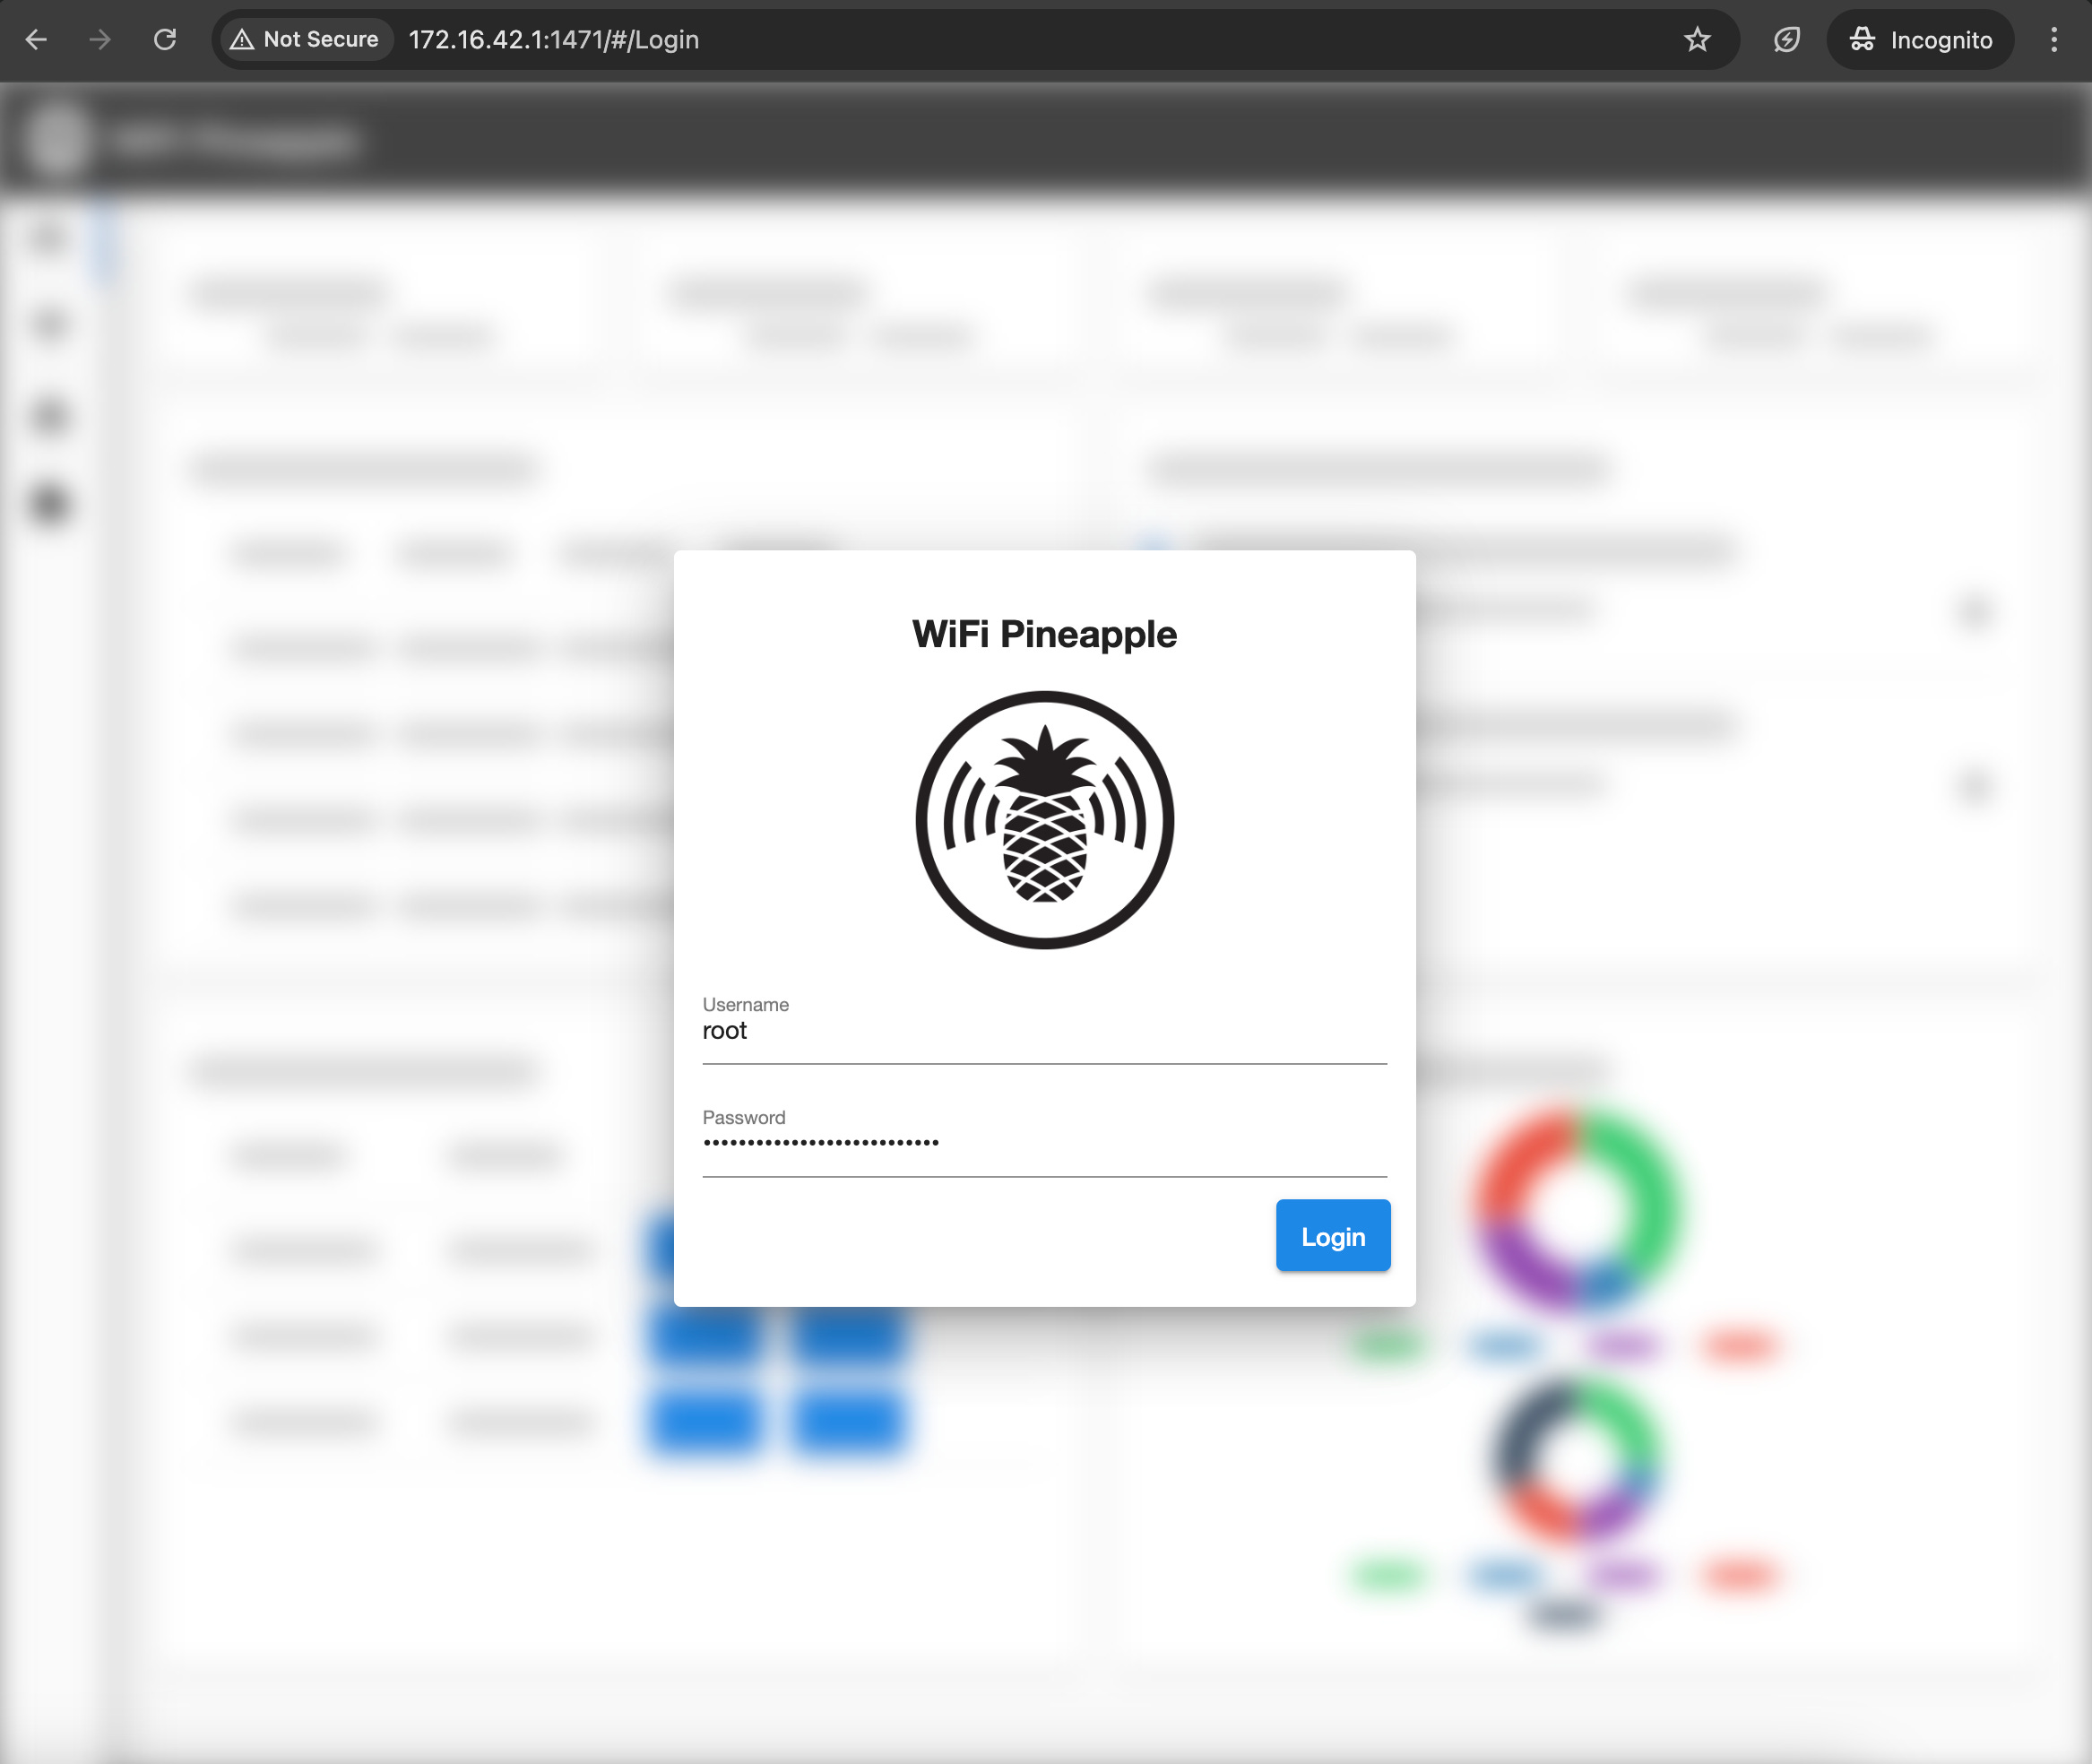
Once connected to the Management AP, you will lose internet access because you're now connected to the Pineapple’s local network.
Open a web browser and go to http://172.16.42.1:1471, then log in with the username and password you set during General Setup. From there, you can start using the WiFi Pineapple's tools and features.
Step 6) Connecting to the Internet
Once logged in, you’ll need to connect your WiFi Pineapple to the internet for updates, downloads, and remote management. The setup screen provides three options to establish a connection:
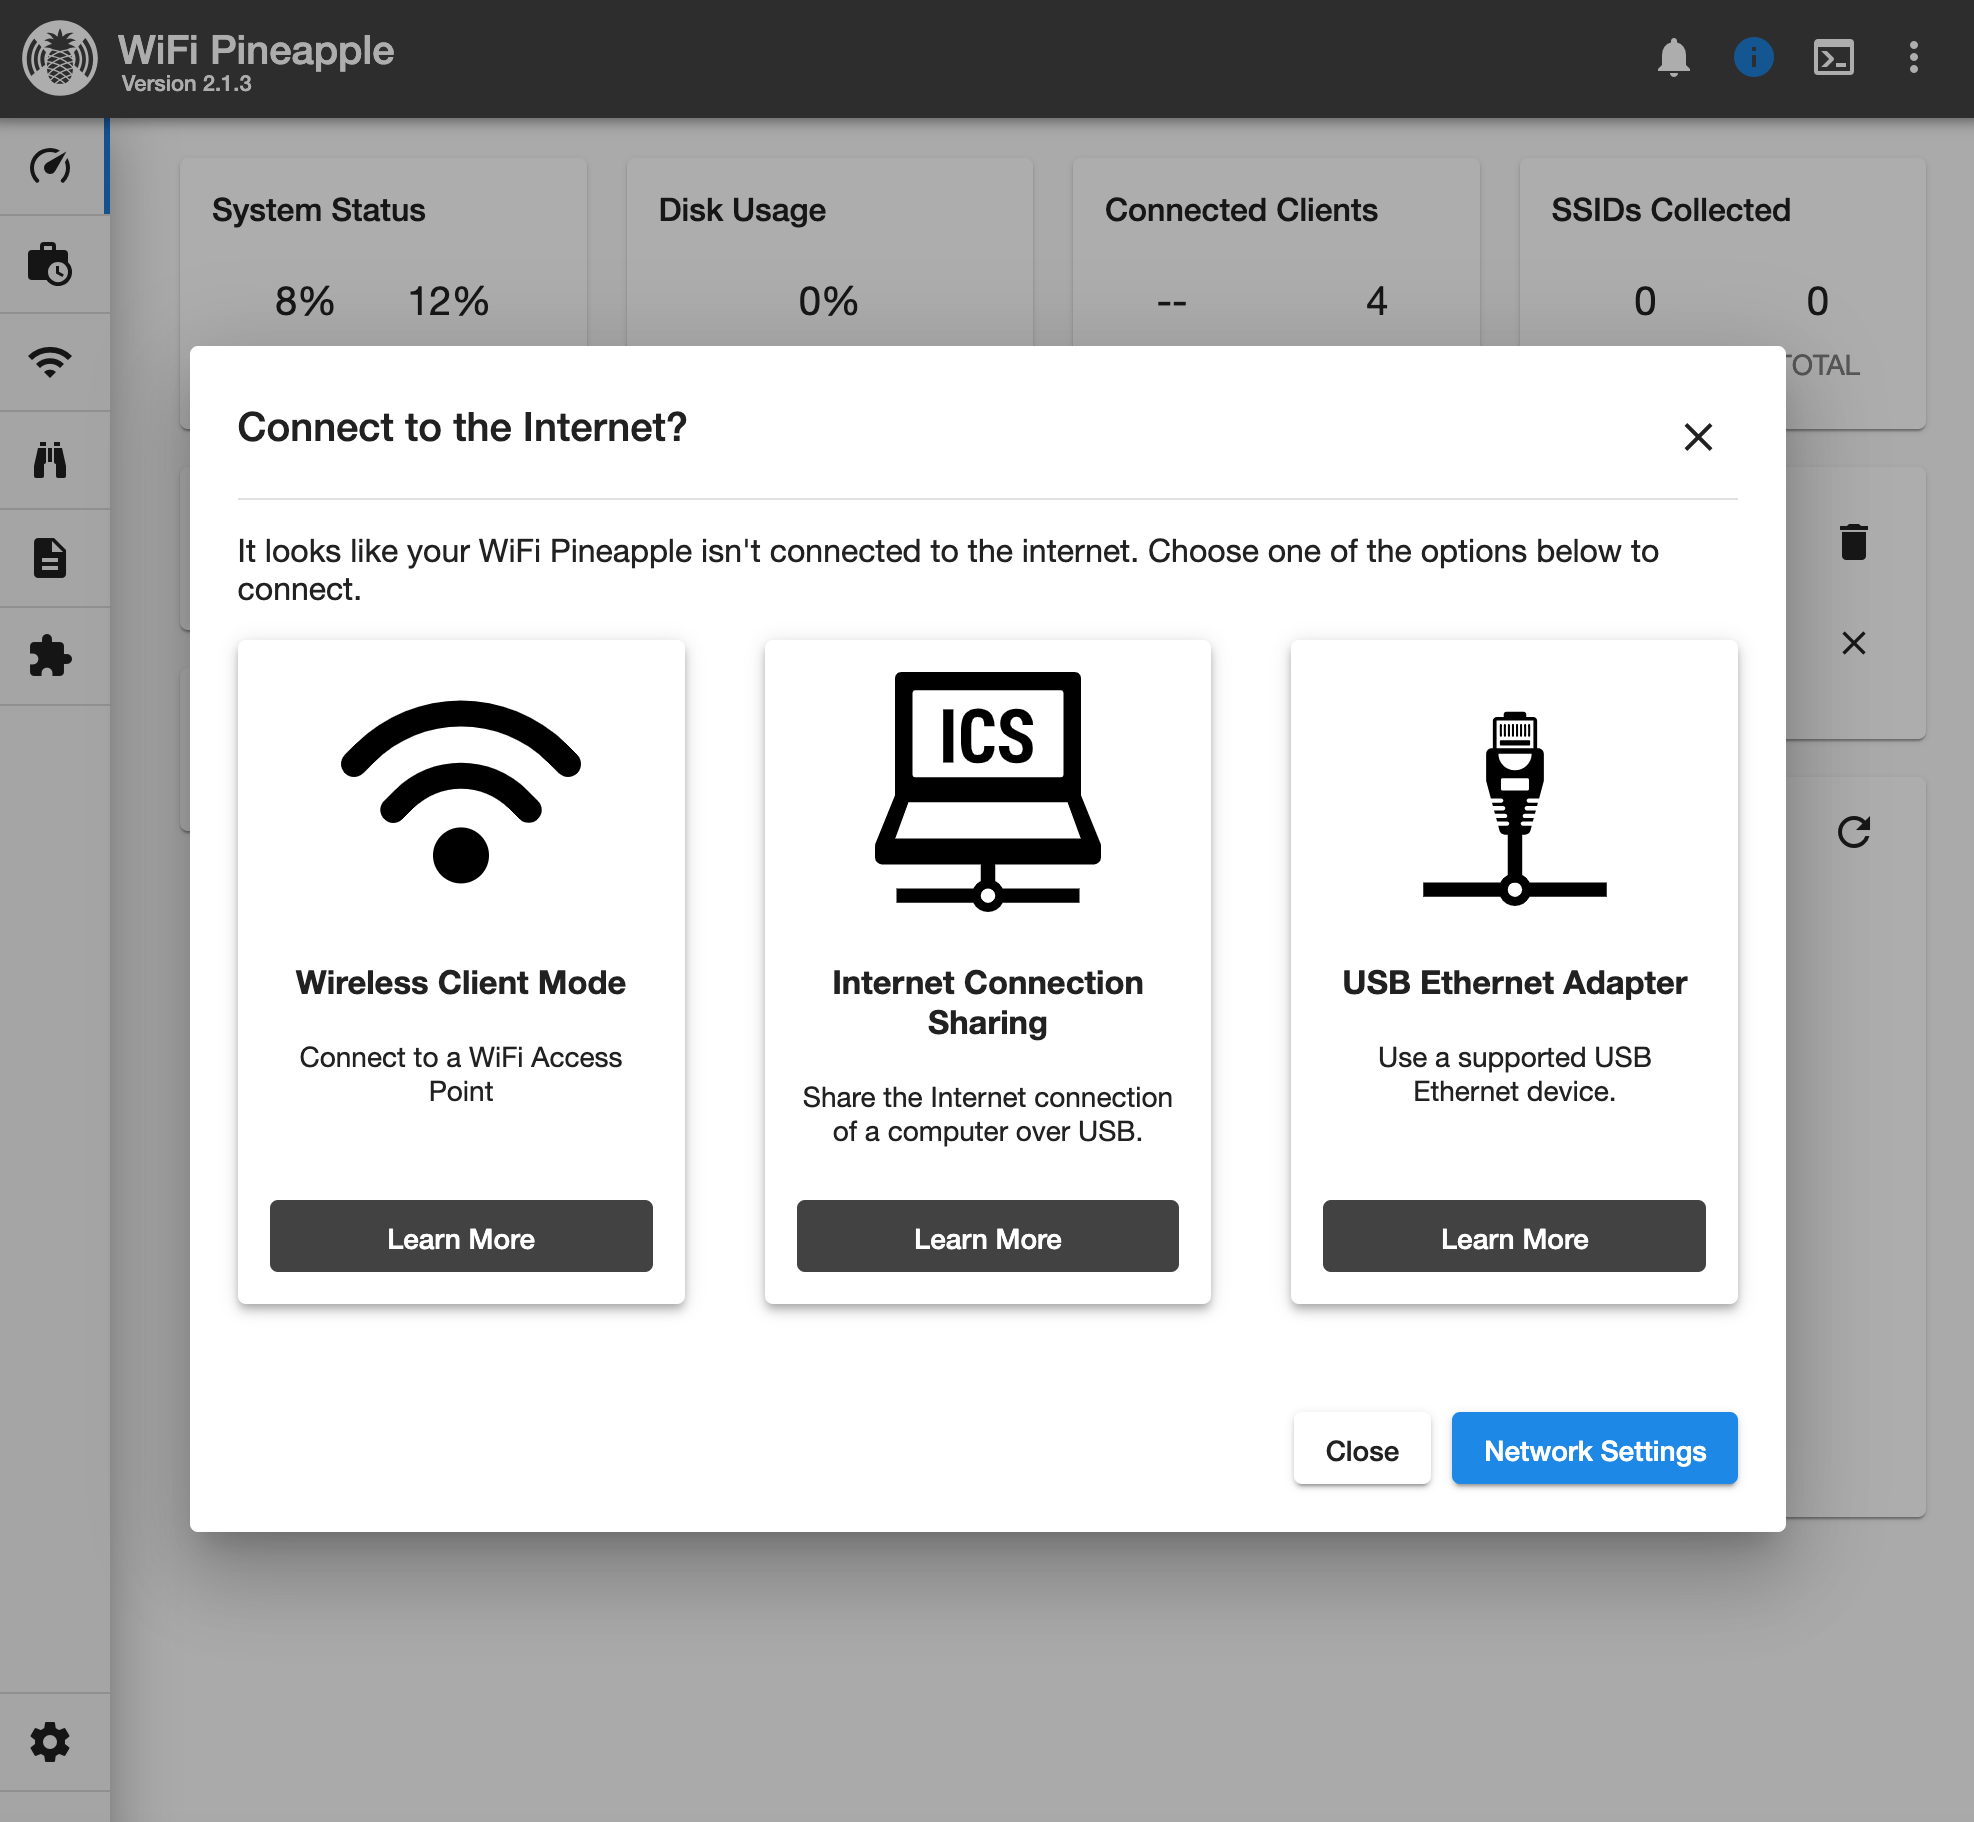
Understanding the Three Internet Connection Options: The WiFi Pineapple offers three ways to connect to the internet, each with its own advantages.
Wireless Client Mode (Recommended) – This option connects the WiFi Pineapple to a nearby WiFi network, allowing it to access the internet wirelessly. It’s the quickest and easiest setup, requiring no extra hardware. Wireless Client Mode is the simplest and most efficient way to get online. It doesn’t require cables or extra adapters, making it ideal for most users.
Internet Connection Sharing (ICS) – This method shares your computer’s internet connection over USB. While useful in restricted networks, it requires additional setup steps depending on your operating system. It also limits mobility, as the WiFi Pineapple must stay physically connected to your computer.
USB Ethernet Adapter – This option connects the WiFi Pineapple to a wired network using an Ethernet cable and a USB-C to Ethernet adapter. It provides a stable and fast connection but requires additional hardware and may not be practical in all environments.
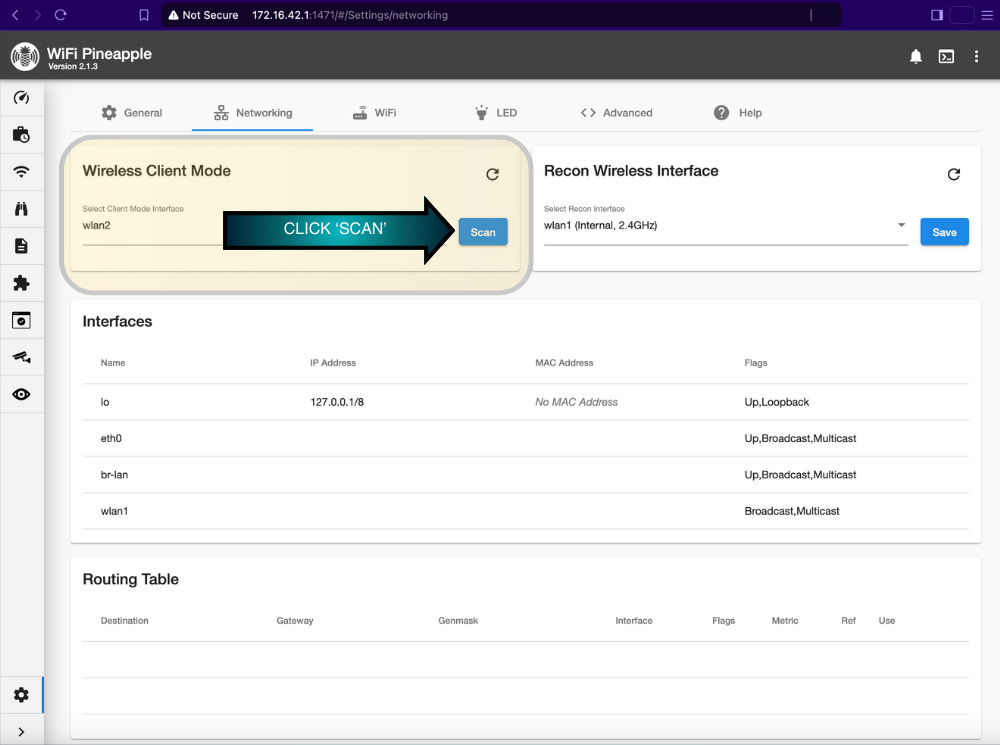
How to Set Up Wireless Client Mode:
Go to Network Settings at
http://172.16.42.1:1471/#/Settings/networkingIn the top left under Wireless Client Mode, click Scan.
Select your WiFi network from the dropdown, enter the password, and wait for an IP address to be assigned.
Once connected, your WiFi Pineapple has internet access and is ready for use. You can now download updates, install modules, and begin testing and auditing networks.
Step 7) Update Firmware
Firmware is the built-in software that controls the WiFi Pineapple’s hardware. Updating it ensures you have the latest features, security patches, and bug fixes.
To update the firmware on your WiFi Pineapple:
Log in to the WiFi Pineapple’s web interface at
http://172.16.42.1:1471/#/SettingsScroll to the bottom of the Settings page and find the Software Update section.
Choose one of the following options:
Check for updates online: Click this button to download and install the latest firmware automatically.
Manual update: Upload a firmware file from your computer by clicking Choose File and selecting the file you downloaded earlier.
Wait for the update to complete. The WiFi Pineapple will reboot and return to the Command and Control page when finished.
Congrats! You’re all set up and ready to start hacking.
How to use the WiFi Pineapple Mark VII
This section provides a high-level overview of the WiFi Pineapple’s core functionality and its most popular modules. We’ll also guide you through launching a basic example attack. Future posts will explore more advanced attack flows in detail.
Core Features of the WiFi Pineapple

The WiFi Pineapple simplifies and automates many WiFi attacks that would normally require multiple tools and scripts.
Here are the core built-in features that every user should know:
PineAP – Capturing Wireless Traffic & Impersonating Networks
PineAP gets its name from the WiFi Pineapple, playing on the word "Pineapple" while also referencing AP (Access Point) functionality. WiFi devices constantly search for known networks by sending probe requests. PineAP captures and rebroadcasts these requests, tricking devices into connecting automatically. Once connected, the WiFi Pineapple can monitor traffic, manipulate data, or launch attacks like credential harvesting, making it a powerful tool for security testing.Recon – Scanning & Identifying Networks & Devices
Before performing any attacks, it’s important to see what WiFi networks and devices are nearby. Recon scans for available networks, displaying information like signal strength, encryption type, and connected devices. This helps identify potential targets for testing, such as open networks or devices that automatically connect to familiar WiFi names.Deauthentication Attacks – Forcing Devices to Reconnect
Many WiFi networks rely on devices staying connected once they authenticate. A deauthentication attack sends a signal that forces devices to disconnect, making them search for networks again. This is useful for pushing a device to connect to a fake network or capturing its reconnection attempt for password cracking.WPA Handshake Capture – Testing WiFi Password Strength
When a device connects to a secure WiFi network, it goes through a handshake process where authentication details are exchanged. The WiFi Pineapple can capture these handshakes, allowing the security tester to analyze the password’s strength. If the password is weak, it can be cracked offline using tools that attempt common or custom password lists.Client Management – Monitoring & Controlling Connected Devices
The WiFi Pineapple logs all devices that connect to it, showing their unique hardware address (MAC address), how long they have been connected, and what networks they are looking for. This helps in tracking activity, identifying specific devices, and disconnecting unwanted connections. It also allows testers to filter which devices can or cannot connect.Campaigns – Automating & Preconfiguring Attacks
Rather than manually setting up each attack, the WiFi Pineapple allows testers to automate common testing workflows. Campaigns let you configure a sequence of actions, such as scanning for networks, capturing probe requests, and launching deauthentication attacks. This makes penetration testing more efficient and ensures the same steps are followed consistently.
WiFi Pineapple Modules: Expanding Functionality
While the built-in features cover basic WiFi attacks, modules extend the WiFi Pineapple’s capabilities, adding network traffic interception, credential harvesting, and more advanced exploits.
Modules are developed by the WiFi Pineapple community and can be accessed via the Modules page. If a graphical module isn’t available for a specific tool, check the Packages section to see if a command-line version can be installed.
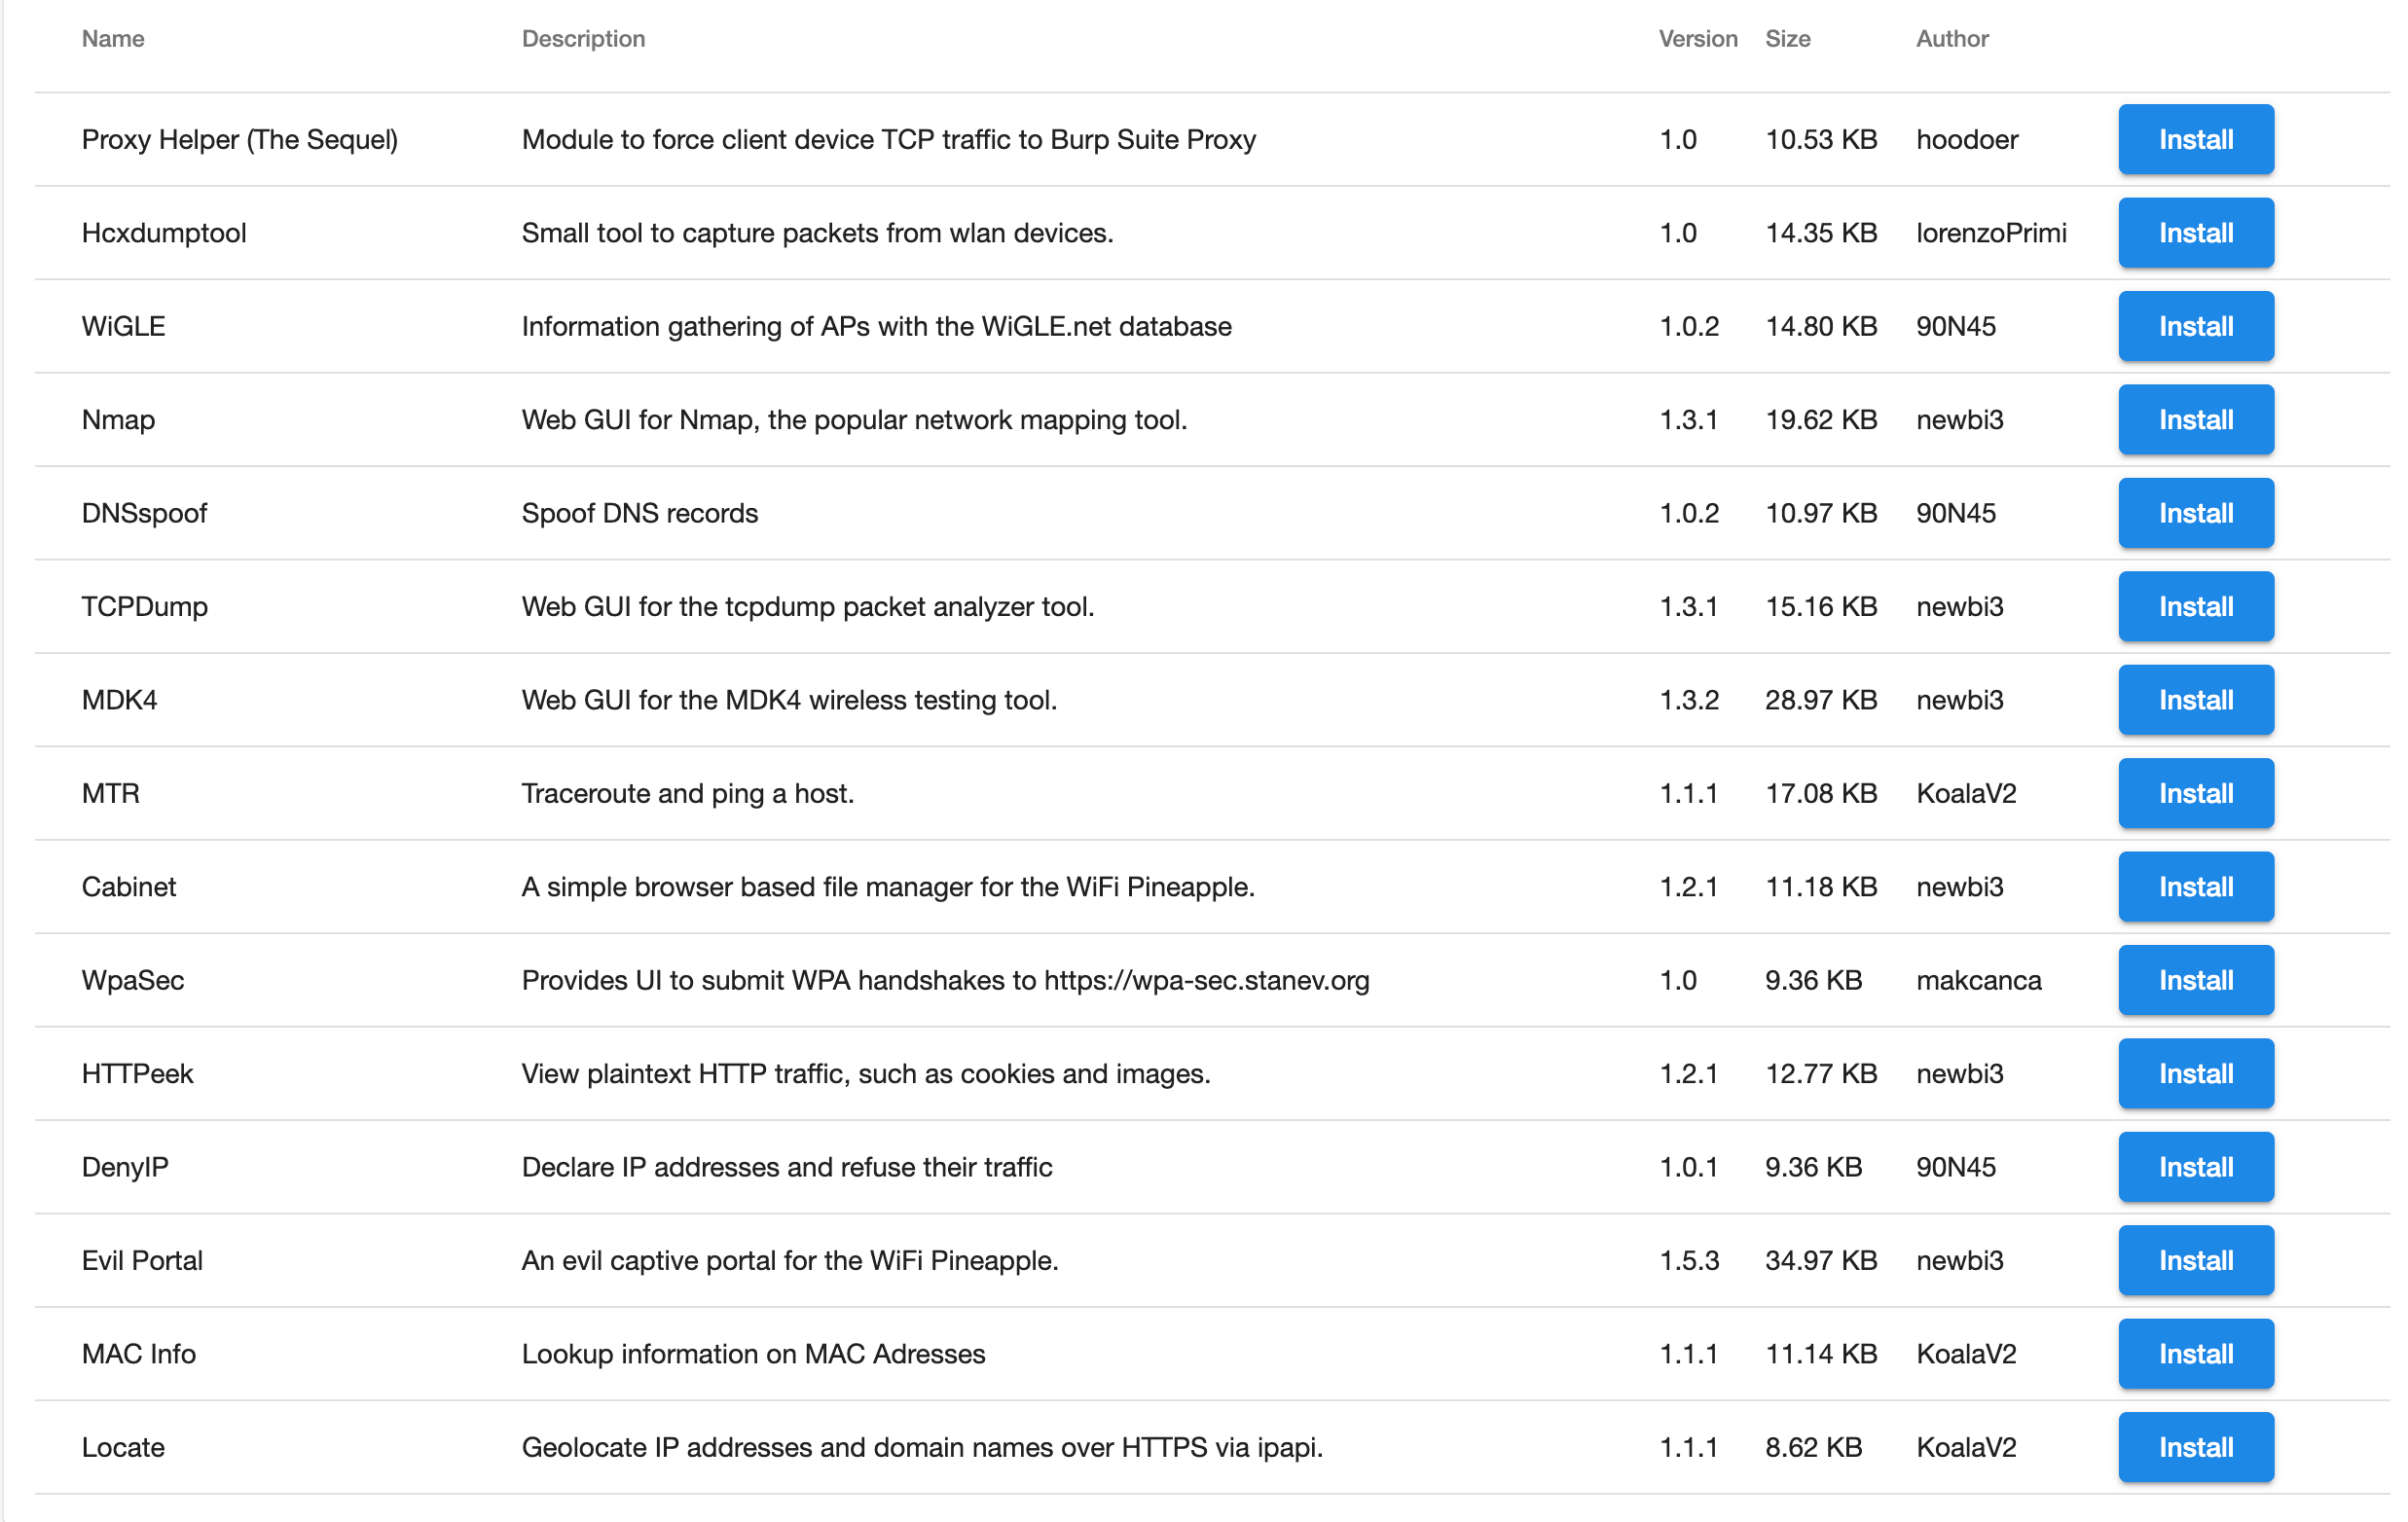
WiFi Pineapple One-Click Modules:
The WiFi Pineapple Mark VII comes with powerful built-in features, but its real strength lies in its ability to expand functionality using modules. These one-click install modules provide easy access to advanced attacks like credential harvesting, traffic interception, and network scanning—without needing complex setup.
Modules Include:
Proxy Helper (The Sequel): Redirects device TCP traffic to tools like Burp Suite Proxy for interception and analysis.
Hcxdumptool: Captures packets from wireless devices, useful for collecting WPA handshakes and other wireless data.
WiGLE: Collects information on wireless access points using the WiGLE.net database for location and network data.
Nmap: Provides a web interface for Nmap, a popular tool used to scan networks and identify connected devices.
DNSspoof: Allows you to spoof DNS responses, redirecting devices to fake websites for testing and analysis.
TCPDump: Captures and analyzes network traffic using a graphical interface for the tcpdump tool.
MDK4: Web interface for MDK4, a wireless testing tool capable of deauthentication attacks and network stress testing.
MTR: Combines traceroute and ping to diagnose network connectivity issues.
Cabinet: A simple file manager that lets you browse and manage files on the WiFi Pineapple.
WpaSec: Uploads WPA handshakes to WPA-sec.stanev.org for password cracking using GPU servers.
HTTPeek: Allows you to view plaintext HTTP traffic, including cookies, images, and website content.
DenyIP: Blocks specific IP addresses from connecting to the WiFi Pineapple.
Evil Portal: Creates fake captive portals to capture login credentials from unsuspecting users.
MAC Info: Looks up device information using MAC addresses.
Locate: Geolocates IP addresses and domain names using ipapi.
To install a module, click the Install button next to its name. Once installed, you can access the module from the Modules page. Modules can be uninstalled by clicking the trashcan icon.
Module Developers:
If you’re interested in developing your own modules, visit the WiFi Pineapple Module Development Guide for detailed instructions. Existing community modules can be found in the WiFi Pineapple Modules Repository.
Launching Your First Attack:
Capturing Passwords with Evil Portal
Evil Portal creates fake login pages that mimic real captive portals on public WiFi networks. When users try to connect, they’re asked to enter credentials—often for social media or email accounts—to gain access. Once they do, their login details are captured, and their traffic can be intercepted, setting them up for further exploitation.
For this attack, we’ll simulate a public WiFi login page that requires users to sign in with Facebook or Google. When they enter their credentials, the password is logged, and their internet connection routes through the attacker's device. This not only gives access to their login details but also allows monitoring and manipulation of their traffic for further attacks.

Step 1: Log in to the WiFi Pineapple
Ensure your WiFi Pineapple is powered on and connected to your computer.
Open a web browser and go to http://172.16.42.1:1471
Enter your username and password from the initial setup.
Click Log In to access the dashboard.
Step 2: Install the Evil Portal Module
Navigate to Modules & Packages > Modules (in menu on top of page)
Look for Evil Portal
Click Install
Once installed, you’ll see Evil Portal listed under ‘Installed’ tab in Modules.
Click the ‘thumbtack’ icon next to Evil Portal on the ‘Installed’ Modules tab to pin Evil Portal to your sidebar.
Step 3: Set Up a Fake WiFi Network
Before launching the attack, set up a fake Open Access Point (AP) to attract connections.
In the WiFi Pineapple menu, go to PineAP Suite (WiFi icon in menu)
Click Open AP
http://172.16.42.1:1471/#/PineAP/openEnter a fake SSID (e.g., "Free WiFi")
Make sure ‘Hidden’ mode is off, so the network is visible
Click Save
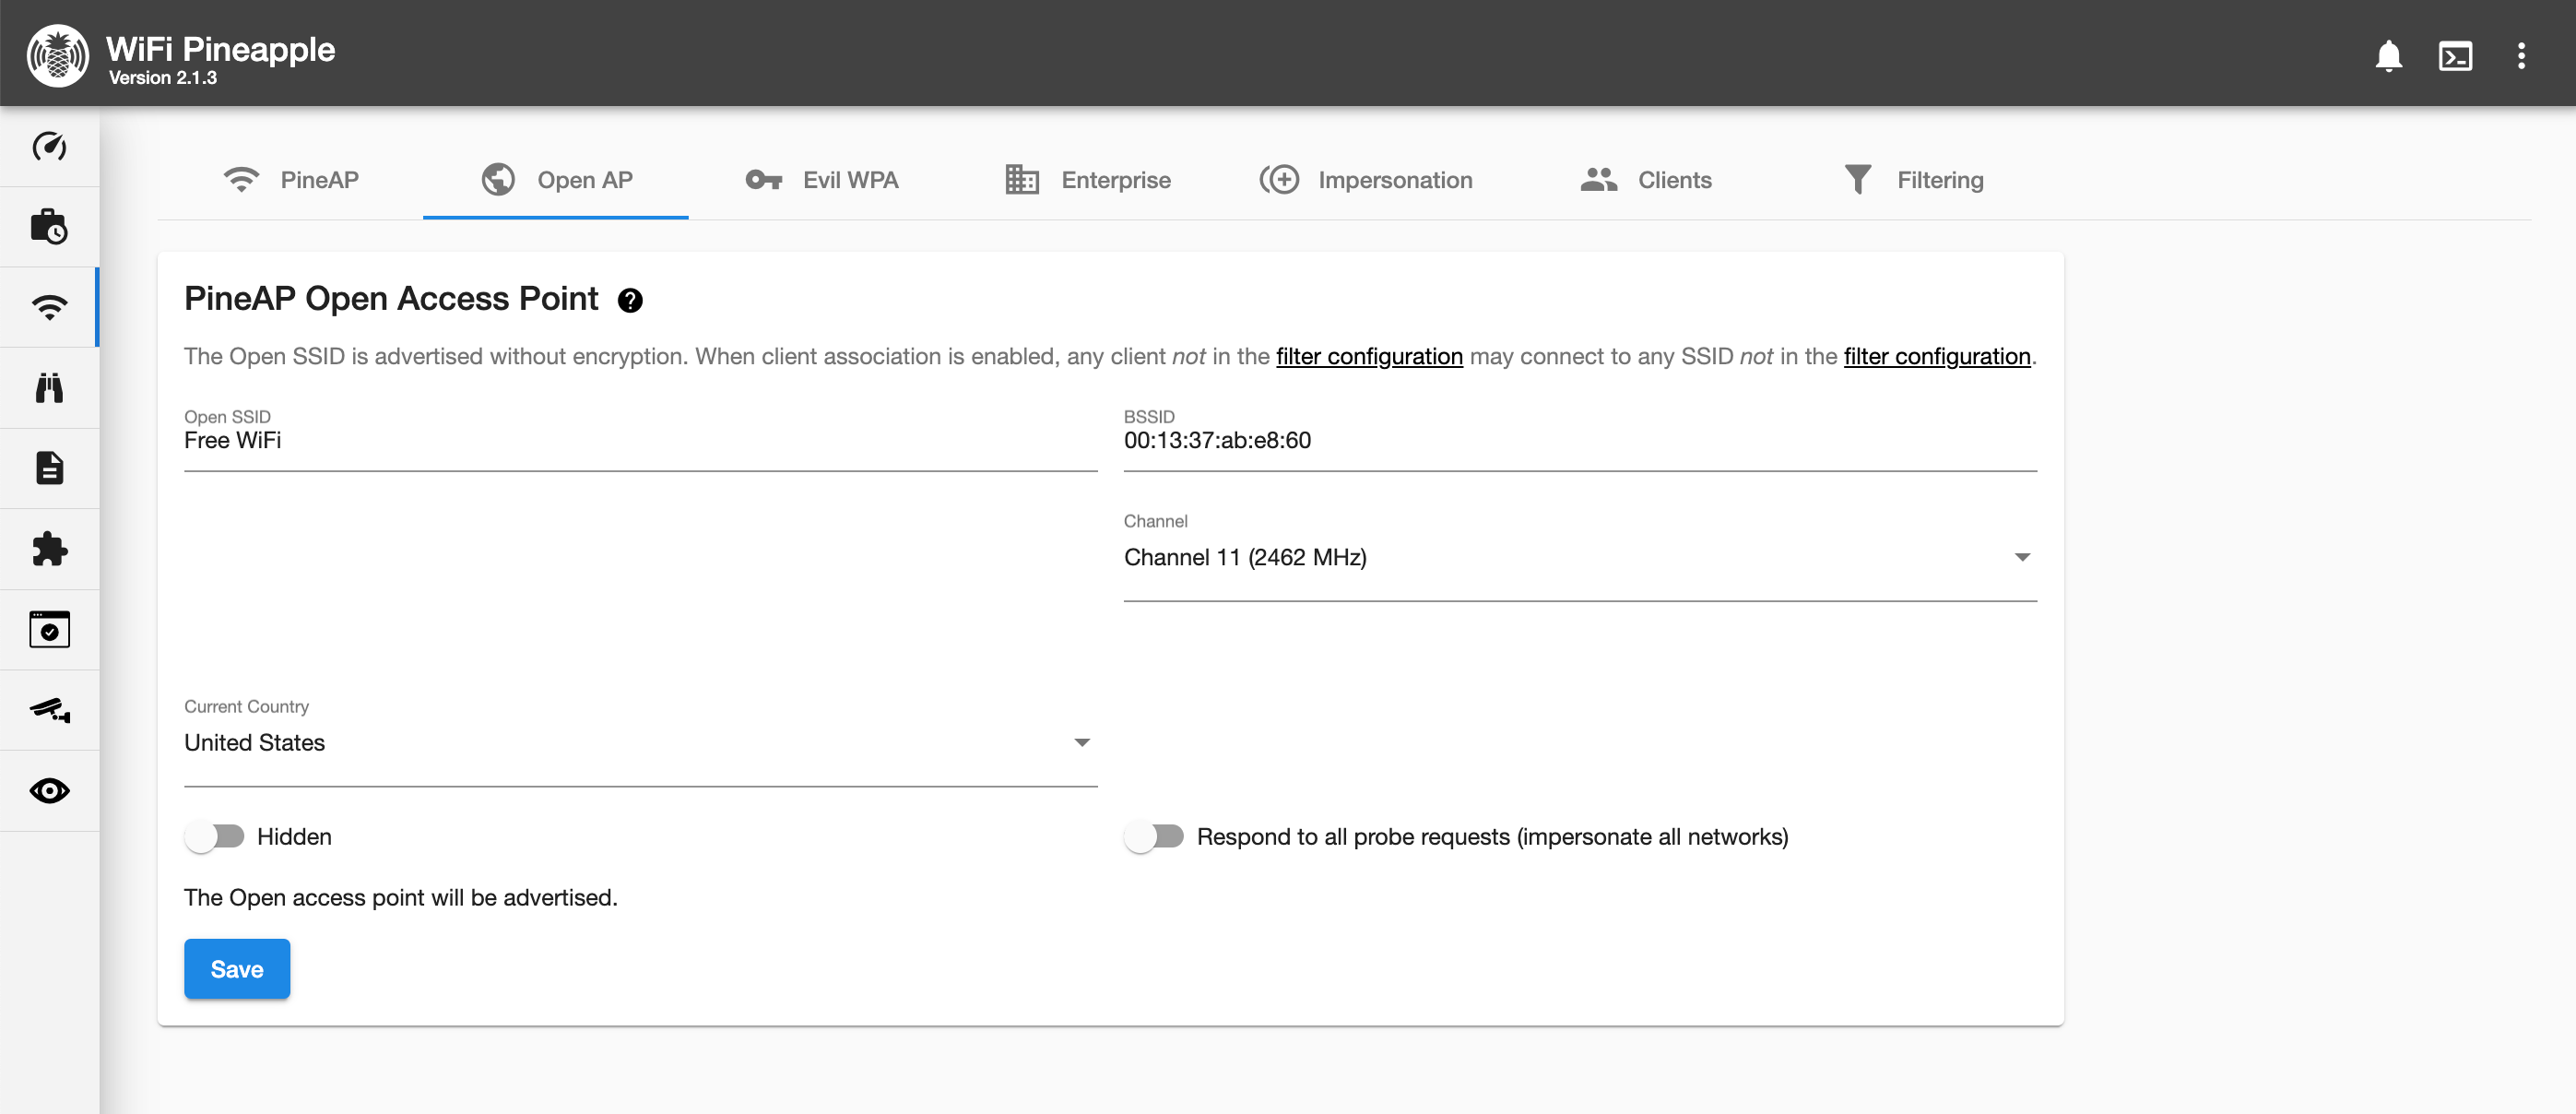
Nearby devices will now see and attempt to connect to your fake WiFi network.
Step 4: Install Evil Portal Template
In this step, we will download and install the Evil Portal template from GitHub directly onto the WiFi Pineapple.
Option 1: Manual Download
Visit
https://github.com/dark-marc/evil-portal-template/tree/mainClick the green button that says: ‘<> Code’
Click ‘Download Zip’
Extract the Zip file on your computer
Open a terminal window, navigate to the folder where you downloaded and extracted the GitHub files to. Enter
lsto find out what folder you’re in, andcd folder-nameto navigate to the folder.Use Secure Copy Protocol (SCP) to recursively copy the FreeWiFi folder from inside evil-portal-template to the Pineapple:
scp -r evil-portal-template/FreeWiFi root@172.16.42.1:/root/portals/Follow the prompts to allow access to your Pineapple.
Option 2: Use Terminal
Open a terminal window.
Navigate to the folder you want to download the file to.
Enter
git clone https://github.com/dark-marc/evil-portal-template.gitUse Secure Copy Protocol (SCP) to recursively copy the FreeWiFi folder from inside evil-portal-template to the Pineapple:
scp -r evil-portal-template/FreeWiFi root@172.16.42.1:/root/portals/Follow the prompts to allow access to your Pineapple.
To complete the installation, refresh the Evil Portal page at:http://172.16.42.1:1471/#/Modules/evilportal
You should now see the template installed!
Step 5: Activate Evil Portal
Go to the Evil Portal module page at:
http://172.16.42.1:1471/#/Modules/evilportalFind your
FreeWiFiportal in the list.If it is active, you will see a "Deactivate" button next to it.
If it is not active, click "Activate" to enable it.
Add Your IP to the Always Allowed Clients List
This ensures your device always has internet access, even when the portal is active.
Find Your Device’s IP Address Run the following command on your local computer to get your IP:
ifconfig | grep inetAdd Your IP to "Permanent Clients" in Evil Portal
Devices that successfully verify through your Evil Portal will automatically be added to the Allowed Clients list, giving them access to the internet.
Step 6: Capturing Credentials
Once Evil Portal is active:
Any user connecting to the fake WiFi will see the captive portal login page
When they enter credentials, their email and password will be logged
To view captured credentials:
Navigate to Evil Portal dashboard page
Locate your active portal in your Portal Library list.
Click ‘View Log’ next to your active portal.
Inside you will see the logged information.
WiFi Pineapple Troubleshooting
You may run into common issues when setting up or using your WiFi Pineapple.
Issues Connecting:
Problem: I am able to connect to the admin hotspot, but can’t connect to the C2 panel at http://172.16.42.1:1471
Solution: Follow these steps to troubleshoot
Disable VPN or Proxy (If Enabled) – First Step
VPNs or proxies can block local network connections, preventing access to
172.16.42.1.Go to System Settings > Network > VPN & Proxy and disable them.
Disconnect from any active VPN and try again.
Restart the WiFi Pineapple
Press the button on the back for 2-3 seconds to reboot.
Warning: Holding the button too long will factory reset the device, requiring a full setup and firmware update.
Restart Your Computer
A simple reboot clears network issues and refreshes your connection.
Check if the Pineapple is Reachable
Open Terminal and try:
ping 172.16.42.1If you receive responses, the Pineapple is online.
Check If Port 1471 Is Open
Run:
nmap -p 1471 172.16.42.1If port 1471 is open, the web interface is running.
Try Connecting via SSH
If the web UI isn’t loading, see if SSH works:
ssh root@172.16.42.1If SSH works but the browser doesn’t, the web server may need a restart.
Restart the Web UI Manually
If SSH works, restart the web service:
/etc/init.d/lighttpd restartThen retry
http://172.16.42.1:1471Clear Browser Cache and Try Incognito Mode
Some browsers cache failed attempts. Try:
Chrome:
Cmd + Shift + NFirefox:
Cmd + Shift + P
Then enter
http://172.16.42.1:1471
Manually Add a Route (If Needed)
If your Mac isn’t routing traffic correctly, add a static route:
sudo route -n add 172.16.42.1/24 172.16.42.1Note: This is temporary and will be cleared when:
You restart your computer.
You disable and re-enable Wi-Fi.
You manually remove it with:
sudo route -n delete 172.16.42.1/24Disable your Firewall Temporarily
The firewall may be blocking access. Try:
sudo pfctl -dIf the issue is resolved, re-enable it after testing:
sudo pfctl -eTest Another Browser or Device
If your phone can access the Pineapple but your Mac can’t, the issue is with your computer settings.
Factory Reset as a Last Resort
If nothing works, reset the Pineapple by holding the button for 10+ seconds, then set it up again.
Following these steps should resolve most connection issues with the WiFi Pineapple.
Amazing article Marc. I want to try this so bad! :) Or maybe get as close as I can with a rasp pi.
Love this! Something I’ve wanted to check out for a while.