
Recon-ng: A Powerful Reconnaissance Tool for Hackers (Red Team, Pentesters)

The first phase of a cyber attack is reconnaissance, where attackers gather critical information about their targets to identify potential vulnerabilities and weaknesses.
Recon-ng is a powerful tool designed to simplify the various forms of reconnaissance. It enables penetration testers to efficiently collect and analyze data from numerous online sources, providing a comprehensive view of the target.

With a modular design, Recon-ng allows for tailored information-gathering processes, making it easier to focus on specific data types and needs.
This guide will walk you through the installation of Recon-ng, demonstrate how to use the tool effectively, and explore its key features that can significantly enhance your penetration testing and security research efforts.
By utilizing Recon-ng, you can streamline your reconnaissance phase, uncover valuable insights, and bolster your overall security strategy.
What is Recon-ng?
According to the official GitHub page, Recon-ng is:
“…a full-featured reconnaissance framework designed with the goal of providing a powerful environment to conduct open source web-based reconnaissance quickly and thoroughly.
Recon-ng has a look and feel similar to the Metasploit Framework, reducing the learning curve for leveraging the framework.
However, it is quite different. Recon-ng is not intended to compete with existing frameworks, as it is designed exclusively for web-based open source reconnaissance. If you want to exploit, use the Metasploit Framework.”
Source: https://github.com/lanmaster53/recon-ng
How to Use Recon-ng:
To effectively use Recon-ng, you’ll need to know its key functionalities and workflow for gathering open-source intelligence. In this guide, we'll follow this basic workflow:
Create a new workspace for your target
Add seed data (domains) to the database
Install required modules from the marketplace
Run reconnaissance modules to gather data
Chain modules together to expand findings
Export results for analysis or reporting
This represents a typical reconnaissance workflow that can be expanded with additional modules, API integrations, and advanced techniques as needed.
In the following steps, we'll explore these features sequentially to set up a project, download modules, and execute them.
Guide Explanation
In this guide, you will learn how to install and use recon-ng, and you will use two reconnaissance modules:
DNS Hostname Brute Forcer (
brute_hosts) - performs DNS brute force attacks against a target domain to discover subdomains and hosts that may not be publicly linked or easily discoverable through traditional web crawling methods.DNS Host Resolver (
resolve) - takes the discovered hosts and performs comprehensive DNS lookups to resolve hostnames to IP addresses, follow CNAME redirects, and uncover additional infrastructure details.
Step 1: Install and Run Recon-ng
Recon-ng is preinstalled on Kali Linux, making it easily accessible if you use that distribution. For those without Kali Linux, you can install Recon-ng by following the detailed installation instructions on GitHub.
If you prefer using Kali Linux but do not want to install it directly on your system, setting up a Kali virtual machine is an excellent alternative. You can find a detailed guide on that process here: How to Set Up Virtual Machines for Cybersecurity Labs.
After installing Recon-ng, you can launch it by opening your terminal and typing the following command:
recon-ngOnce the program starts, view all available commands and options by entering:
helpStep 2: Create a workspace
Workspaces are used for organizing your projects within Recon-ng.
Each workspace can have its own unique settings, and data. This allows for better management of different reconnaissance efforts.
Each workspace operates with a separate SQLite database, meaning that the data for different workspaces does not overlap. This structure ensures that activities and findings within one project do not interfere with others, providing a clean and organized environment for each project.
Create a workspace using the command below, replacing the workspace name 'LAB' with your workspace name of choice.
workspace create LABYou can view all workspaces by typing:
workspaces list
Understanding the SQLite Database
Recon-ng uses a SQLite database to store all reconnaissance data (e.g., domains, hosts, emails) within each workspace. This database serves as a central repository, allowing data to be queried, updated, and reused across modules.
View the database schema by typing:
db schema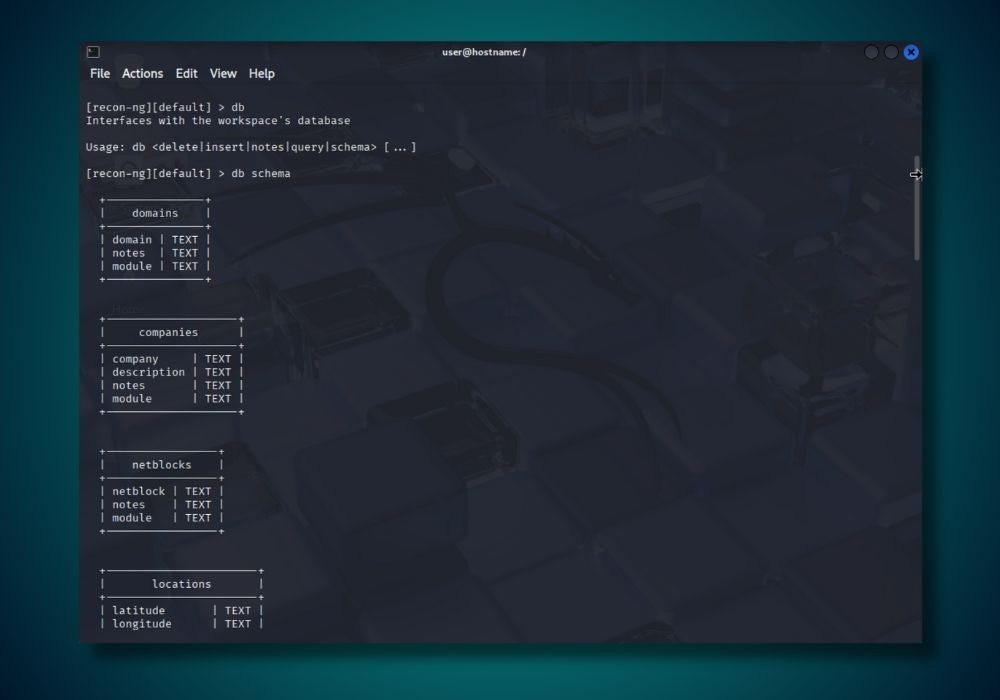
The database includes the following tables:
domains: Domain names and related metadata - Stores information about domain names, including notes and the source tool or module used to gather the data, useful for tracking domains in investigations.
companies: Company details - Contains information about organizations, such as their names and descriptions, to link businesses to investigations or threat intelligence.
netblocks: IP address ranges - Holds data on IP netblocks (ranges), including ownership or usage notes, for network analysis and attribution.
locations: Geolocation data - Stores geographic coordinates and addresses to map physical or virtual locations tied to entities or infrastructure.
vulnerabilities: System vulnerabilities - Tracks known vulnerabilities on hosts, including references and status, for security assessments and threat analysis.
ports: Open ports on systems - Contains details about open ports and services running on IPs or hosts, useful for network reconnaissance.
hosts: Host and IP information - Stores data about servers or devices, including geolocation, to map infrastructure in investigations.
contacts: Individual contact details - Holds information about people, such as names and contact info, for linking individuals to organizations or incidents.
credentials: User credentials - Stores usernames, passwords, or hashes from breaches or leaks, aiding in credential-stuffing investigations.
leaks: Data breach information - Contains details about data leaks, including sources, targets, and impact, for tracking breach intelligence.
pushpins: Geolocated social media or online activity - Stores data from posts or profiles with location data, useful for OSINT and social media analysis.
profiles: Online user profiles - Holds data about user accounts on platforms or resources, aiding in tracking online identities.
repositories: Code repositories - Stores information about software repositories, including ownership and purpose, for analyzing code or developer activity.
Step 3: Choose a Starting Point
You start by adding domains or other seed data to the database. Modules then perform actions on this data, transforming or expanding it (e.g., finding subdomains or resolving IPs).
You start by adding domains or other seed data to the database. Modules then perform actions on this data, transforming or expanding it (e.g., finding subdomains or resolving IPs).
For this guide, we'll add a domain to the SQL database in the domains table, which you can see reflected in the database schema from the previous step. You could also start from other data points, such as companies, contacts, hosts, or credentials.
To add a domain, use the commands:
db insert domainsThen type your domain. The notes field is optional.
You can check to see if the domain was added by typing:
db query SELECT * FROM domains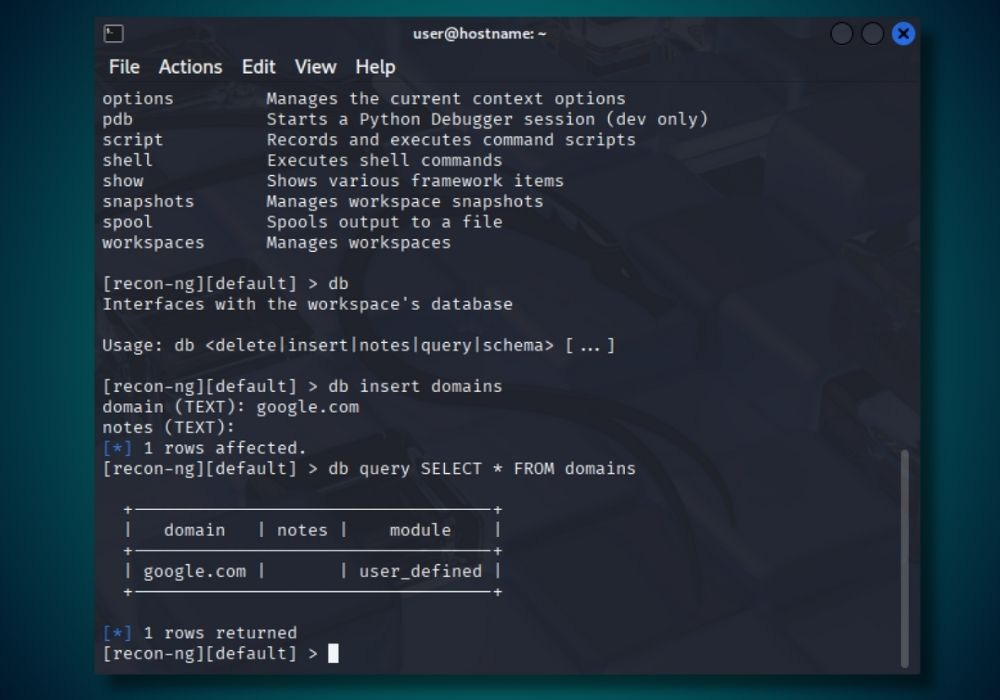
Step 4: Install Modules
The framework employs a variety of modules (plugins that execute specific reconnaissance tasks such as passive enumeration, active scanning) accessed via the marketplace or pre-installed options.
Now that you've set up your workspace and added a domain, it's time to install modules—specialized tools that perform reconnaissance tasks. Recon-ng allows you to install modules one at a time or all at once, depending on your needs.
What to Search For:
Modules are organized by the type of data they work with or produce. For example, search for “domains” to find modules that operate on domain data (e.g., finding subdomains), or “hosts” for modules that work with host information (e.g., port scanning). The library is categorized into groups like recon/, discovery/, and reporting/, reflecting their purpose.
How It's Organized:
Recon-ng's module system operates differently from traditional file structures. Instead of physical folders on your filesystem, modules exist as a dynamic collection managed through Recon-ng's integrated marketplace. This design allows for easy discovery, installation, and updates of reconnaissance tools.
Each module follows a standardized naming pattern that immediately tells you its purpose. The URL below can be broken down into distinct parts that convey this information:
recon/domains-hosts/brute_hostsrecon indicates the module category (reconnaissance)
domains-hosts specifies the input-output relationship (takes domains as input, produces hosts as output)
brute_hosts describes the specific function (brute force host discovery)
This naming convention makes it easy to understand what data a module requires and what it will produce.
Module Categories:
Modules are organized into logical categories based on their data sources and targets:
Domain-based modules (recon/domains-*)
Work with domain names as input
Examples: DNS enumeration, subdomain discovery, domain reputation checks
Company-based modules (recon/companies-*)
Use company information as starting points
Examples: Employee enumeration, company profile gathering
Contact-based modules (recon/contacts-*)
Process contact information and email addresses
Examples: Email validation, social media profile discovery
Host-based modules (recon/hosts-*)
Analyze specific hosts and IP addresses
Examples: Port scanning, service enumeration, geolocation
Network-based modules (recon/netblocks-*)
Target network ranges and subnets
Examples: Network enumeration, IP range analysis
Each module contains detailed information about its purpose, configuration options, and requirements. This information helps you understand what the module does and how to configure it before installation.
Accessing Module Details
Before installing any module, you can examine its configuration and requirements. Here's how to get detailed information about a module:
[recon-ng][LAB] > modules load recon/domains-hosts/brute_hosts[recon-ng][LAB][brute_hosts] > infoThis displays comprehensive module information:
Name: DNS Hostname Brute Forcer
    Author: Tim Tomes (@lanmaster53)
   Version: 1.0

Description:
  Brute forces host names using DNS. Updates the 'hosts' table with the results.

Options:
  Name      Current Value                            Required  Description
  --------  -------------                            --------  -----------
  SOURCE    default                                  yes       source of input (see 'info' for details)
  WORDLIST  /home/user/.recon-ng/data/hostnames.txt  yes       path to hostname wordlist

Source Options:
  default        SELECT DISTINCT domain FROM domains WHERE domain IS NOT NULL
  <string>       string representing a single input
  <path>         path to a file containing a list of inputs
  query <sql>    database query returning one column of inputs
Installing Modules
The marketplace system provides powerful search capabilities to find the right modules for your reconnaissance needs. Start by searching for modules that match your specific requirements.
Search by keyword (marketplace search «keyword») for example:
marketplace search domainsThis command returns all modules related to domain reconnaissance, displaying results like:
recon/domains-hosts/bing_domain_webrecon/domains-hosts/certificate_transparencyrecon/domains-vulnerabilities/ghdb
Each result shows the module path, which you'll use for installation and configuration.
Get detailed module information (marketplace info «path»), for example:
marketplace info recon/domains-vulnerabilities/ghdb
This command reveals details about the module, including:
Module description and functionality
Required configuration options
Dependencies (such as API keys)
Author information and version
View all available modules:
To view information about every module in the marketplace, use the command:
marketplace info allOption A: Install One Module
Install specific modules that match your reconnaissance objectives, for example can install the ‘DNS Hostname Brute Forcer’ module with the command:
marketplace install recon/domains-hosts/brute_hostsThis downloads and enables the module for use in your workspace.
This targeted approach offers several benefits:
Cleaner workspace - Only relevant tools are available
Faster loading - Fewer modules to initialize
Clear dependencies - You know exactly what each module requires
Easier troubleshooting - Problems are easier to isolate
If you only want to install one module, install the brute_hosts module as shown above. We'll use it in the next section to demonstrate module configuration and execution.
Option B: Install All Modules
To install every available module, use:
marketplace install allImportant considerations:
Many modules require API keys or external dependencies
Some modules may be irrelevant to your specific reconnaissance needs
Troubleshooting becomes more complex with numerous installed modules
Initial setup takes longer due to dependency checking
This approach is best suited for comprehensive reconnaissance environments or when exploring Recon-ng's full capabilities.
Step 5: Run a Module
Now that you've installed modules, it's time to load and execute them to gather reconnaissance data. This step demonstrates how to configure and run a module using the domain data you added to your workspace.
Loading a Module
To load a module, use the modules load command followed by the module path. For example, to load the brute_hosts module:
modules load recon/domains-hosts/brute_hostsYou can load any installed module using this same pattern. Once loaded, your prompt will change to indicate the active module:
[recon-ng][LAB][brute_hosts] >This prompt change confirms you're now working within the context of the loaded module.
Configuring Module Options
Before running a module, you may need to configure its options.
View current configuration:
options list
Get comprehensive module information:
info
The info command displays complete module details including:
Required settings (marked with asterisks)
Optional parameters
Current values
Default values
Setting Options
To set an option value, use:
options set <option_name> <value>For example, with the brute_hosts module, you might configure the source:
options set SOURCE defaultThe SOURCE option typically defaults to "default", which uses all domains from your workspace's domains table. Different modules will have different options and values. Always check the module's info output to understand available settings.
Running the Module
Execute the module with:
runUsing the brute_hosts module as an example, it will:
Load your domain list from the workspace database
Apply brute force techniques using its built-in hostname wordlist (
/home/user/.recon-ng/data/hostnames.txt)Perform DNS queries to discover valid subdomains and hosts
Test common subdomain patterns (www, mail, ftp, admin, dev, staging, etc.)
Validate discovered hosts through DNS resolution
Store results directly in the hosts table with IP addresses when available
Different modules will perform different actions based on their purpose. During execution, you'll typically see real-time progress and a summary of results upon completion.
When you execute the run command, you'll see the results streaming in as the module discovers new hosts. The output shows each successful discovery in real-time, including the hostname found and its resolved IP address.

When the command completes, you'll see a summary of the findings displayed in the terminal. This summary provides key statistics about the reconnaissance session, including the total number of data points discovered.

You can view the stored results in the hosts table using the command:
show hosts
The data from this module can now input into other modules, forming a reconnaissance chain. For example, host data found through domain enumeration can aid port scanning modules in identifying open services or vulnerability assessment modules in checking for security flaws.
You can load more modules and repeat this process to create a complete intelligence profile of your target. Each module enhances the data from preceding ones, detailing your target's infrastructure. Additionally, you can export the results in various formats, which will be covered next.
Step 6: Take Action on Results
After running modules and collecting reconnaissance data, you have two primary options for utilizing your results: chaining modules together or exporting data for external analysis.
Option A: Chain Modules Together
Data output from one module can serve as input for another, enabling a chain of reconnaissance actions to build a comprehensive target profile.
Understanding Data Flow
Recon-ng's database design lets modules access and modify different tables.
domains → hosts (domain enumeration modules)
hosts → ports (port scanning modules)
hosts → vulnerabilities (vulnerability assessment modules)
domains → contacts (contact discovery modules)
contacts → profiles (social media enumeration modules)
Loading Additional Modules
To continue the chain, load and run additional modules:
We'll load a module that will perform DNS resolution on our discovered hosts. The recon/hosts-hosts/resolve module takes hostnames from the hosts table and performs comprehensive DNS lookups to:
Convert hostnames to IP addresses (A records)
Follow CNAME redirects to discover canonical names
Identify DNS aliases and alternative hostnames
Reveal infrastructure details like CDN endpoints, load balancers, and mail servers
This process often uncovers additional hosts that weren't found during initial subdomain enumeration, as DNS resolution can reveal:
CDN redirects (
www.site.com→site.cdn.cloudflare.com)Mail services (
mail.company.com→company.mail.protection.outlook.com)Load balancers (
api.site.com→lb-1234.amazonaws.com)Cloud infrastructure hostnames
Example DNS resolution chain:
# Load the DNS resolution module
modules load recon/hosts-hosts/resolve

# Configure to use all hosts from database
options set SOURCE default

# Run the module to perform DNS resolution
run

# Check results - new hosts may have been discovered
show hosts
This is just one example of module chaining. You can explore other modules using modules search to find modules that work with your data types. Each module will automatically use relevant data from the database as input.
Option B: Export Data for External Analysis
You can export results to various formats for further analysis, reporting, or integration with other tools.
Available Export Formats
Recon-ng supports multiple export formats:
HTML reports - Formatted web-based reports
CSV files - Spreadsheet-compatible data
JSON - Machine-readable structured data
XML - Structured markup format
Using Reporting Modules
Load reporting modules to export your data. Available reporting options include:
reporting/csv
reporting/html
reporting/json
reporting/list
reporting/proxifier
reporting/pushpin
reporting/xlsx
reporting/xml
Use command modules search reporting to see all available reporting modules.
File Location
When exporting data in Recon-ng, you have two options for specifying a filename:
Filename Only: Simply entering
filename.htmlwill save the file in the current workspace folder within recon-ng’s filesystem. For example: /home/user/.recon-ng/workspaces/LABAbsolute Paths: Employing a full path like
/home/user/reports/filename.htmlallows saving files in any location on your system where you have write permissions.
It can be helpful to create a dedicated directory for reconnaissance reports before beginning a session. It’s advised to navigate to that directory prior to launching Recon-ng to maintain organization.
Export Commands
Here are examples of common export formats:
Export to HTML:
modules load reporting/html
options set FILENAME /path/to/report.html
run
Export to CSV:
modules load reporting/csv
options set FILENAME /path/to/data.csv
run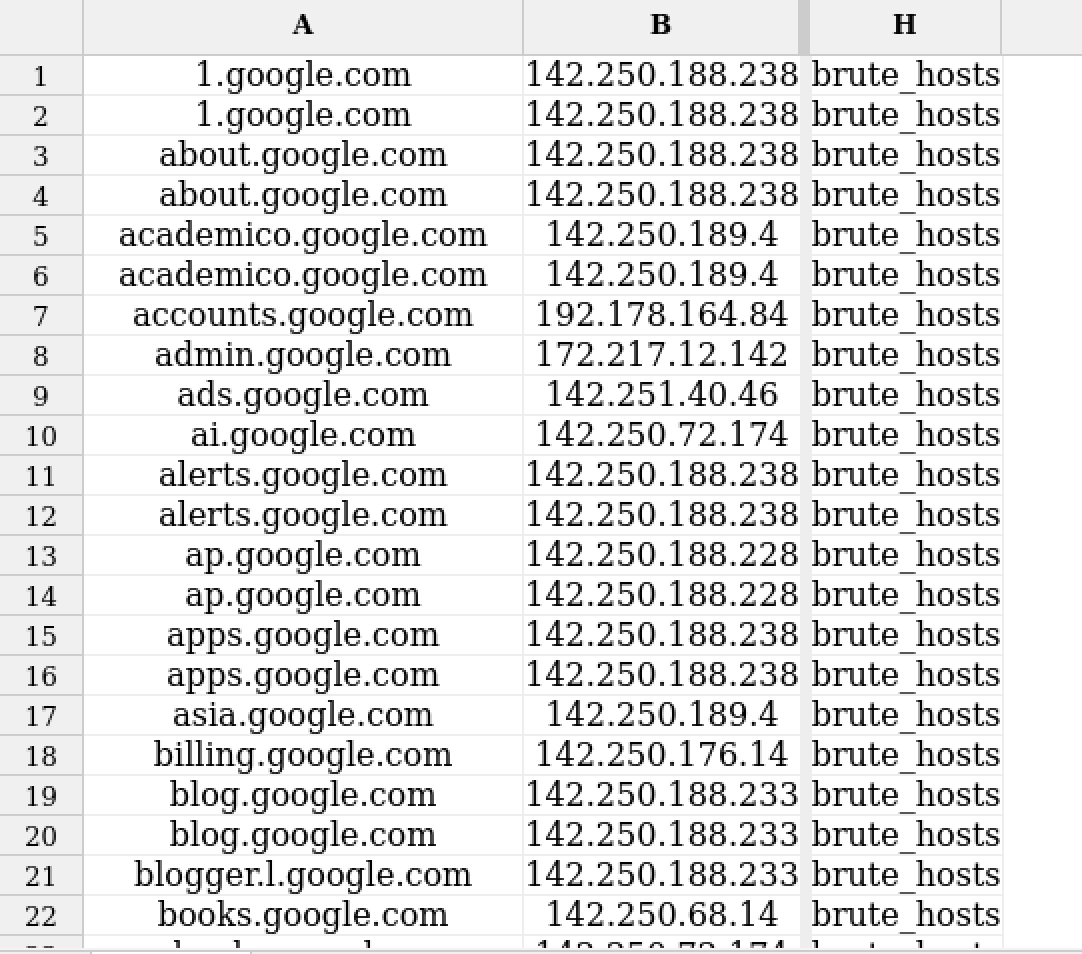
Recon-ng: a Great Tool to Have in Your Kit.
In this guide, you examined the practical applications of Recon-ng within the reconnaissance phase of cybersecurity.
Key functionalities explored included systematic data gathering, efficient workspace configuration, the input of seed data, and the installation of modular reconnaissance tools.
Recon-ng enhances your reconnaissance operations by facilitating streamlined data management and enabling the integration of specialized modules for targeted intelligence gathering.
Mastery of this tool allows for more precise analysis and effective identification of potential vulnerabilities, thereby strengthening your overall security posture.