
The Complete Guide to Enumeration (Ethical Hacking)

Scanning in ethical hacking begins with identifying live hosts and open ports, then continues with enumeration, which collects detailed information about those systems, such as user accounts, shared resources, and service configurations.
This guide builds on our previous network scanning guide, where we identified live hosts, open ports, running services, and operating systems using tools like Nmap, Wireshark, and specialized scanners.
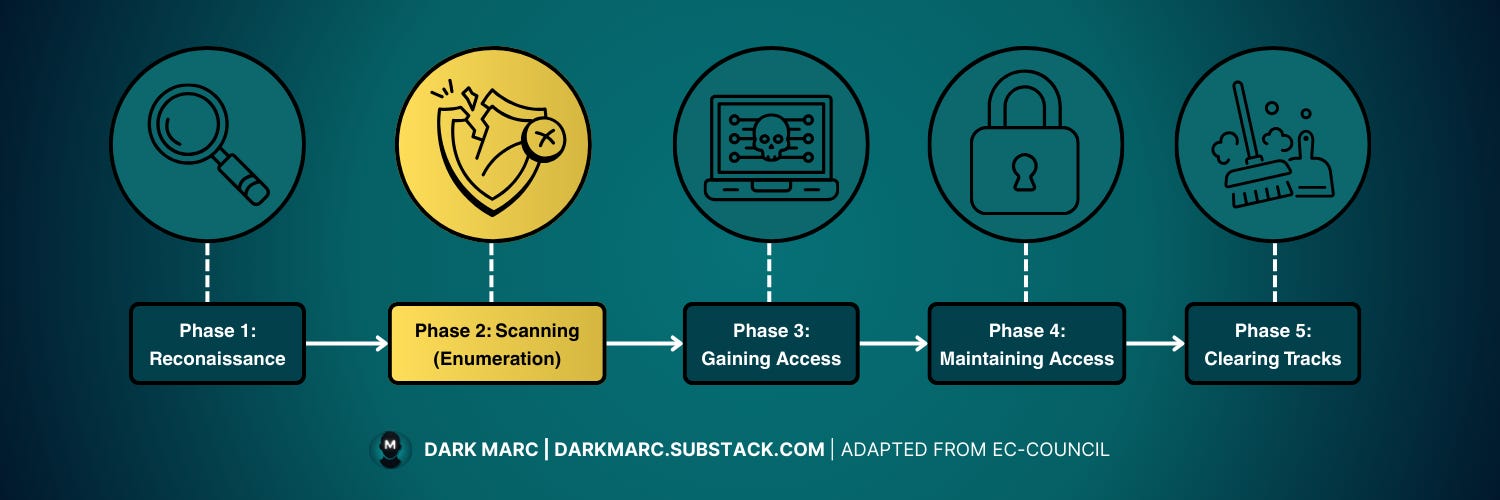
Phase 2: Scanning - Three Step Process
Phase 2: Scanning is made up of three steps that work together:
Network Scanning - We discover live hosts, open ports, and running services using tools like Nmap. This gives us a broad view of what's available on the network.
» Enumeration (current step) - We go beyond basic discovery by establishing active connections with target systems. We perform directed queries to extract detailed information like user accounts, network shares, and service configurations.
Vulnerability Scanning - We identify specific security weaknesses in the services we've discovered and enumerated, preparing us for the actual exploitation phase.
Previous Step: Network Scanning
If you haven't read about network scanning yet, check it out here:

In this guide, you will learn:
The role and objectives of enumeration in ethical hacking
Practical methods and tools for extracting detailed system information
How enumeration works for commonly used protocols.
This guide gives you the knowledge and techniques to perform enumeration responsibly while adhering to ethical hacking principles.
What is Enumeration?
Enumeration is the process of actively extracting detailed information from target systems identified during the initial scanning phase.
While initial scanning focuses on discovering live hosts, open ports, and running services, enumeration digs deeper to gather specific data like:
Network resources and network shares
Routing tables and system configurations
Audit and service settings, SNMP and FQDN details
Machine names, users and groups, and applications and banners
Think of the first scanning step as locating all the doors in a building. Enumeration is like testing each door to see which ones are open and what's behind them before making entry.
Example: After discovering an open SMB port (445) during scanning, enumeration involves querying the system to list shared folders or enumerate user accounts.
These two steps together provide a comprehensive view of your target's attack surface, helping you make the best decision when it's time to enter.
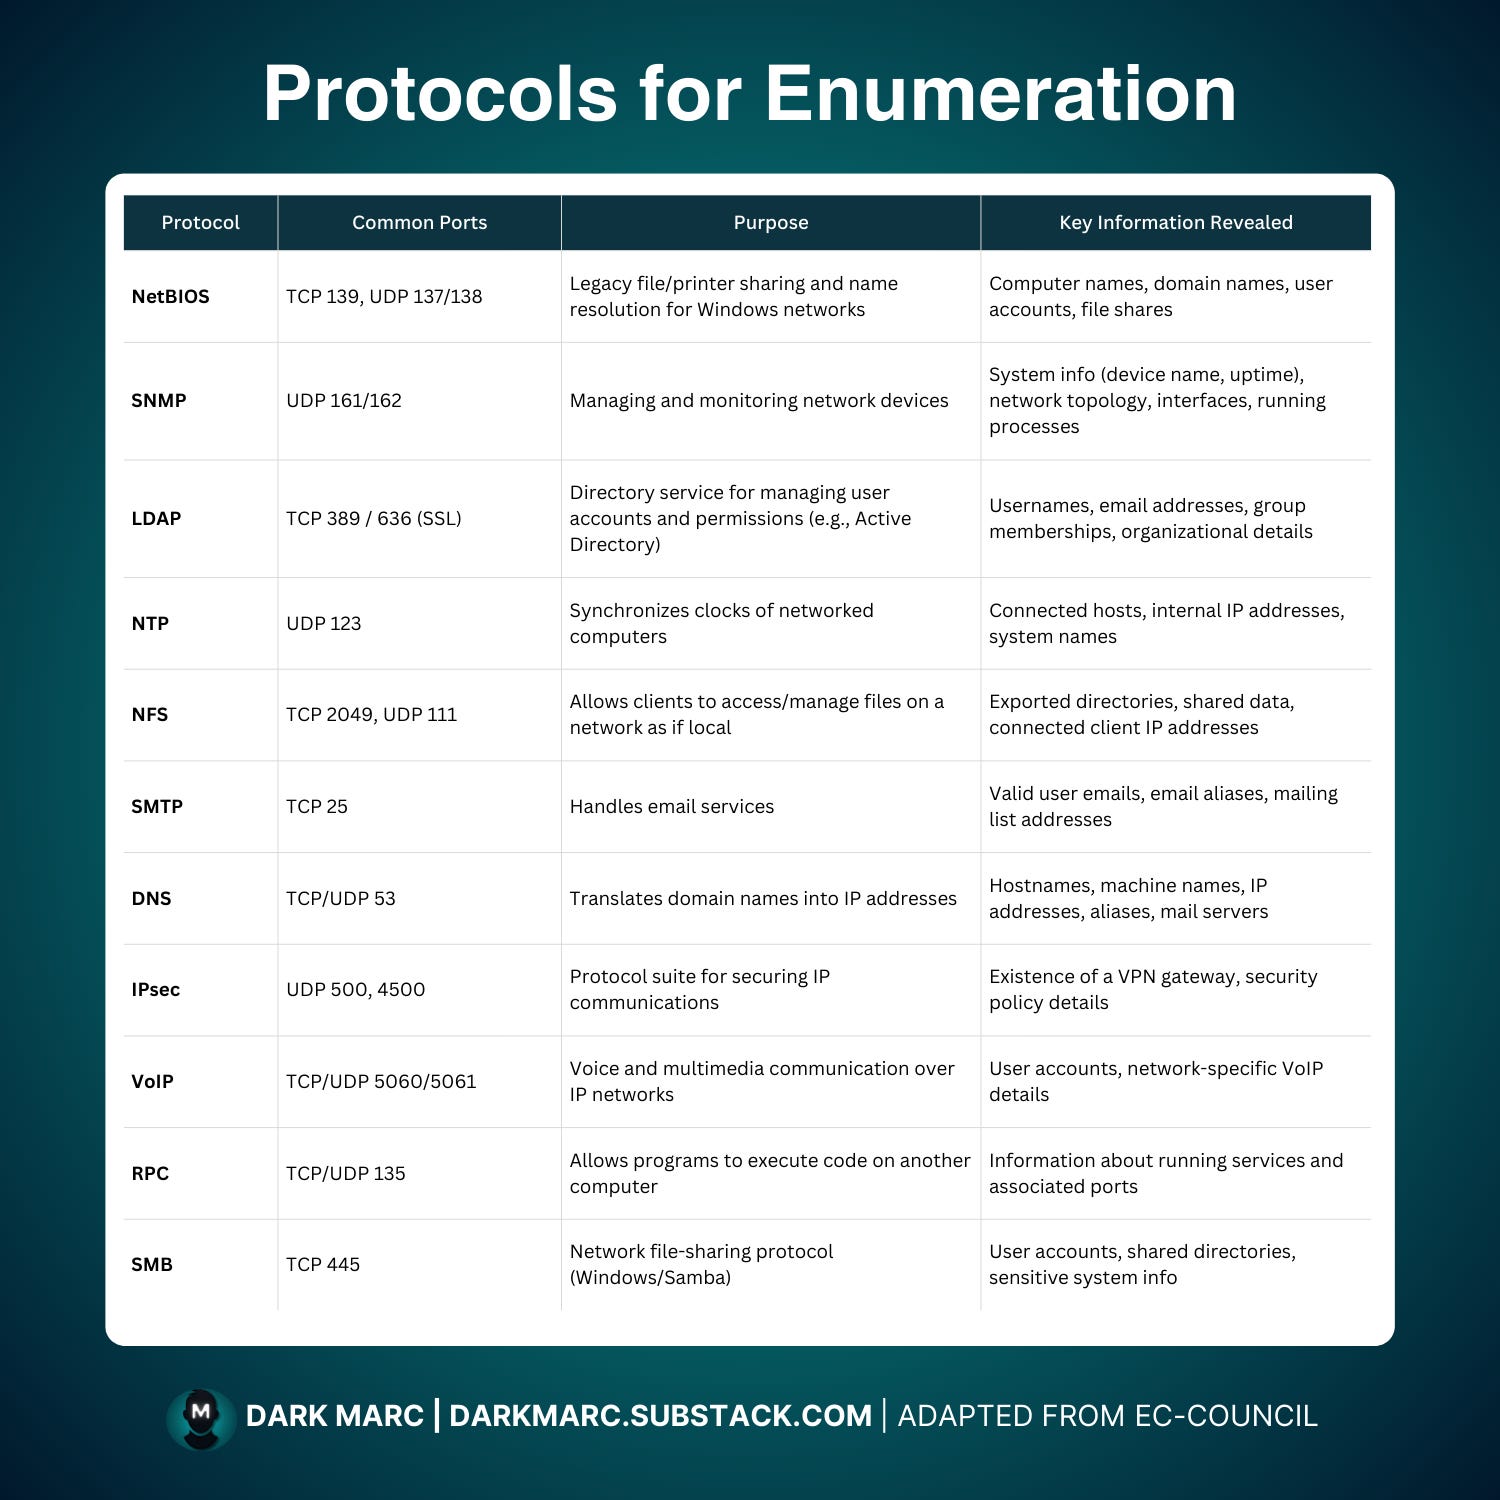
Protocols for Enumeration
A protocol is a set of rules for how systems communicate. Each has a role such as file sharing, email, or name resolution, and during enumeration they can expose details about users, hosts, and services.
Enumeration happens inside a target network, so you need to be connected to it. After mapping entry points, you test protocols to see what information they reveal.
This guide covers the following protocols for enumeration: NetBIOS, SNMP, LDAP, NTP, NFS, SMTP, DNS, IPsec, VoIP, RPC, and SMB.
Important Note: This guide covers commonly encountered protocols during enumeration, but it is not an exhaustive list of all possible protocols and services you may encounter in real-world environments.
You might be thinking: "This is boring! Why do I need to learn about all these protocols?" Well, if you want to be a hacker, knowing these things is part of the job.
Protocols are like languages that computers use to talk to each other. If you understand the language, you can listen in, ask questions, and sometimes even trick the system into giving you more than it should.

You didn't think it would be all about wearing masks and furiously typing green text in terminal windows, did you? Don't worry. Take it one step at a time, and before you know it, you'll master these concepts.
With that said, let’s get to it.
NetBIOS Enumeration (Port 139)
NetBIOS (Network Basic Input/Output System) is a legacy networking protocol used primarily in older Windows systems.
It allows Windows systems to share files, folders, and printers across a local area network. Although Microsoft is phasing it out, you'll still find it in legacy environments for compatibility.
NetBIOS in the Real World:
WannaCry, a malicious ransomware cryptoworm, launched a global cyberattack in May 2017. It targeted computers running outdated and unpatched versions of Microsoft Windows. WannaCry encrypted victims' files and demanded ransom payments in Bitcoin for decryption keys.
WannaCry used NetBIOS to scan for and spread to other vulnerable computers on networks. It exploited a vulnerability in the Server Message Block (SMB) protocol, which operates over NetBIOS, to propagate like a worm.
With NetBIOS, you can find:
Lists of computers that belong to a domain
File shares on individual network hosts
Policies and passwords
NetBIOS responses consist of a 16-byte ASCII string that identifies devices or services. The name portion takes up to 15 bytes, while the final byte is reserved for the NetBIOS code, which tells you the service type.
NetBIOS Codes (Suffixes):
A NetBIOS suffix is the 16th byte of a NetBIOS name. Microsoft networking software uses this suffix to identify the type of service running on a device. The suffixes appear in hexadecimal format because many are unprintable characters.
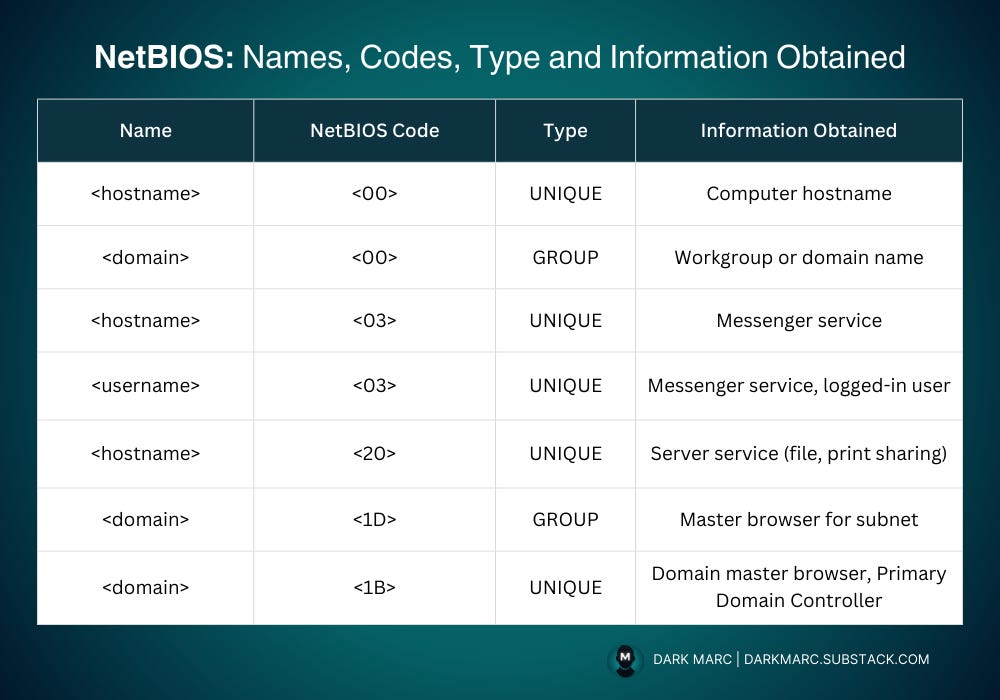
A single computer can have multiple NetBIOS names registered, each with the same machine name but different suffixes. These different suffixes uniquely identify the various functions or services available on that host.
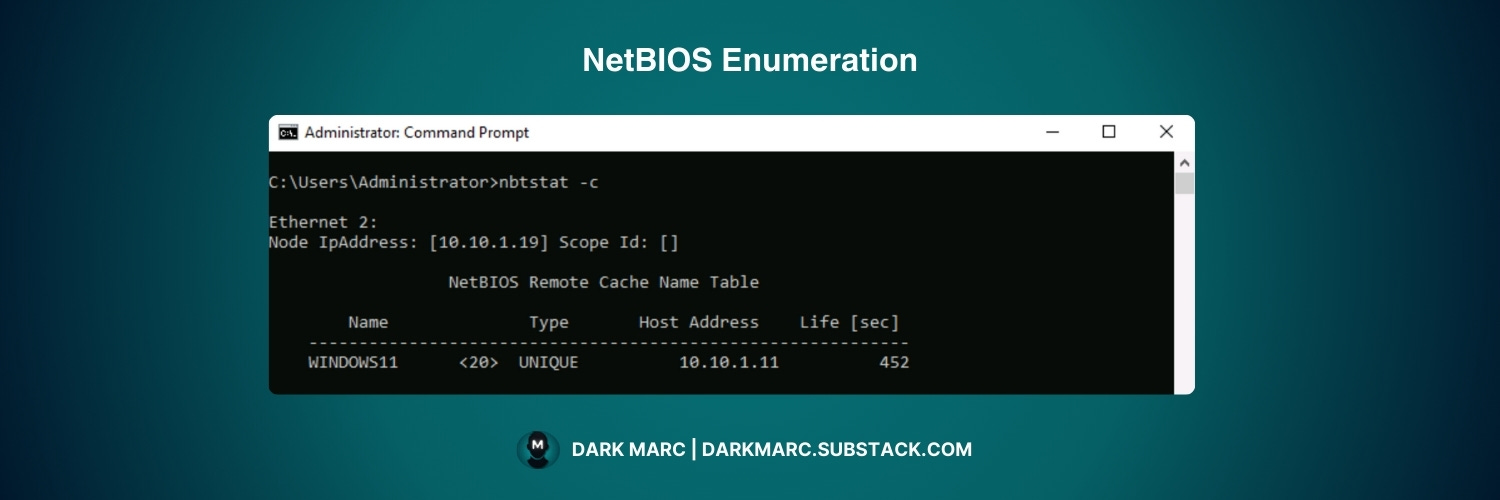
Example: NetBIOS Enumeration
Running the nbtstat command with the -a parameter is used to query a remote computer’s NetBIOS Name Service to retrieve its local name table, listing registered names and suffixes.
The table, stored in memory on each NetBIOS-enabled device, is dynamically generated and sent in response. For example, if a machine with NetBIOS is located at internal IP 192.168.1.10, running this command:
nbtstat -a 192.168.1.10Will return a result like:
NetBIOS Remote Machine Name Table

Name               Type         Status
---------------------------------------------
PC1            <00>  UNIQUE      Registered
PC1            <03>  UNIQUE      Registered
PC1            <20>  UNIQUE      Registered
MYDOMAIN       <00>  GROUP       Registered
MYDOMAIN       <1C>  GROUP       Registered
Explanation of the Response
The response shows NetBIOS name registrations that function like a phone book for network services. The codes with "PC1" represent individual computer services - <00> is the basic computer name, <03> enables network messaging, and <20> indicates file/print sharing is active.
The "MYDOMAIN" entries with <00> and <1C> codes show the computer belongs to a workgroup or domain called "MYDOMAIN" and can locate domain controllers. All services show "Registered" status, meaning they're properly functioning and available to other network computers.
NetBIOS Enumeration Tools:
NetBIOS Enumerator
Nmap
Global Network Inventory
Advanced IP Scanner
Hyena
NetBIOS Enumeration Lab Exercise:
Ready to try NetBIOS enumeration? Try this lab exercise:

SNMP Enumeration
SNMP stands for Simple Network Management Protocol. It's a network protocol that allows network administrators to monitor and manage network devices.

SNMP-enabled devices automatically send information about their status, performance, and configuration to management systems. It can detect crashes, hardware failures, and other network events.
How SNMP Works
SNMP operates using a straightforward client-server model with three core components that work in coordination:
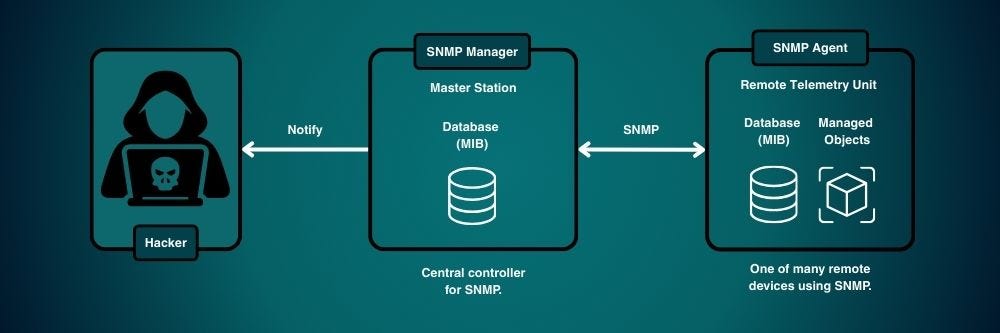
SNMP Manager - This is the monitoring system that actively requests information from network devices. It sends queries to devices across the network and processes the responses to provide administrators with visibility into network status and performance.
SNMP Agent - Software running on each network device that responds to requests from the SNMP Manager. The agent maintains local device information and can send this data when queried or automatically notify the manager of critical events.
MIB (Management Information Base) - A structured database that organizes all manageable information in a hierarchical tree format, similar to a file system directory structure. The MIB standardizes what information is available and how it's accessed.
These components work together through a standardized addressing system where each piece of information has a unique Object Identifier (OID) expressed as dot-separated numbers.
When the SNMP Manager needs specific information, it sends a request using the appropriate OID to the target device's SNMP Agent. The agent then looks up that OID in its local MIB implementation and returns the corresponding data.
For example: When querying System Description (OID 1.3.6.1.2.1.1.1), a Linux server responds with "Ubuntu 20.04" while a Cisco router returns "Cisco IOS Version 15.1". System Name queries (1.3.6.1.2.1.1.5) might return hostnames like "WEBSERVER01" or "ROUTER-MAIN", and network interface information (1.3.6.1.2.1.2.1) provides details about each device's actual hardware interfaces.
With SNMP, you can find:
System Information: Device names, descriptions, uptime, location
Network Devices: Hosts, routers, switches, printers, servers
Network Resources: Devices and shares
Network Information: ARP tables, routing tables, network traffic
Performance Data: CPU usage, memory usage, network traffic statistics
Device Configuration: VLAN information, port configurations
Process Information: Running processes and services
User Information: Sometimes usernames and group information
SNMP Versions and Security
SNMP relies on community strings to control access. These strings act like simple passwords that determine whether someone can read or modify SNMP data.
Common defaults are "public" for read-only access and "private" for read-write access. The issue is that in older SNMP versions, these strings are sent in plain text, making them easy to intercept and exploit.
SNMP has evolved through three main versions:
SNMPv1 – The original version, which uses plain text community strings.
SNMPv2c – An improved version, but still relies on plain text community strings.
SNMPv3 – A secure version that introduces authentication and encryption. Instead of weak community strings, it requires valid usernames, passwords, and potentially encryption keys.
Because SNMPv1 and SNMPv2c expose community strings in plain text, they are the most common targets for enumeration. SNMPv3, by contrast, is significantly harder to attack due to its stronger security model.
Find SNMP Version on a System
To find out which version of SNMP is being used on a system, try each one and see how the device responds. Start with SNMPv2c, since that’s what you’ll see most often:
snmpwalk -v2c -c public [IP Address]If you get back interface stats or system info, you know it’s v2c.
If you get a "Timeout: No Response from [device_ip]" error, drop down to v1:
snmpwalk -v1 -c public [IP Address]If both come back with errors but the port is open, you’re dealing with SNMPv3. In that case you’ll usually see an authentication error instead of data, which tells you the device is secured and you’ll need proper credentials to continue.
SNMP Enumeration Tools:
snmp-check: Command-line tool for basic SNMP enumeration
SoftPerfect Network Scanner: GUI-based network scanner with SNMP support
Network Performance Monitor: Enterprise monitoring solution
OpUtils: Network management toolkit with SNMP capabilities
SNMP Enumeration with SNMPWalk & SNMPGet
The snmpwalk and snmpget command-line programs query an SNMP agent, printing MIB object values. snmpwalk starts at a given OID and repeatedly requests the "next" object until that MIB branch is exhausted, effectively traversing a subtree. snmpget retrieves the value of a specific, single OID.
With no OID given, it starts at
.1.3.6.1(the “internet” tree).With a specific OID, it only returns the objects under that part of the tree.
Walk everything (default root):
The most practical approach is to start with snmpwalk on the main branches (1.3.6.1.2.1.1 for system info) and then explore the branches that return data.
snmpwalk -v2c -c public [IP Address]Walk from a chosen OID:
Returning all of the objects will return an excessive amount of information. You can hone in on important information for enumeration by choosing from some of the most commonly used OID’s.
System Information:
1.3.6.1.2.1.1.1.0    # System description
1.3.6.1.2.1.1.3.0    # System uptime
1.3.6.1.2.1.1.4.0    # System contact
1.3.6.1.2.1.1.5.0    # System name
1.3.6.1.2.1.1.6.0    # System location

Processes & Services:
1.3.6.1.2.1.25.4.2.1.2    # Running processes
1.3.6.1.2.1.25.4.2.1.4    # Process paths
1.3.6.1.2.1.25.4.2.1.5    # Process parameters

Network Interfaces:
1.3.6.1.2.1.2.2.1.1     # Interface index
1.3.6.1.2.1.2.2.1.2     # Interface descriptions
1.3.6.1.2.1.4.20.1.1    # IP addresses

Installed Software (Windows):
1.3.6.1.2.1.25.6.3.1.2    # Software names
1.3.6.1.2.1.25.6.3.1.3    # Software IDs

Storage/Disks:
1.3.6.1.2.1.25.2.3.1.3    # Storage descriptions
1.3.6.1.2.1.25.2.3.1.4    # Storage units
1.3.6.1.2.1.25.2.3.1.5    # Storage size
Single value (use snmpget instead of walking):
snmpget -v2c -c public [IP Address] .1.3.6.1.2.1.1.5.0SNMP Enumeration with Nmap
Nmap is a network scanning tool that comes with built-in scripts for SNMP enumeration. These scripts automatically parse SNMP responses into readable information instead of raw MIB data.
SNMP runs on UDP port 161, so in the following commands we'll use -sU (UDP scan) and -p (port) 161 flags to target the correct protocol and port. Commonly used NMAP scripts for SNMP enumeration include:
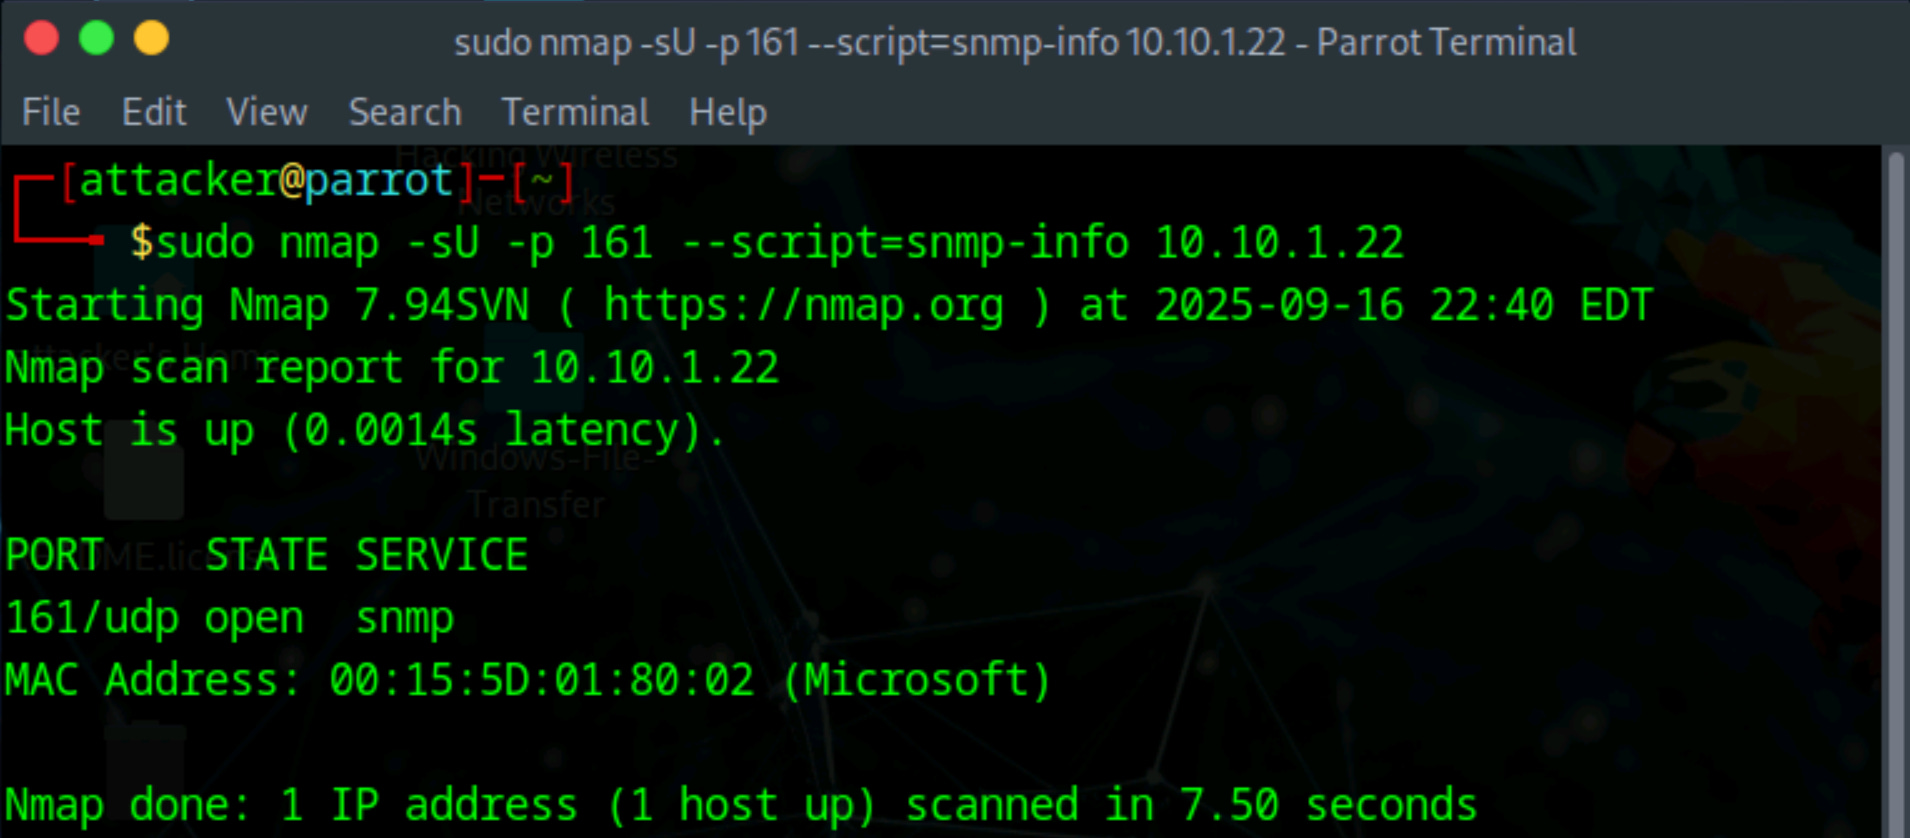
# Basic system information
nmap -sU -p 161 --script=snmp-info [IP Address]

# Network interfaces
nmap -sU -p 161 --script=snmp-interfaces [IP Address]

# Running processes
nmap -sU -p 161 --script=snmp-processes [IP Address]
View all SNMP NMAP Scripts:
Use ls to list files in the NMAP data directory for SNMP scripts:
ls /usr/share/nmap/scripts/snmp-*.nse
Use nmap —script-help command to learn more about the scripts:
Next, you can search NMAP the script library for the script name. In the example below, we’ll search for info on the script ‘smnp-interfaces’ (seen in previous command).
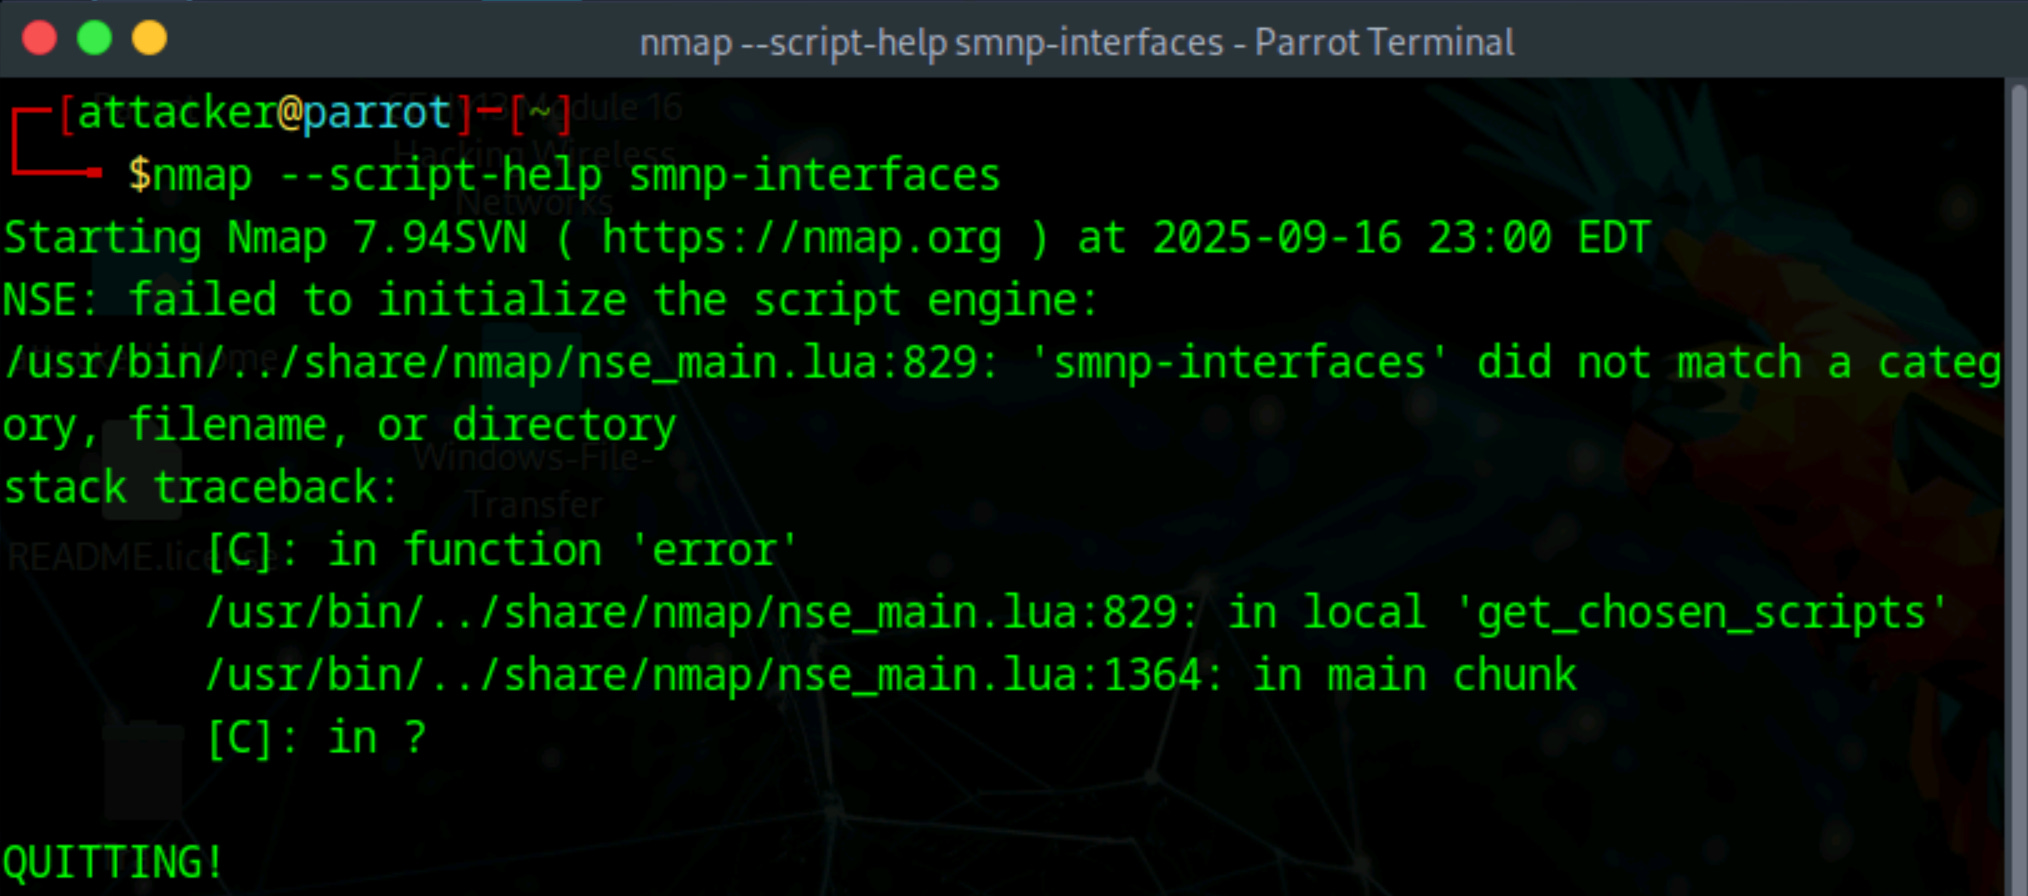
nmap --script-help [Script Name]LDAP Enumeration
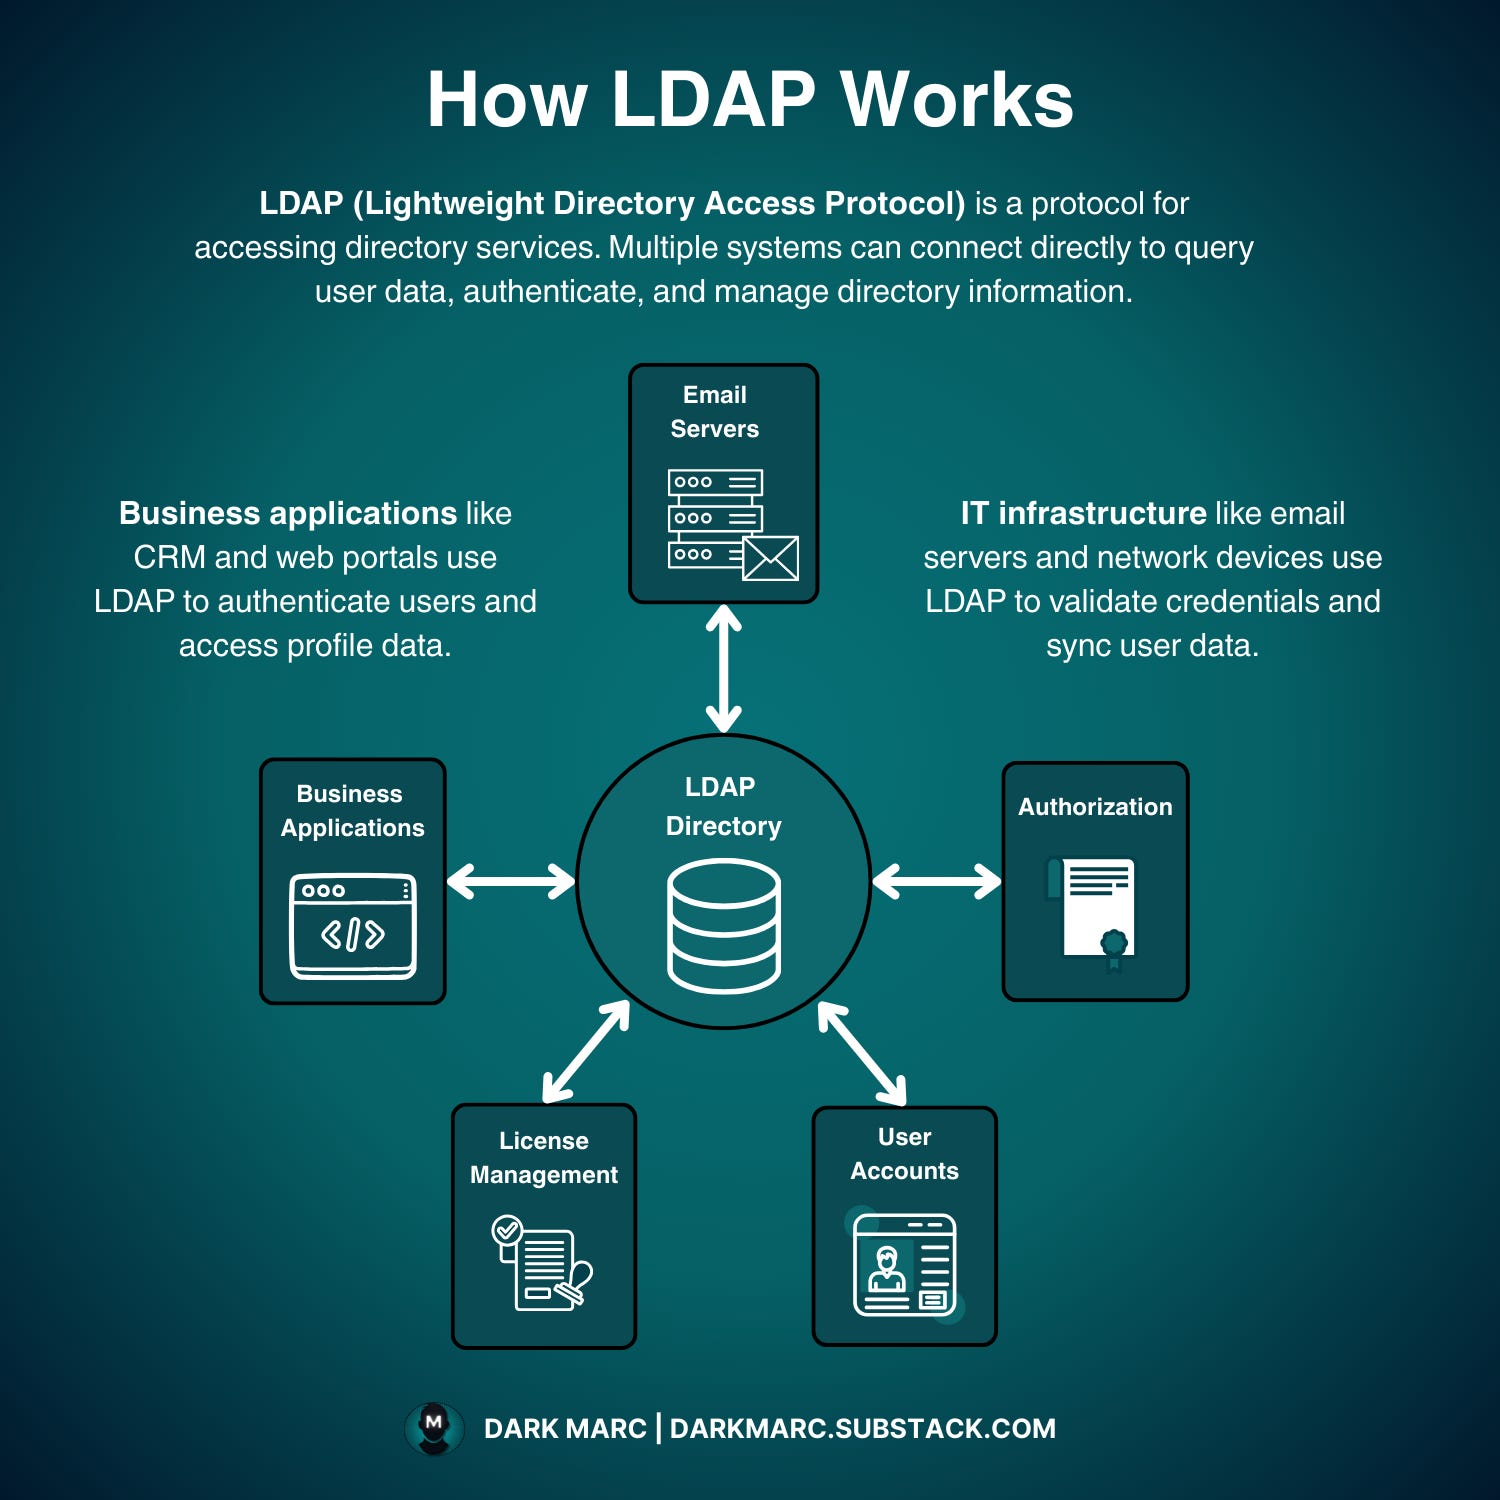
LDAP (Lightweight Directory Access Protocol) is a network protocol that allows different systems to access and manage directory information stored on a server.
Think of it as a standardized way for applications and services to look up user information, similar to how you might search a phone book.
The LDAP Architecture
At its core, LDAP follows a client-server model where multiple systems can simultaneously connect to a central directory to query, authenticate, and manage user data. The directory stores information in a hierarchical tree structure, making it easy to organize users, groups, and resources.
The LDAP Communication Process
LDAP follows a client-server model where multiple systems can simultaneously connect to a central directory.
The directory stores information in a hierarchical tree structure, making it easy to organize users, groups, and resources.
Here's how the process works:
Step 1: Connection - The client establishes a TCP connection to the LDAP server, typically on port 389 (unencrypted) or port 636 (encrypted with SSL/TLS).
Step 2: Bind (Authentication) - The client sends a bind request with credentials to authenticate to the directory. The server responds with success or failure.
Step 3: Search Operations - Clients query the directory for information, such as user details or group memberships. This enables business applications like CRM systems and web portals to verify user credentials and retrieve profile data.
Step 4: Modify Operations - Authorized clients can update existing directory entries, like changing passwords or user attributes. IT infrastructure components like email servers and network devices use this to sync user data.
Step 5: Add/Delete Operations - Administrative clients can create new directory entries or remove existing ones through user management systems.
Step 6: Response Processing - The LDAP server processes each request and sends back a response with the requested data or confirmation of the operation.
Step 7: Unbind - When finished, the client sends an unbind request to close the connection gracefully.
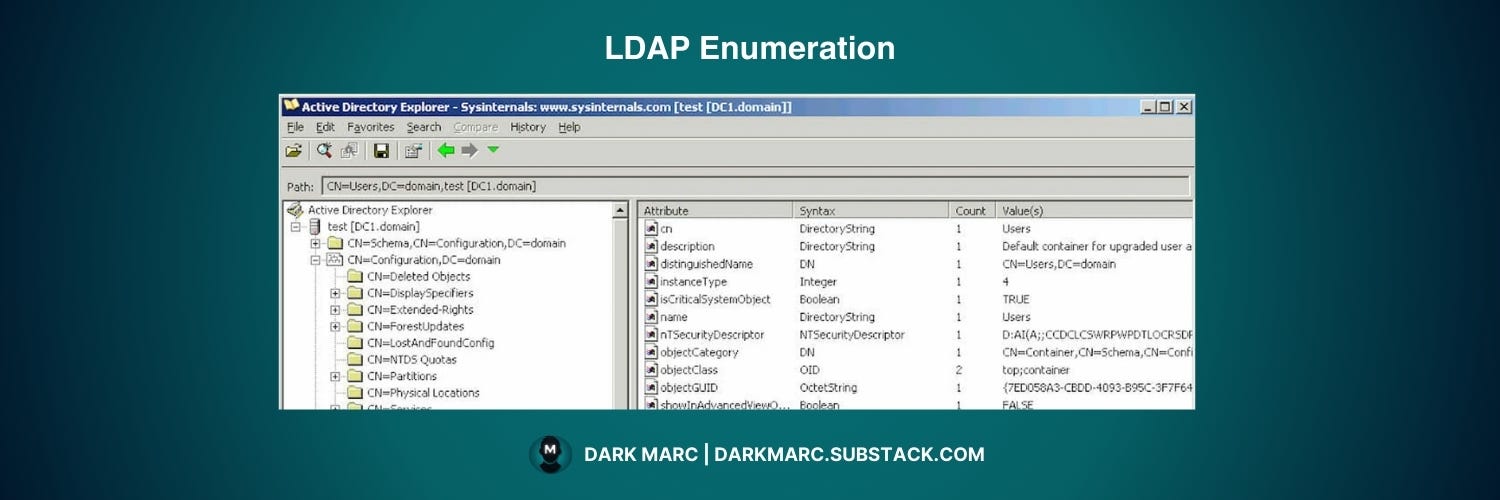
LDAP enumeration involves systematically querying the directory service to collect comprehensive user data, organizational structure, and access control information.
LDAP, you can find:
Valid usernames
Addresses
Departmental details
LDAP enumeration tools:
LDAPSearch
Softerra LDAP Administrator
AD Explorer
LDAP Admin Tool
NTP Enumeration (Port 123)
NTP (Network Time Protocol) is designed to synchronize the clocks of networked computers. It uses UDP port 123 as its primary means of communication.
NTP can maintain time within 10 milliseconds over the public Internet and achieve accuracies of 200 microseconds or better in local networks under ideal conditions.
While essential for network operations, NTP services can inadvertently expose valuable network intelligence.
How NTP Works:
NTP operates using a client-server model where systems continuously synchronize their clocks through a hierarchical network of time sources.
The NTP Daemon (ntpd)
Every NTP-enabled system runs the ntpd daemon, a background service that handles all time synchronization activities. The daemon performs three critical functions:
Queries multiple time sources to gather time information
Calculates the most accurate time by comparing responses from different servers
Gradually adjusts the local clock to prevent sudden time jumps that could disrupt applications
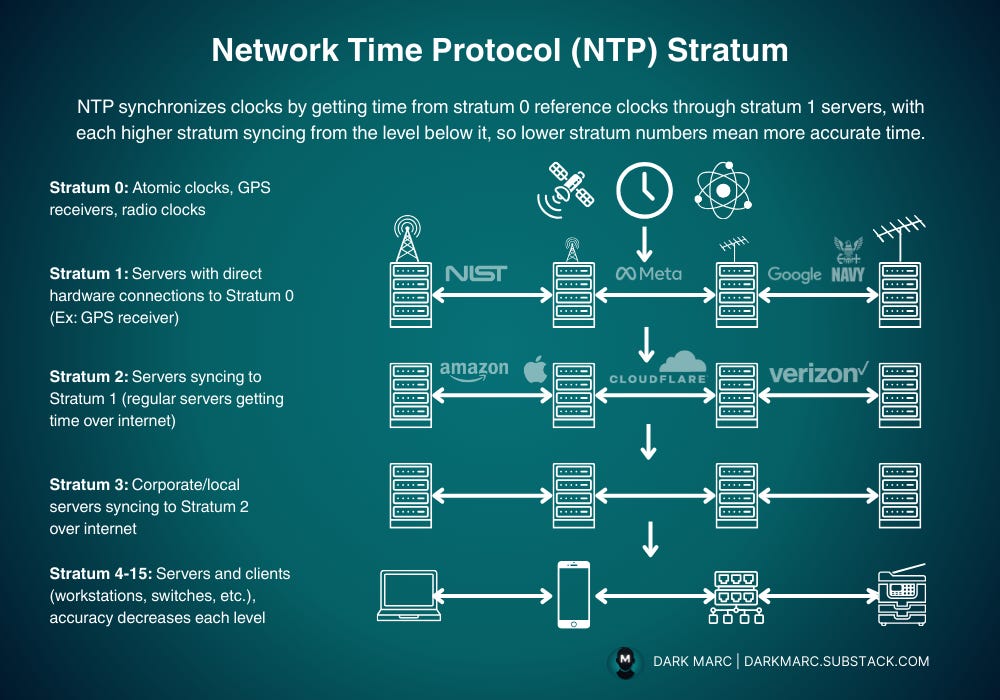
Stratum Hierarchy System
NTP organizes time sources into numbered levels called "strata" that create a pyramid structure:
Stratum 0: Physical reference clocks (atomic clocks, GPS receivers, radio time signals) - these are not network accessible
Stratum 1: Primary time servers with direct connections to Stratum 0 sources via serial cables or radio receivers
Stratum 2: Secondary servers that synchronize with Stratum 1 servers over the network
Stratum 3-15: Additional network levels, each synchronizing with servers from the stratum above
The lower the stratum number, the closer the server is to the original time source and the more accurate it is considered.
Peer Relationships and Synchronization
NTP servers don't rely on a single time source. Instead, they maintain "peer" relationships with multiple servers to ensure reliability:
Each server queries 3-5 different time sources simultaneously
The daemon compares all responses and identifies outliers or failed servers
It uses statistical algorithms to calculate the most accurate time from the valid responses
Servers can peer with others at the same stratum level for additional verification
Local Network Implementation
Organizations typically deploy NTP using this structure:
Designated NTP servers in the network synchronize with external Stratum 1 or 2 servers
Internal systems point to these local NTP servers instead of external sources
Network traffic is reduced since only a few servers need external access
Faster synchronization occurs because local servers respond quicker than internet sources
Connection to Global Time Standards
The entire NTP network traces back to national time standards maintained by government agencies. Stratum 1 servers connect directly to:
Atomic cesium clocks at facilities like NIST (US) and NPL (UK)
GPS satellite signals which carry atomic clocks accurate to nanoseconds
Radio time broadcasts (like WWV in the US) transmitted from atomic clock facilities
Telephone time services that provide direct access to atomic time
This connection ensures that a computer in any office can maintain time accuracy within milliseconds of the same atomic clocks used by global financial markets, telecommunications networks, and scientific research facilities.
With NTP, you can find:
NTP (Network Time Protocol) servers maintain valuable network information that can be extracted during enumeration.
Other time servers connected to the target
IP addresses of time servers in the network
Time server hierarchy and relationships
Network timing infrastructure details
NTP Enumeration Process
1. Initial Discovery
First, confirm that NTP is running on the target machine:
nmap -sU -p 123 [IP Address]
We can see from the scan that NTP is active on the device. Now we can go further by probing the NTP server for useful information.
2. Extract Time Server Information
Use these NTP commands to gather network intelligence:
ntpq - Monitors NTP daemon operations and lists peer time servers connected to the target.
ntpdc - Queries the NTP daemon for detailed server state information and comprehensive peer statistics.
ntptrace - Traces the complete chain of time servers back to the primary time source, revealing network hierarchy.
Note: The ntpdate command, which was previously in this list, has been deprecated and removed from most modern Linux distributions due to security concerns and the availability of better alternatives.
Its functionality has been replaced by ntpd -q for one-time synchronization and sntp for simple time queries. Many systems now use chrony instead of the classic NTP suite. However, ntpq, ntpdc, and ntptrace remain widely available as they serve essential monitoring and diagnostic purposes.
ntpq Commands
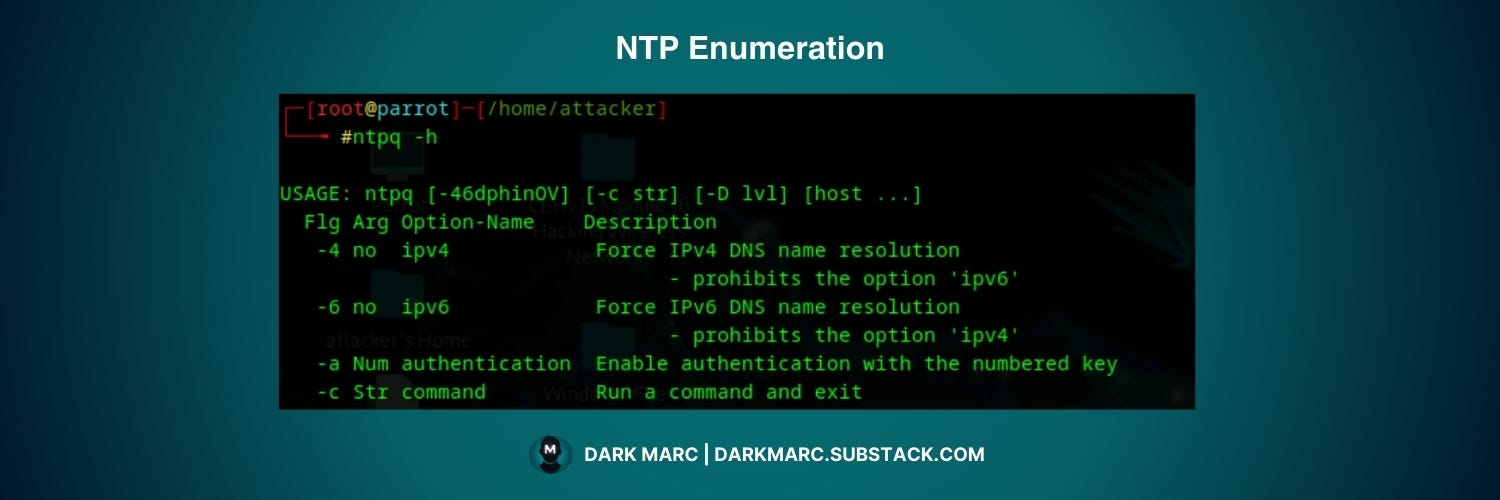
This command monitors the operations of the NTP daemon ntpd and determines performance. Use the following command to view the available parameters:
ntpq -h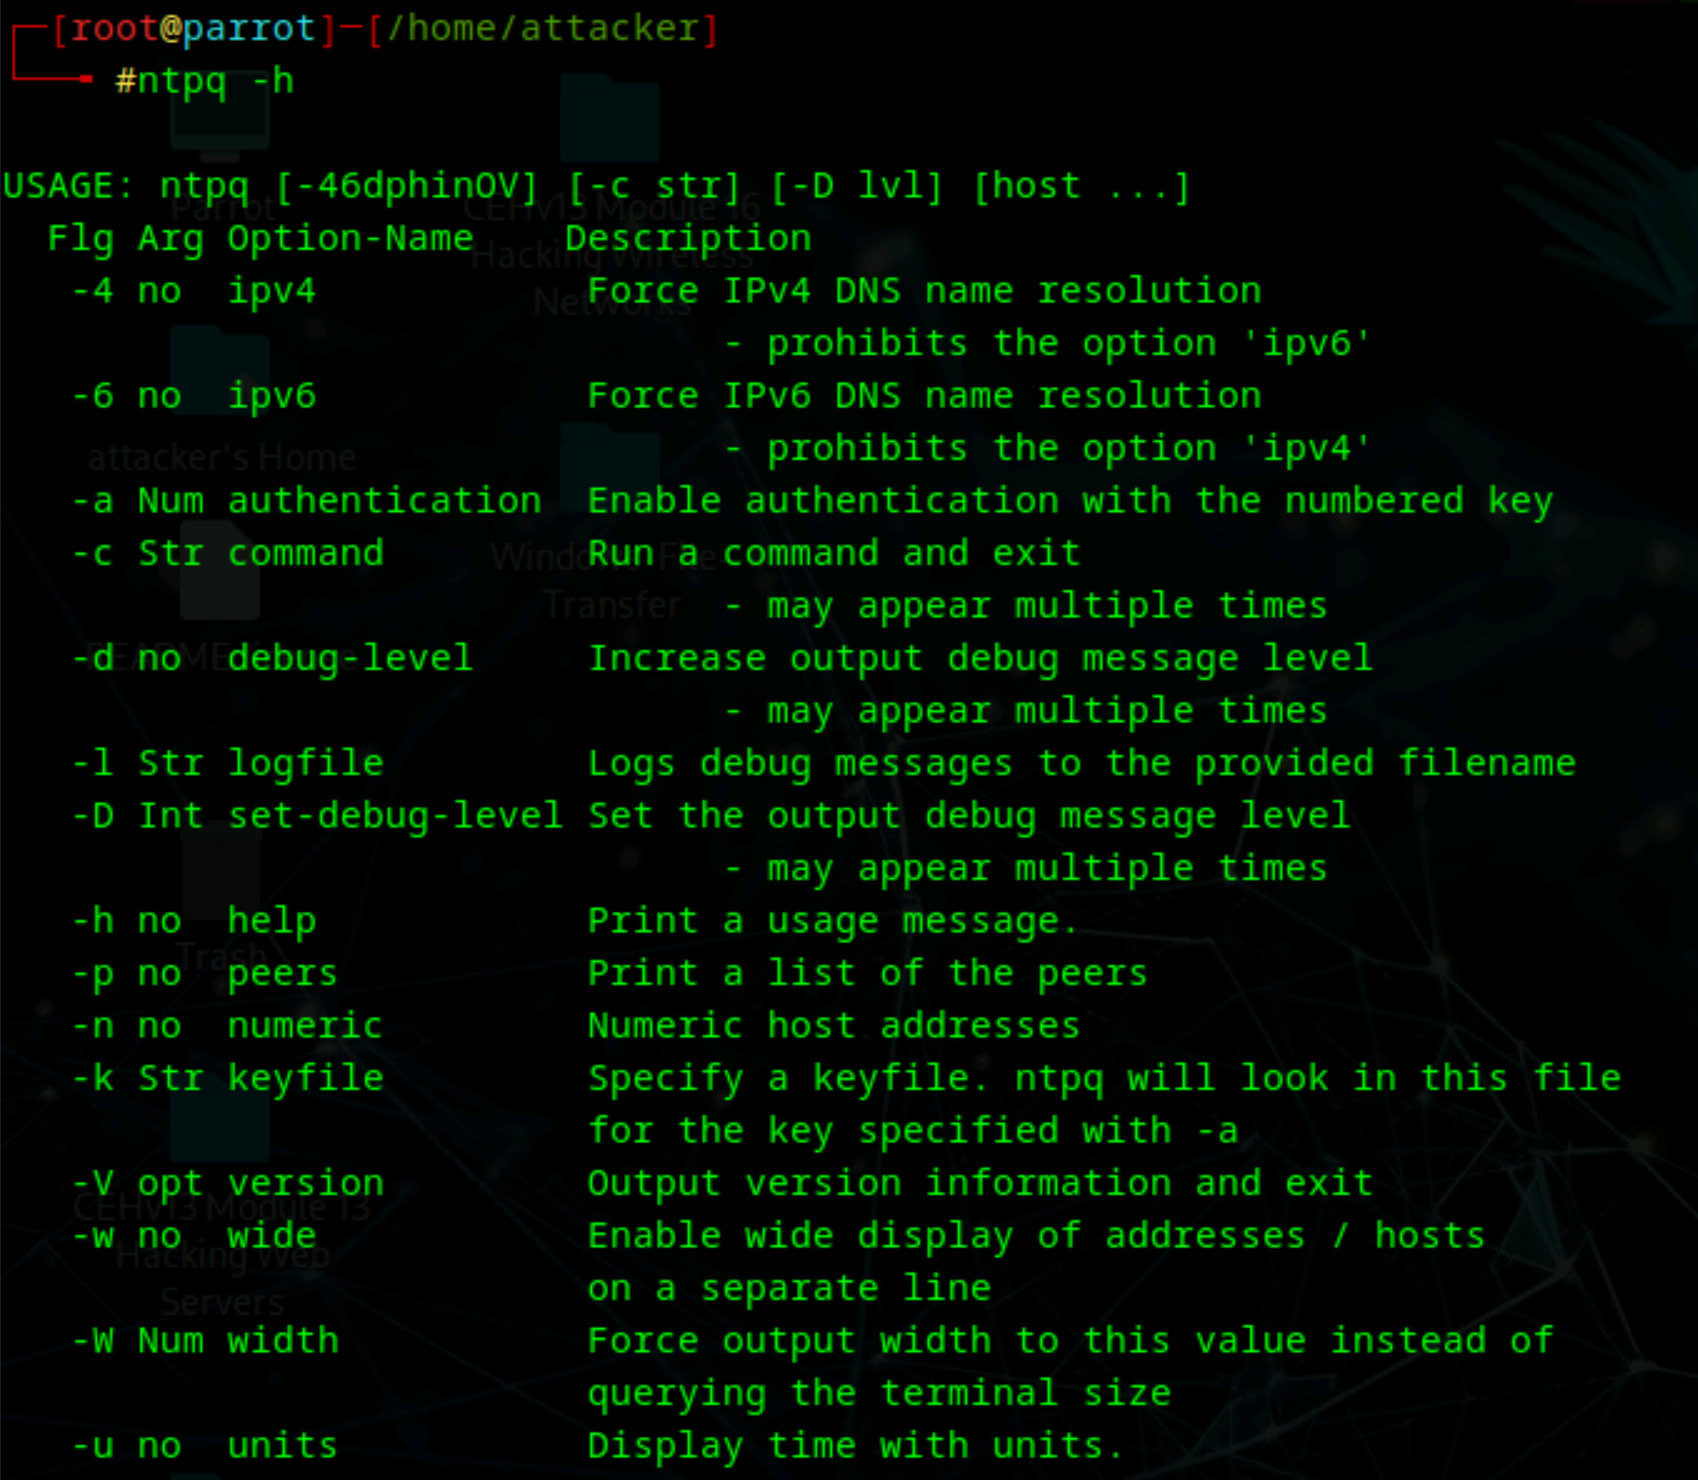
Common ntpq commands include:
# List peer servers with IP addresses
ntpq -pn [target_ip]

# Interactive mode
ntpq [target_ip]
ntpq> peers
ntpq> associations

# Get association details
ntpq -c associations [target_ip]

# Show system variables
ntpq -c sysinfo [target_ip]
ntpdc Commands
This command queries the NTP daemon for detailed configuration and statistical information about peer servers and system operation. It provides more comprehensive data than ntpq but is being deprecated in newer NTP versions.
# List all known servers
ntpdc -l [target_ip]

# Interactive mode
ntpdc [target_ip]
ntpdc> listpeers
ntpdc> peers

# Show system information
ntpdc -c sysinfo [target_ip]

# Display peer statistics
ntpdc -c peerstats [target_ip]

# Show system statistics
ntpdc -c sysstats [target_ip]
ntptrace Commands
This command traces the chain of NTP servers back to the primary time source, revealing the complete hierarchy of time synchronization. This exposes the network's timing infrastructure and relationships between servers.
Use the following command to view the available parameters:
ntptrace —help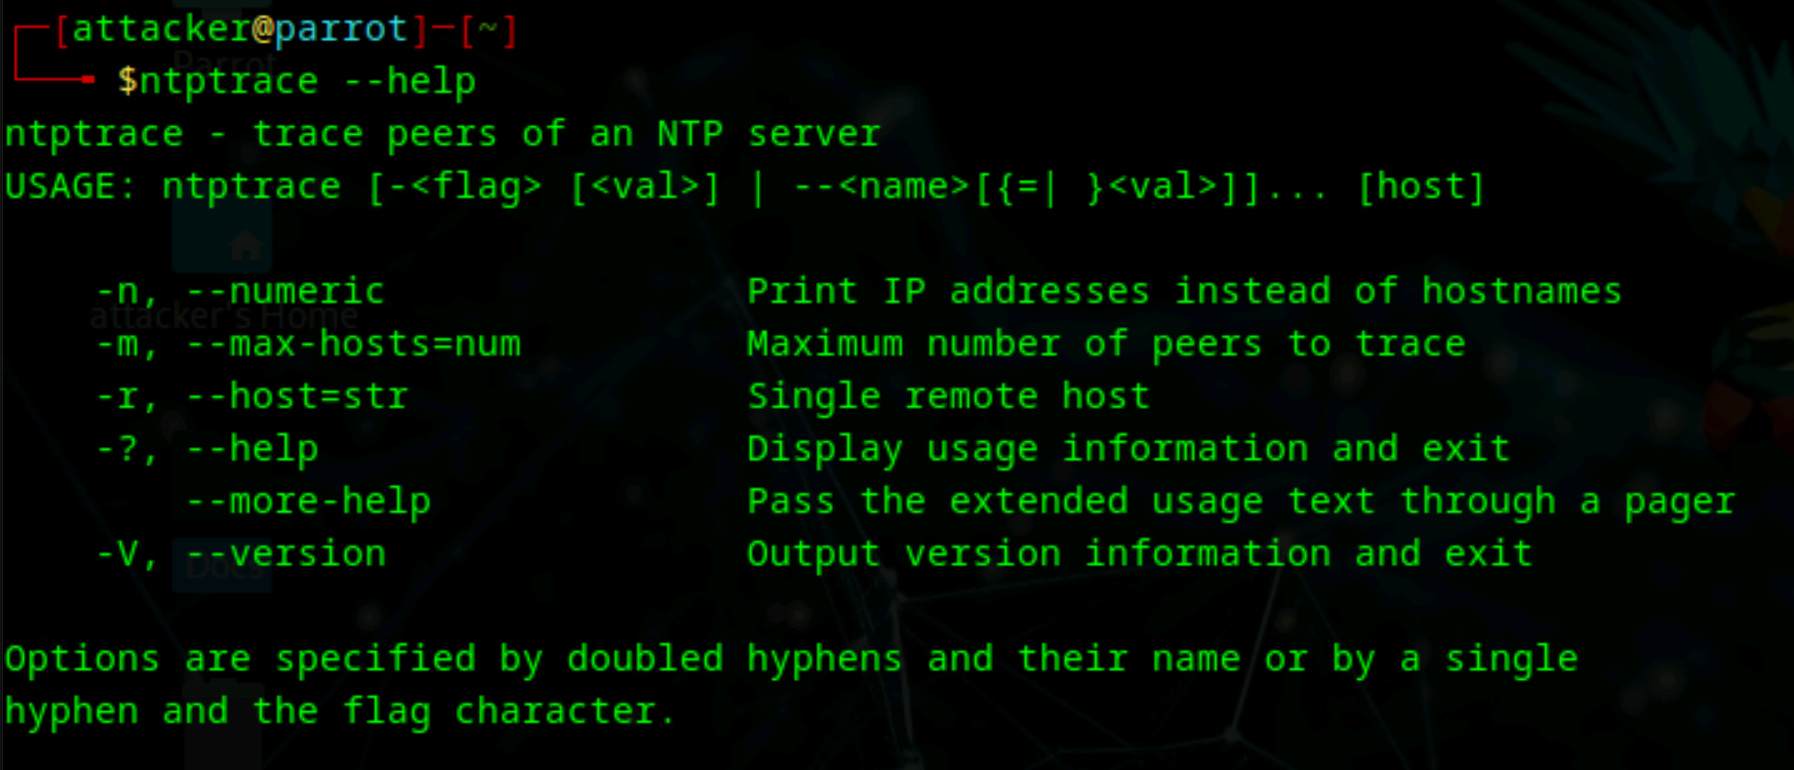
Common ntptrace usage:
# Trace time server hierarchy
ntptrace [target_ip]

# Trace with timeout specification
ntptrace -t 5 [target_ip]

# Trace with retry count
ntptrace -r 3 [target_ip]

# Maximum number of levels to trace
ntptrace -m 10 [target_ip]
NFS Enumeration (Port 2049)
NFS (Network File System) lets systems mount and use remote directories as if they were local. Common in Unix/Linux environments for sharing home dirs, backups, and application data.

How NFS Works:
NFS servers export directory paths. Clients request mounts via RPC calls to the NFS service (usually over TCP/UDP 2049). The server responds with export lists and, if allowed, serves file operations (read, write, list). Authentication/authorization is typically host/IP-based (older NFS) or via Kerberos.
What you can find
Exported directories (shares) and their access permissions
List of clients connected to the NFS server with their IP addresses
Shared data associated with client IP addresses
File and directory listings of exported content (if world-readable)
Sensitive files left in exports (backups, keys, configs)
UID/GID mappings and hints about users and services
NFS enumeration enables attackers to identify exported directories, client connections, and potentially spoof IP addresses to gain unauthorized access to shared files.
NFS Enumeration Commands
Initial port scan:
nmap -p 2049 <target> # Check if NFS port is openInstall and use SuperEnum:
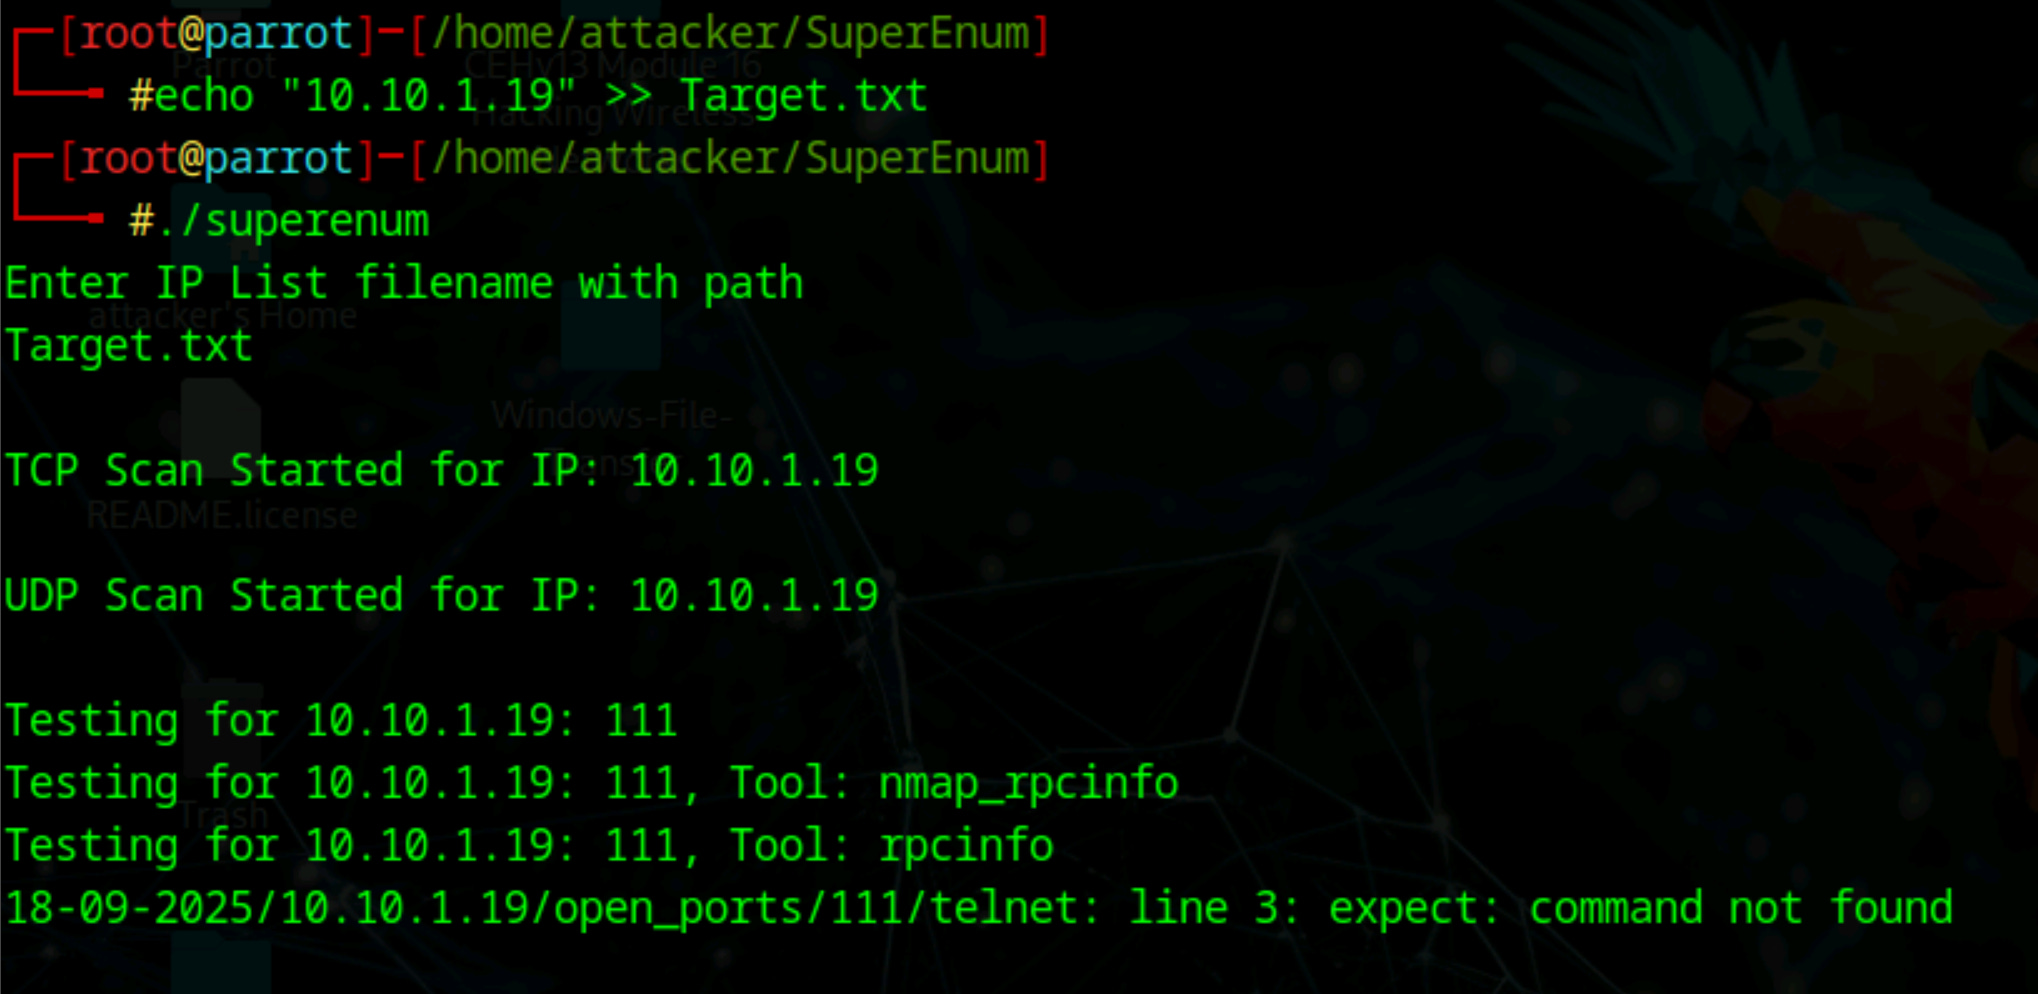
# Download and install SuperEnum
git clone https://github.com/P3GLEG/SuperEnum.git
cd SuperEnum
chmod +x superenum

# Create target file and run scan
echo "<target_ip>" >> Target.txt
./superenum                         # Run enumeration script
# Enter Target.txt when prompted
Install and use RPCScan:
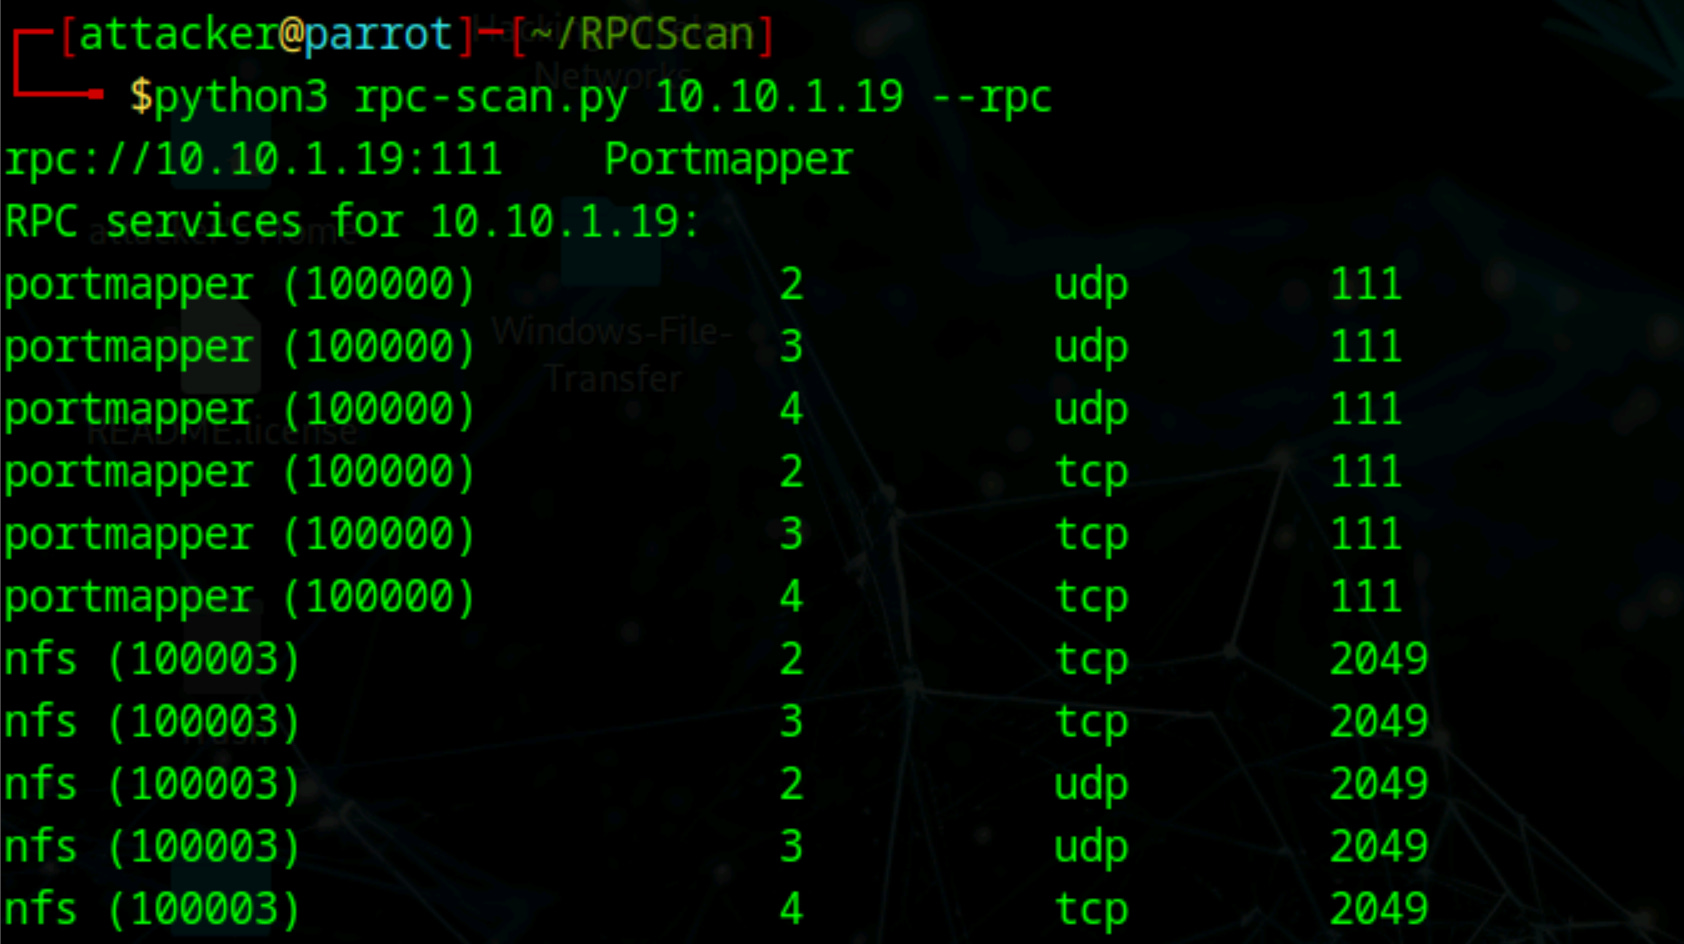
# Download and install RPCScan
git clone https://github.com/hegusung/RPCScan.git
cd RPCScan
pip3 install -r requirements.txt

# Run RPC enumeration
python3 rpc-scan.py <target> --rpc  # List RPC services and NFS details
NFS enumeration tools:
RPSCan
SuperEnum
SMTP Enumeration (Port 25, 587, 465)
SMTP (Simple Mail Transfer Protocol) is an internet standard communication protocol for electronic mail transmission.
Mail systems commonly use SMTP with POP3 and IMAP, which enable users to save messages in the server mailbox and download them from the server when necessary. SMTP uses mail exchange (MX) servers to direct mail via DNS.
It runs on TCP port 25, 2525, or 587.
How SMTP Works:
SMTP servers handle email transmission between clients and other mail servers. The protocol provides built-in commands (VRFY, EXPN, RCPT TO) that can be used to gather information about users and mail routing.
SMTP servers respond differently to these commands for valid and invalid users, allowing enumeration of valid accounts.
With SMTP, you can find:
List of valid users on the SMTP server
Delivery addresses of aliases and mailing lists
Message recipients and mail routing information
Open SMTP relays that can be abused for spam
Available SMTP commands and server capabilities
User account information for password spraying attacks
SMTP enumeration enables attackers to obtain valid usernames which can then be used in password spraying attacks to gain unauthorized access.
SMTP Enumeration Process:
The SMTP enumeration process leverages these built-in commands through a systematic approach that combines automated tools with manual verification.
The commands (VRFY, EXPN, RCPT TO) are integrated into the enumeration workflow as follows:
Initial Reconnaissance: First, identify active SMTP servers and determine which commands are supported, as server configurations vary significantly.
User Enumeration Phase: Once available commands are confirmed, the enumeration process systematically tests usernames against the SMTP service. The VRFY command directly validates if a username exists, while EXPN reveals members of mailing lists and aliases. RCPT TO can also indicate valid recipients during the mail transaction process.
Validation and Expansion: Valid usernames discovered through one command are cross-referenced using other available commands to build a comprehensive user list and understand mail routing configurations.
SMTP Built-in Commands
SMTP provides several built-in commands that can be exploited for information gathering. These commands were designed for legitimate mail server operations but can reveal sensitive information about users and system configuration:
VRFY (Verify) Command: The VRFY command verifies whether a specific email address or username exists on the mail server. It was originally designed to help administrators verify mail delivery paths and confirm user accounts.
VRFY usernameEXPN (Expand) Command: The EXPN command expands mailing lists and aliases to show their actual delivery addresses. This reveals not only if an alias exists but also the real email addresses behind group lists.
EXPN mailinglistRCPT TO (Recipient To) Command: The RCPT TO command specifies message recipients during the mail transaction process. While part of normal mail delivery, it can also indicate whether an address is valid when the server validates recipients before accepting mail.
RCPT TO: username@domain.comSMTP Enumeration with NMAP:
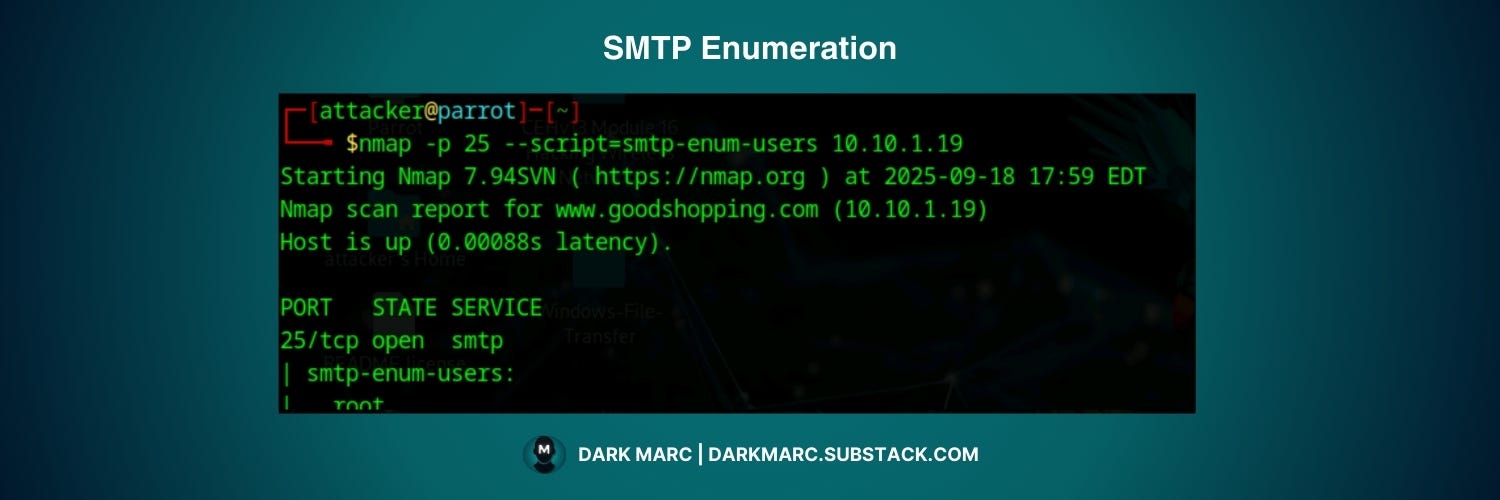
Nmap provides convenient scripts that automate the process of sending these SMTP commands. The smtp-enum-users script uses VRFY, EXPN, and RCPT TO to discover valid usernames from a built-in wordlist of common usernames.
This script can also accept custom wordlists for more targeted enumeration, making it the first step in identifying accounts that could be targeted for further attacks like password spraying.
nmap -p 25 --script=smtp-enum-users [Target IP Address]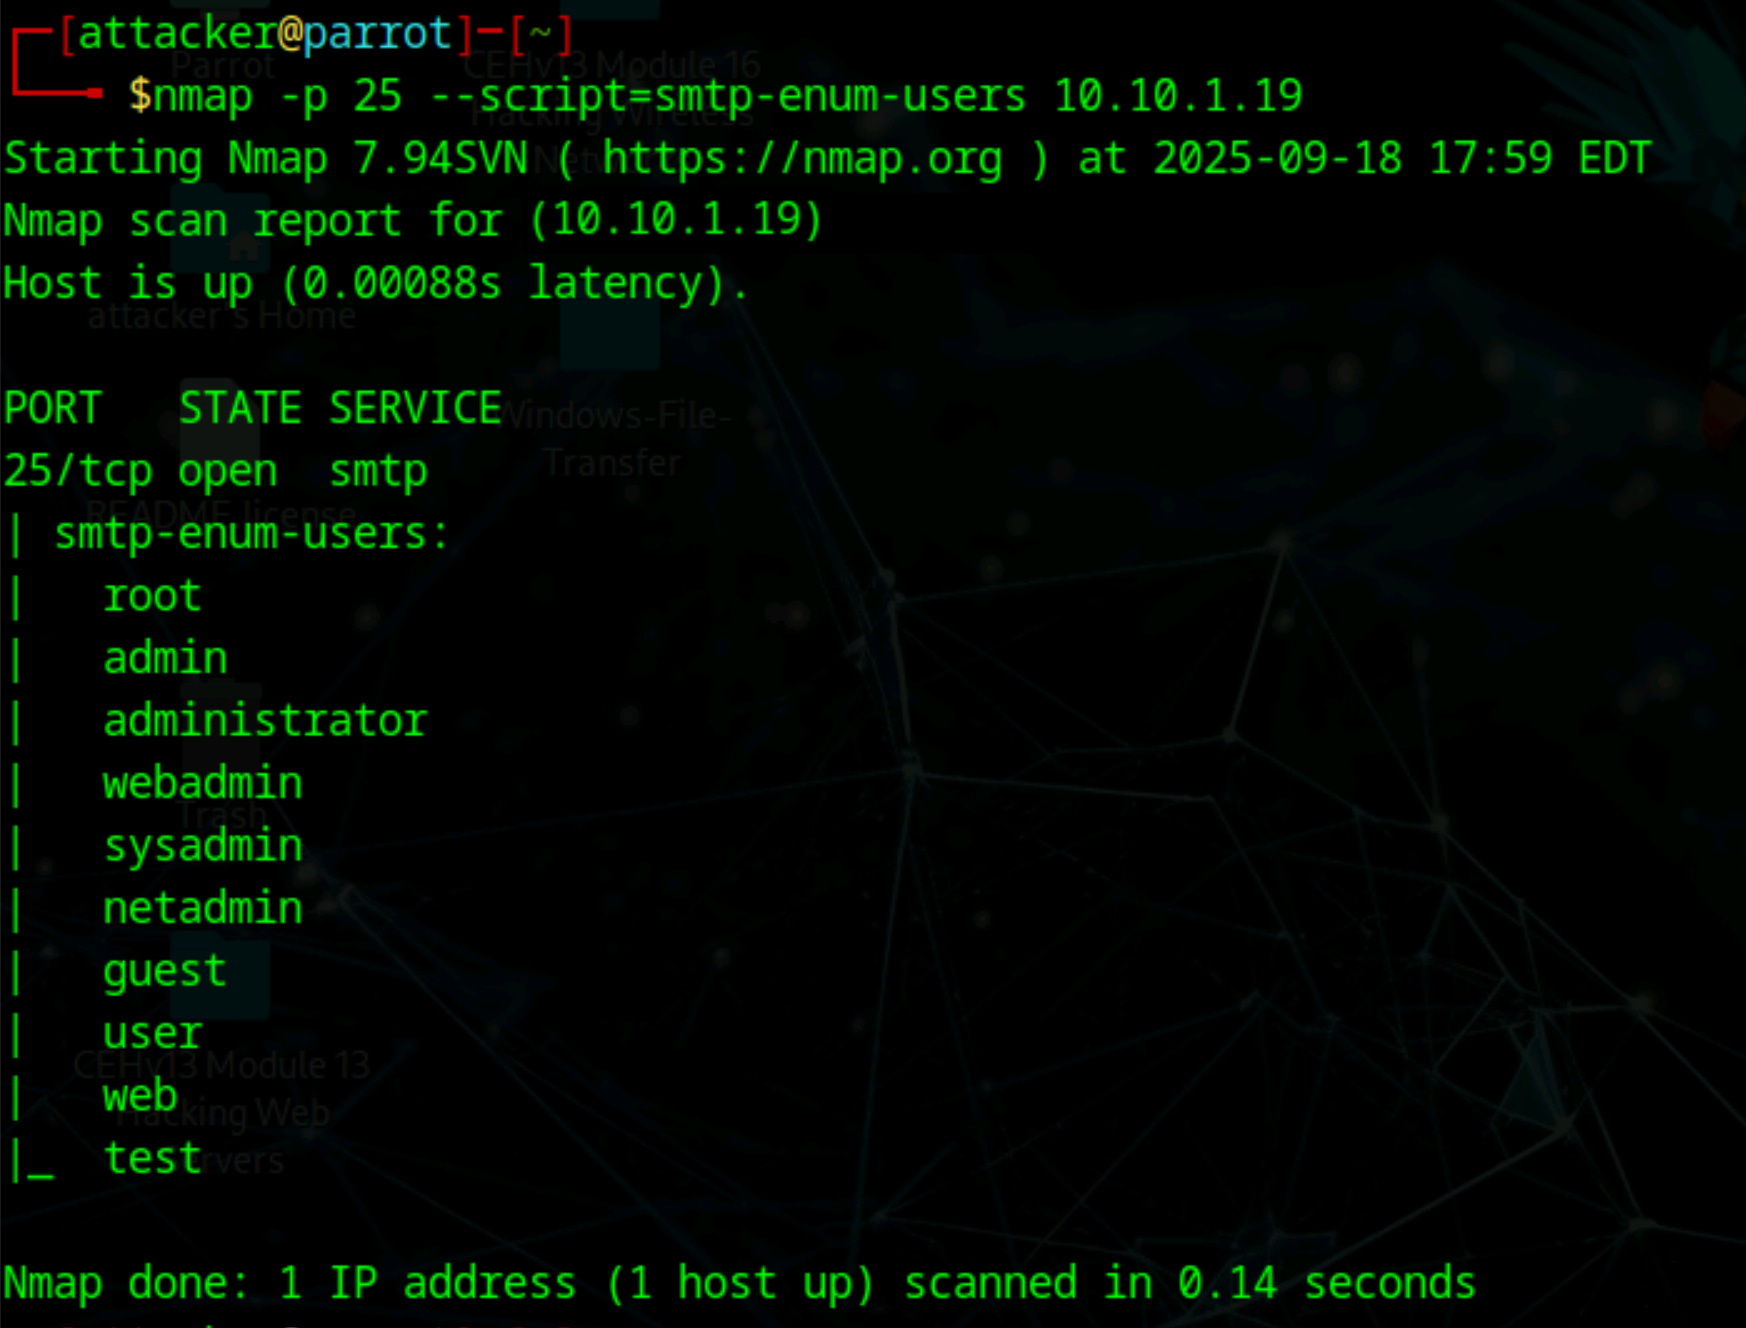
After enumerating users, the next step is checking if the SMTP server can be used to relay emails externally. Open relays can be abused for sending spam or phishing emails. This step helps identify misconfigured servers that could pose a security risk.
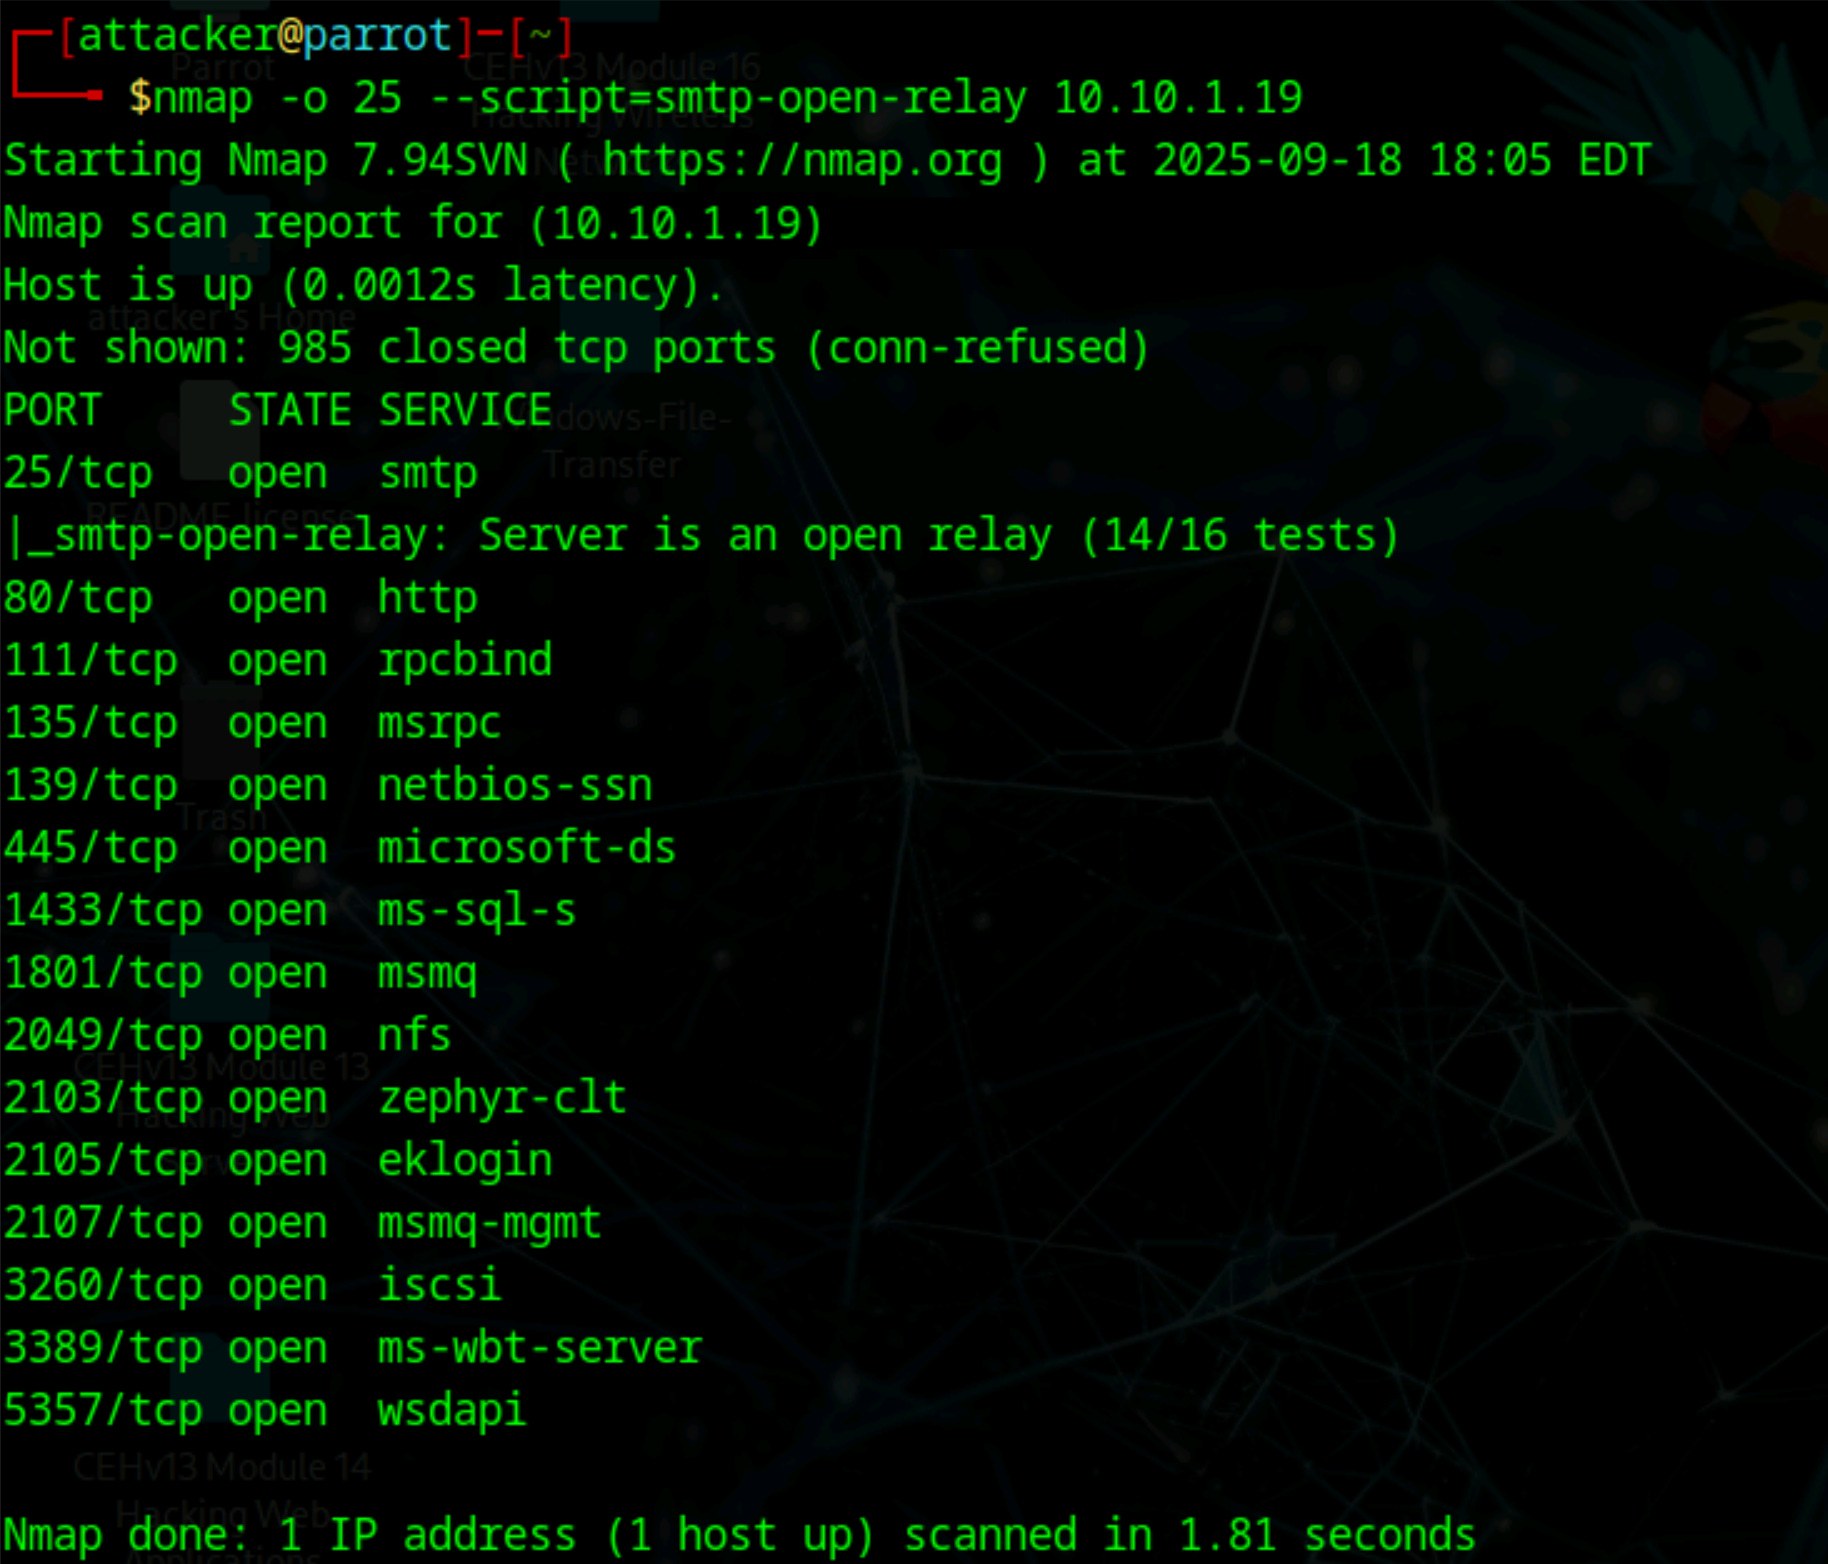
nmap -p 25 --script=smtp-open-relay [Target IP Address]Not all commands are always available on every server. Some servers disable VRFY or EXPN for security reasons.
This script queries the server to list supported commands. Knowing which commands are allowed lets you plan enumeration carefully and avoid unnecessary errors.
It also reveals information about server capabilities like STARTTLS support, size limits, and authentication mechanisms. You can discover available commands using:
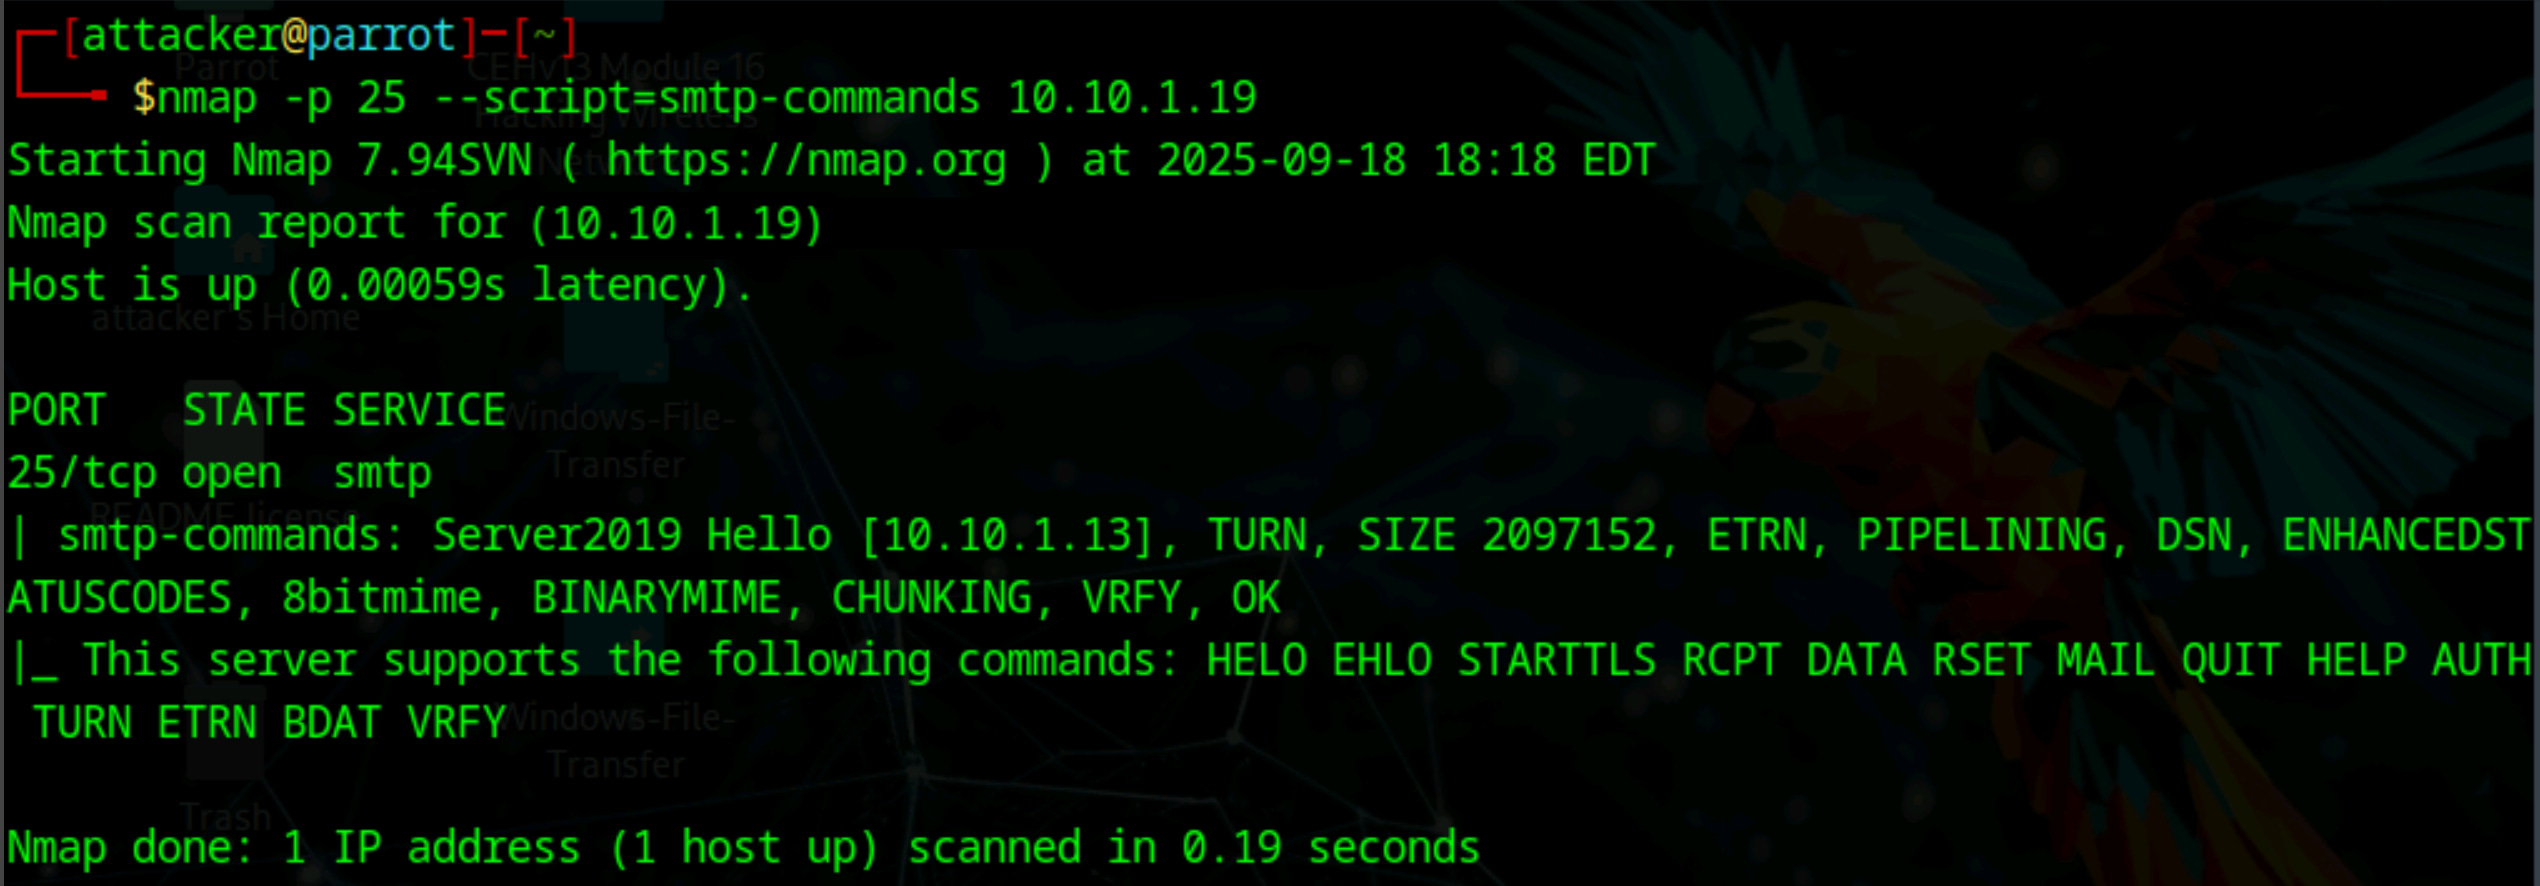
nmap -p 25 --script=smtp-commands [Target IP Address]Using SMTP Commands Manually:
Manual enumeration provides more control and can bypass some automated detection mechanisms. Connect directly to the SMTP server using telnet or netcat:
telnet [Target IP] 25Once connected, check which commands are available by using the EHLO command to get an extended greeting and list server capabilities:
EHLO [domain or IP]
SMTP Enumeration Tools:
Nmap
Metasploit
smtp-user-enum
NetScanTools Pro
DNS Enumeration
DNS (Domain Name System) is like the internet’s phonebook. It translates human-friendly domain names (like google.com) into machine friendly IP addresses (like 142.250.72.72.206).
This lets your browser find and connect to the right website without you needing to remember the numbers.
How DNS Works:
When you type a domain name into your web browser, your computer needs an IP address to locate and connect to the website, since computers communicate using IP’s not domain names. The process is fast, but it involves a number of components behind the scenes. Here’s how it goes:
Step 1: Check Local Sources
Before asking external servers, your computer first checks local sources: the browser cache, operating system DNS cache and the hosts file. If the IP is found here, it is used immediately. If not the query moves to a recursive resolver.
Step 2: Ask the Recursive Resolver
The recursive resolver, usually provided by your ISP or a public DNS service like Google DNS (8.8.8.8) or CloudFlare (1.1.1.1), handles the task of finding the IP address. If it has the IP cached from a recent lookup, it responds immediately. Otherwise, it begins querying the DNS hierarchy.
Step 3: Query a Root DNS Server
If the resolver doesn’t have the answer, it contacts one of the 13 root server clusters (A-M), operated by organizations such as NASA, The US Department of Defense, The US Army, University of Maryland, and The University of Southern California Information Sciences Institute, among others.
Root servers do not store IP addresses for individual domain names. Instead, they maintain the root zone file, managed by IANA, and published by VeriSign, which lists all top-level domains (TLD’s) and the authoritative nameservers for each.
The root server responds with the IP addresses of the appropriate TLD servers for a given domain.
Step 4: Query the TLD Nameserver
The recursive resolver then contacts the TLD nameservers for the requested domain, such as the .com servers operated by VeriSign. These servers do not know the domain’s IP but know which authoritative nameservers are responsible for the domain. They return the names of these authoritative servers.
Step 5: Query the Authoritative Nameserver
The resolver queries the authoritative nameservers, which contain the actual DNS records for the domain. These records include A records (IPv4), AAAA records (IPv6), MX records (mail servers), and CNAME records (aliases). The authoritative server responds with the domain’s IP address.
Step 6: Return and Cache the Result
The recursive resolver caches the IP according to its TTL (Time To Live) for faster future queries and returns it to your computer.
Step 7: Connect to the Website
With the IP address, your browser can connect to the web server, send an HTTP or HTTPS request, and receive the website content, which it then displays.
With DNS, you can find:
Hostnames and IP addresses (A/AAAA) – to map devices and servers.
Mail servers and MX records – to identify email infrastructure and test email security.
Name servers (NS) and SOA information – to understand server hierarchy and administrative details.
Subdomains and service records (SRV) – to discover additional services like LDAP, SIP, or internal applications.
TXT records – such as SPF, DKIM, or internal notes that may reveal configuration details.
Reverse DNS (PTR) mappings – to correlate IP addresses to hostnames and understand IP allocations.
Zone transfers (AXFR) – if misconfigured, they can reveal the entire DNS zone content.
DNSSEC status and misconfigurations – to check for security weaknesses in DNS validation.
This information is useful for understanding a domain’s publicly exposed infrastructure, assessing security posture, and identifying the attack surface.
DNS Enumeration Commands:
DNS enumeration uses standard DNS query mechanisms to gather information about a target's network infrastructure.
DNS servers are designed to respond to various query types for legitimate name resolution, but these same mechanisms can reveal valuable intel for attackers.
Linux-Based DNS Enumeration (using dig)
Find the IPv4 address of a hostname Use dig or host to resolve a domain name into its A record.
dig A www.example.com
host www.example.com
Get a clean, script-friendly answer Use +short to return only the resolved IP.
dig +short www.example.comList the mail servers for a domain Query MX records to see where mail is delivered.
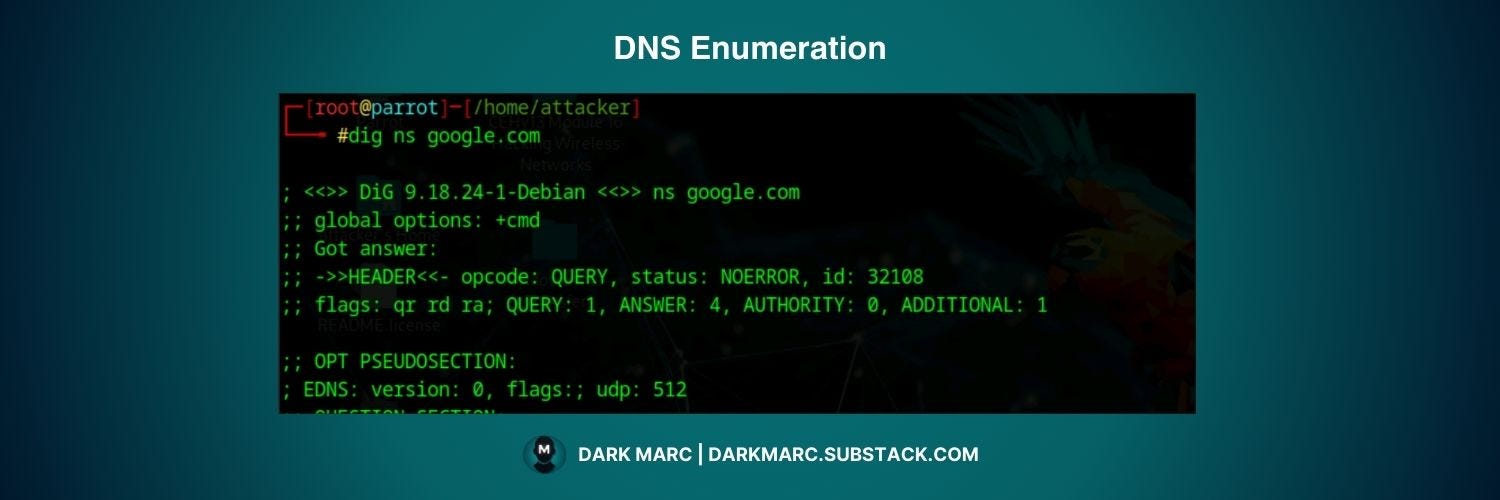
dig MX example.comFind the authoritative name servers Query NS records to learn which servers control the zone.
dig NS example.comDo a reverse lookup (IP → hostname) Resolve a given IP address back to a hostname.
dig -x 192.0.2.10Attempt a zone transfer (AXFR) Zone transfer is a legitimate DNS mechanism used to synchronize DNS records between a primary DNS server and its secondary (backup) servers within the same organization.
The primary server maintains a list of authorized secondary servers that can request complete copies of the DNS zone data for redundancy.
An "unauthorized transfer" occurs when the DNS server is misconfigured and doesn't properly restrict zone transfer requests to only authorized secondary servers. Instead, it accepts requests from any source - including attackers.
When successful, this dumps the entire DNS database containing all hostnames, subdomains, IP addresses, and mail servers for that domain.
dig AXFR @ns1.example.com example.comDNS Cache Snooping
DNS cache snooping is a DNS enumeration technique whereby an attacker queries the DNS server for a specific cached DNS record to determine what domains users have recently visited.
Non-recursive Method: Attackers send a non-recursive query by setting the Recursion Desired (RD) bit in the query header to zero. This method checks if a record exists in the cache without the server performing additional lookups.
Recursive Method: Attackers send a recursive query to determine the time the DNS record resides in the cache. A high TTL value indicates that the record was not in the cache initially, while a low TTL suggests recent caching.
Commands for DNS Cache Snooping:
# Non-recursive query (Linux)
dig +norecurse www.example.com @target-dns-server

# Check TTL values to determine cache status
dig www.example.com @target-dns-server
DNSSEC Zone Walking
DNSSEC zone walking is a DNS enumeration technique where an attacker attempts to obtain internal records of the DNS server if the DNS zone is not properly configured. This technique exploits DNSSEC's NSEC records to enumerate all domain names in a zone.
Attackers use tools such as LDNS and DNSRecon to exploit this vulnerability and obtain the network information of a target domain for further Internet-based attacks.
LDNS Zone Walking:
# Using ldns-walk tool
ldns-walk @nameserver domain.com

# Example command
ldns-walk @8.8.8.8 example.com
DNSRecon Zone Walking:
# DNSSEC zone walking with DNSRecon
dnsrecon -d domain.com -t zonewalk

# Example with specific nameserver
dnsrecon -d example.com -n ns1.example.com -t zonewalk
Windows-Based DNS Enumeration (using nslookup)
nslookup Interactive Mode nslookup can operate in interactive mode, allowing you to execute multiple DNS queries in a single session without restarting the command each time.
Launch nslookup interactive mode:
nslookupSOA (Start of Authority) Query
The SOA record contains administrative information about the DNS zone, including the primary name server and responsible administrator email address.
Set query type to SOA and execute the query:
set querytype=soa
[target-domain]
Zone Transfer with ls command The ls -d command requests a zone transfer from the specified name server, attempting to retrieve all DNS records for the domain.
ls -d [nameserver]DNS Enumeration Tools:
nslookup (Windows)
dig (Linux)
DNSRecon
LDNS
Amass
NMAP
DomainTools
IPsec Enumeration
IPsec (Internet Protocol Security) is the most widely deployed technology for enterprise VPN solutions, supporting both gateway-to-gateway (LAN-to-LAN) connections and host-to-gateway (remote access) scenarios.
It operates at the network layer (Layer 3) to secure IP communications through encryption, authentication, and integrity verification.
How IPsec Works:
Most IPsec implementations use ISAKMP (Internet Security Association Key Management Protocol), which is part of the IKE (Internet Key Exchange) framework. ISAKMP handles the negotiation and establishment of Security Associations (SAs) - the security parameters that define how two systems will communicate securely.
IPsec uses two main security protocols:
Authentication Header (AH) - Provides data integrity and authentication without encryption. It ensures that packets haven't been tampered with during transmission.
Encapsulating Security Payload (ESP) - Provides confidentiality through encryption, along with authentication and integrity checking.
The protocol can operate in two modes:
Transport Mode - Secures only the data payload while keeping original IP headers. Used for end-to-end communication.
Tunnel Mode - Encrypts the entire IP packet and wraps it in a new header. Commonly used in VPN implementations.
The protocol uses Security Associations (SAs) to establish secure communication channels. These SAs define the security parameters including encryption algorithms, authentication methods, and shared keys.
With IPSec, you can find:
These SAs contain critical information including:
Encryption algorithms (3DES, AES, etc.)
Hash algorithms (SHA1, MD5, etc.)
Authentication methods
Key distribution algorithms
SA lifetime duration
IPSec Enumeration Commands:
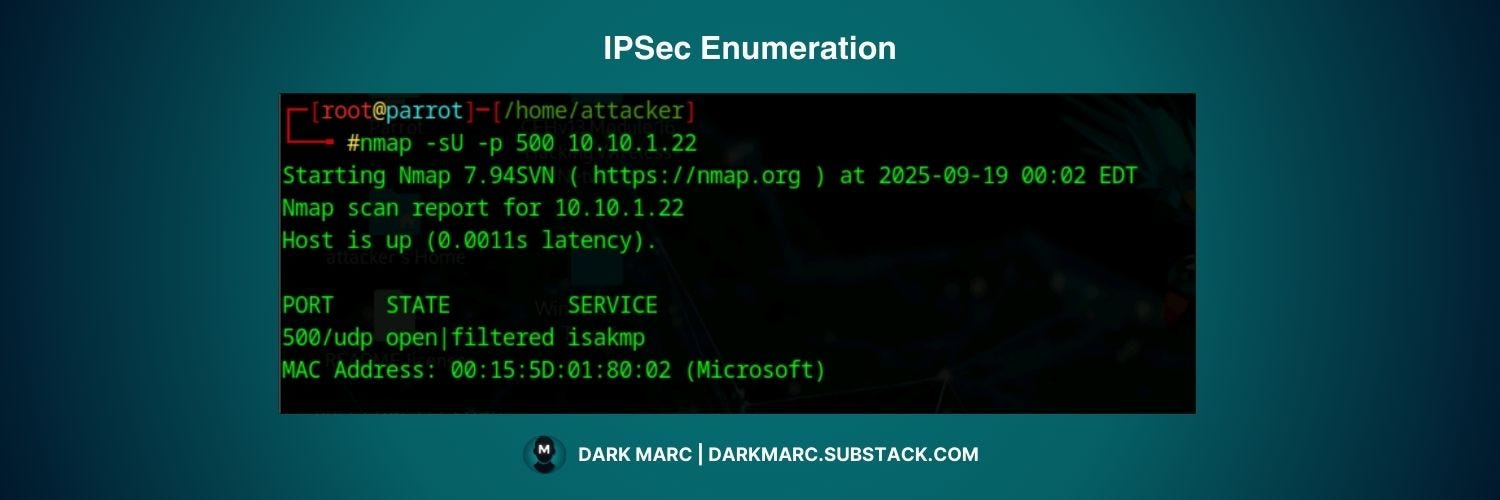
Attackers typically start with basic port scanning to identify ISAKMP services running on UDP port 500. This command will signify the potential presence of a VPN gateway.
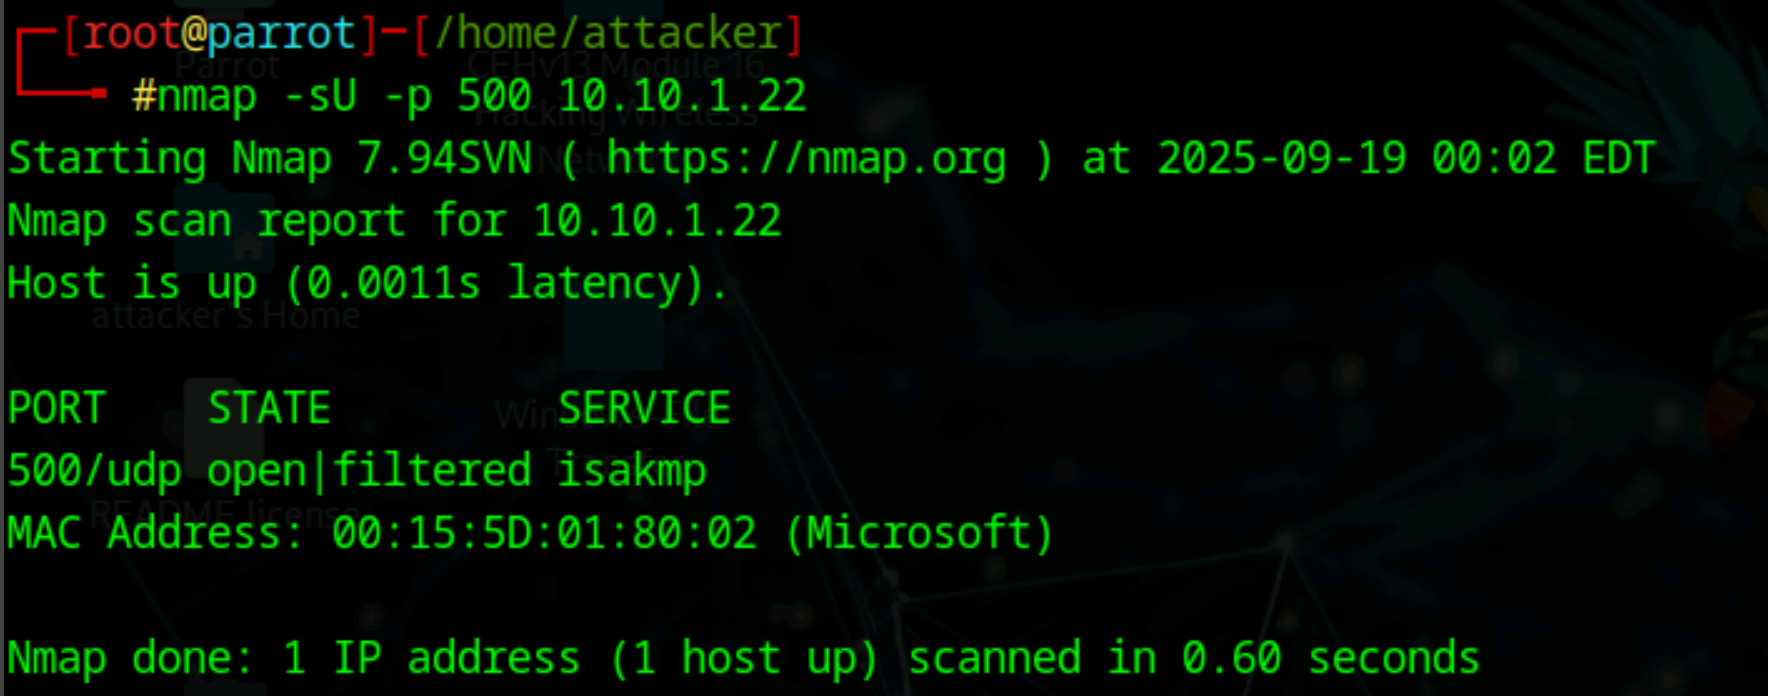
nmap -sU -p 500 <IP Address>This simple scan reveals the presence of VPN gateways by checking if the standard ISAKMP port is open and responsive.
IPSec Enumeration with ike-scan
The ike-scan tool is specifically designed for IPsec enumeration and can extract detailed information about IKE implementations through several techniques:
IKE Host Discovery

ike-scan -M <Target Gateway IP Address Range>This command identifies all hosts running IKE services within a target range by sending IKE requests and analyzing responses.
VPN Fingerprinting
ike-scan can identify specific IKE implementations and software versions through two methods:
UDP Backoff Fingerprinting - Analyzes the timing patterns of IKE response packets and compares them against known retransmission patterns
Vendor ID Fingerprinting - Compares Vendor ID payloads from VPN servers against known vendor identification patterns
Transform Enumeration
The tool discovers supported transform attributes for IKE Phase 1 negotiations, including:
Encryption algorithms (DES, 3DES, AES-128, AES-256)
Hash algorithms (MD5, SHA1, SHA-256)
Authentication methods (Pre-shared key, RSA signatures, RSA encryption)
Diffie-Hellman groups
SA lifetime values
User Enumeration
For certain VPN systems, ike-scan can identify valid usernames that exist in the VPN authentication database.
Pre-shared Key Attacks
When IPsec uses Aggressive Mode with pre-shared key authentication, ike-scan can:
Capture the authentication hash and parameters
Use the companion tool psk-crack for offline dictionary or brute-force password cracking
IPsec Enumeration Tools:
ike-scan: Discovers and enumerates IKE hosts
Nmap with IPsec scripts
ikeforce: Brute force IKE authentication
VPN enumeration tools
VoIP Enumeration (Port 2000, 20001, 5060, 5061)
VoIP converts analog voice signals into digital data packets that can be transmitted over IP networks. The process involves several components working together:

How VoIP Works:
Session Initiation Protocol (SIP) - Handles call setup, management, and termination. SIP servers coordinate communication between endpoints.
Real-time Transport Protocol (RTP) - Carries the actual voice data between endpoints during active calls.
Codecs - Compress and decompress voice data for efficient transmission. Common codecs include G.711, G.722, and G.729.
VoIP Gateways - Bridge traditional phone systems with IP networks, allowing calls between VoIP and traditional phone users.
The communication flow typically involves: call initiation through SIP, negotiation of connection parameters, establishment of RTP streams for voice data, and finally call termination.
With VoIP, you can find:
SIP server information
Extension numbers and user accounts
Voicemail systems
Conference bridge details
Call routing information
Codec information
Gateway configurations
Phone system manufacturer and version
VoIP Enumeration Tools:
SIPVicious: SIP protocol security testing suite
svmap: SIP endpoint scanner
Nmap SIP scripts
Metasploit VoIP modules
SiVuS: SIP vulnerability scanner
RPC Enumeration
RPC stands for Remote Procedure Call. It's a protocol that allows programs to execute procedures or functions on remote systems as if they were local calls.
How RPC Works:
RPC creates an abstraction layer that makes remote function calls appear identical to local function calls. The process involves several key components:
Client Stub - Acts as a local representative of the remote procedure, handling the conversion of function calls into network messages.
Server Stub - Receives network requests, unpacks parameters, calls the actual procedure, and packages the results for return transmission.
RPC Runtime - Manages the underlying network communication, handles connection establishment, and deals with transmission errors.
Portmapper/RPC Bind Service - Maps RPC program numbers to specific network ports, acting like a directory service for RPC services.
The communication flow starts when a client makes what appears to be a local function call. The client stub intercepts this call, packages the parameters, and sends them over the network. The server stub receives the request, calls the actual function, and returns the results back through the network.
With RPC, you can find:
Available RPC services and program numbers
Version information for RPC programs
Network port mappings
Service endpoints
Authentication mechanisms
Supported RPC procedures
Server implementation details
RPC Enumeration Tools:
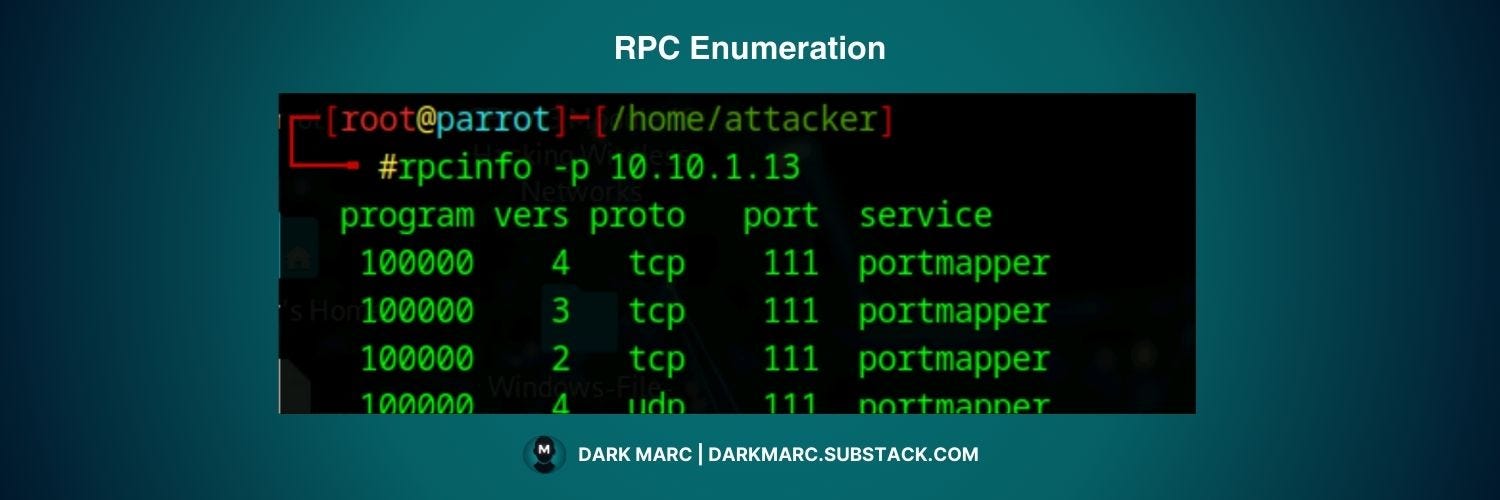
rpcinfo: Lists RPC services on remote systems
Nmap RPC scripts
rpc-grind: RPC endpoint enumeration
Metasploit RPC modules
RPC Enumeration Commands:
# List all RPC services
rpcinfo -p [target_ip]

# Query specific program
rpcinfo -T tcp [target_ip] [program_number]

# Nmap RPC enumeration
nmap -sR [target_ip]
nmap --script rpc-grind [target_ip]
Unix/Linux Enumeration
Unix and Linux systems present unique enumeration opportunities due to their network services, file permissions, and system architecture.
How Unix/Linux Systems Work:
Unix/Linux systems follow a multi-user, multi-tasking architecture with several key characteristics that affect enumeration:
File System Hierarchy - Everything is treated as a file, including devices and network connections. The system uses a unified directory structure starting from the root (/).
User and Group Management - Systems maintain user accounts with specific privileges. The /etc/passwd file contains user information, while /etc/shadow stores password hashes.
Network Services - Common services include SSH (port 22), HTTP/HTTPS (ports 80/443), FTP (port 21), and various remote access protocols.
Process Management - The system runs multiple processes simultaneously, many of which may provide network services or contain sensitive information.
With Unix/Linux, you can find:
User account information
Running processes and services
Network connections and listening ports
System configuration files
Installed software packages
File permissions and ownership
Environment variables
Cron jobs and scheduled tasks
Network interface configurations
System logs and audit trails
Unix/Linux Enumeration Tools:
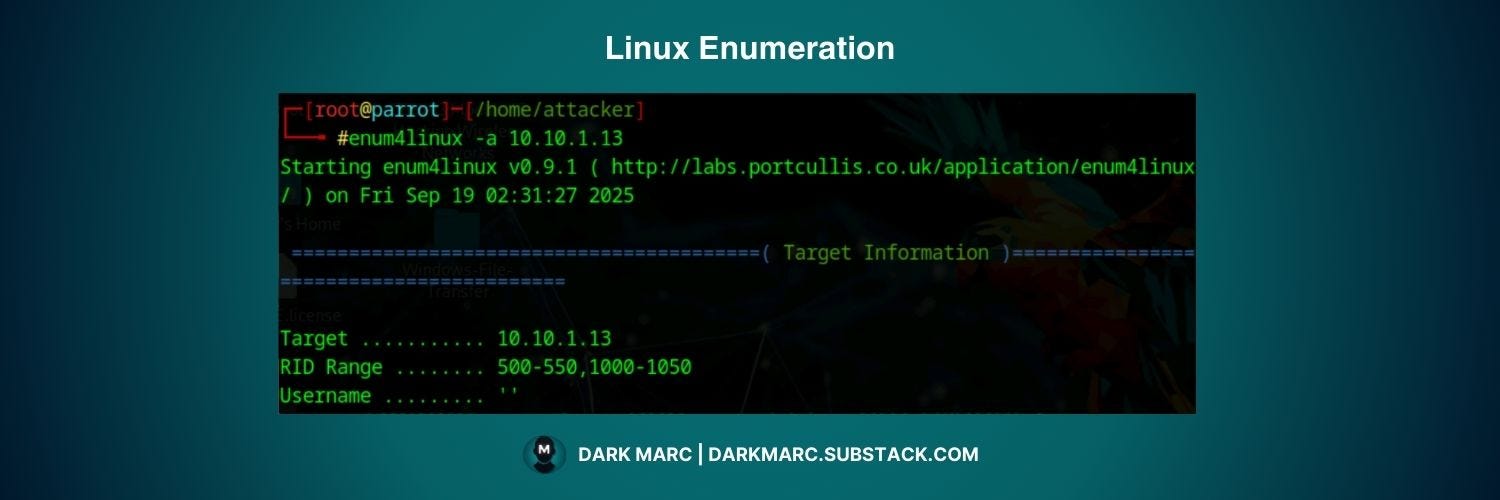
enum4linux: Comprehensive Linux enumeration
LinPEAS: Linux Privilege Escalation Awesome Script
Nmap with various scripts
dirb/gobuster: Directory enumeration
LinEnum: Linux enumeration script
Common Unix/Linux Enumeration Commands:
# User enumeration
finger @[target_ip]
rwho -a [target_ip]

# Service enumeration
rpcinfo -p [target_ip]
showmount -e [target_ip]

# Directory enumeration
dirb http://[target_ip]
gobuster dir -u http://[target_ip] -w wordlist.txt
SMB Enumeration (Ports 445, 135-139)
SMB stands for Server Message Block on Windows, with its Linux equivalent called Samba. It's a network protocol used for sharing files, printers, and other resources between systems.

How SMB Works:
SMB operates as a client-server protocol that enables applications to read and write files and request services from server programs across a network:
SMB Sessions - Clients establish authenticated sessions with SMB servers, typically using NTLM or Kerberos authentication.
Shares - The server presents network resources as "shares" - logical groupings of files, directories, or devices that clients can access.
File and Print Services - SMB handles both file sharing (allowing remote file access) and print sharing (enabling network printing).
Named Pipes - SMB supports named pipes for inter-process communication, allowing applications to communicate across the network.
Different SMB Versions - SMB1 (legacy, vulnerable), SMB2 (improved performance), and SMB3 (enhanced security and features).
The protocol typically operates on ports 139 (NetBIOS Session Service) and 445 (SMB over TCP). SMB runs directly on TCP port 445 or via the NetBIOS API on UDP ports 137-138 and TCP ports 137 and 139.
By using the SMB service, users can access files and other data stored at a remote server. The SMB service also allows application users to read, write, and modify files on the remote server.
With SMB, you can find:
Shared directories and files
User account information
Domain and workgroup details
System information and OS version
Access permissions for shares
Connected users and sessions
Password policies
Printer information
Administrative shares (C,ADMIN, ADMIN ,ADMIN, IPC$)
Machine names and NetBIOS information
Service banners and version details
SMB enumeration provides attackers with a substantial amount of information about the target system, making networks running this service highly vulnerable to further exploitation.
SMB Enumeration Process:
SMB enumeration typically involves banner grabbing to obtain information such as OS details and versions of services running. Using this information, attackers can perform various attacks such as SMB relay attacks and brute-force attacks.
The enumeration process generally follows these steps:
Port Discovery - Scan for open SMB ports (139, 445) to identify active SMB services
Service Detection - Determine SMB version, OS details, and service configuration
Share Enumeration - List available network shares and their permissions
User Enumeration - Identify valid user accounts and group memberships
Session Analysis - Examine active connections and logged-in users
SMB Enumeration with Nmap:
Nmap provides comprehensive SMB enumeration capabilities through its built-in scripts. The basic command for SMB enumeration is:
nmap -p 445 -A <target_IP>In this command:
The
-poption specifies port 445 (the primary SMB port)The
-Aoption enables OS detection, version detection, script scanning, and traceroute information
This scan reveals whether port 445 is open and provides detailed information about the SMB service, including:
NetBIOS name and domain information
SMB protocol versions supported
Operating system details and version
SMB security configuration
Available shares and their permissions
Advanced Nmap SMB Scripts:
Nmap includes specialized scripts for detailed SMB enumeration:
# Enumerate SMB shares
nmap --script smb-enum-shares -p 445 <target_IP>

# Enumerate users and groups
nmap --script smb-enum-users -p 445 <target_IP>

# Check for SMB vulnerabilities
nmap --script smb-vuln-* -p 445 <target_IP>

# Get detailed SMB system information
nmap --script smb-os-discovery -p 445 <target_IP>

# Enumerate SMB protocols
nmap --script smb-protocols -p 445 <target_IP>

# Check SMB security mode
nmap --script smb-security-mode -p 445 <target_IP>
NetBIOS Enumeration via SMB:
Since SMB often runs alongside NetBIOS, you can also target port 139:
nmap -p 139 -A <target_IP>This reveals NetBIOS-specific information including machine names, workgroup details, and service registrations.
SMB Enumeration with smbclient:
The smbclient tool provides interactive SMB access and enumeration capabilities:
# List available shares without authentication
smbclient -L //<target_IP> -N

# List shares with username
smbclient -L //<target_IP> -U <username>

# Connect to a specific share
smbclient //<target_IP>/<share_name> -U <username>
Common smbclient enumeration commands:
-L- List shares on the target-N- Suppress password prompt (null session)-U- Specify username for authentication
SMB Enumeration with enum4linux:
enum4linux is a comprehensive tool specifically designed for SMB and NetBIOS enumeration:
# Basic enumeration
enum4linux <target_IP>

# Verbose enumeration with all checks
enum4linux -a <target_IP>

# Enumerate users only
enum4linux -U <target_IP>

# Enumerate shares only
enum4linux -S <target_IP>
enum4linux provides detailed information including:
Domain and workgroup information
Password policy details
User and group listings
Share permissions and contents
System information and OS details
SMB Enumeration with smbmap:
smbmap specializes in SMB share enumeration and permission analysis:
# Basic share enumeration
smbmap -H <target_IP>

# Enumerate with specific credentials
smbmap -H <target_IP> -u <username> -p <password>

# Recursive directory listing
smbmap -H <target_IP> -R

# Download files from shares
smbmap -H <target_IP> --download '<share>\<file>'
SMB Enumeration with rpcclient:
rpcclient enables RPC-based enumeration of SMB services:
# Connect with null session
rpcclient -U "" <target_IP>

# Common rpcclient commands:
rpcclient> enumdomusers        # Enumerate domain users
rpcclient> enumdomgroups       # Enumerate domain groups
rpcclient> querydominfo        # Query domain information
rpcclient> netshareenumall     # Enumerate network shares
Null Session Attacks:
Many SMB implementations allow null sessions, which provide unauthenticated access to certain information:
# Test for null session access
smbclient -L //<target_IP> -N
net use \\<target_IP>\ipc$ "" /user:""
Null sessions can reveal:
Share listings and permissions
User account information
System configuration details
Password policy information
SMB Enumeration Tools:
smbclient: Command-line SMB client for share access and enumeration
enum4linux: Comprehensive SMB and NetBIOS enumeration tool
smbmap: SMB share enumeration and permission analysis
Nmap SMB scripts: Built-in scripts for automated SMB discovery
rpcclient: RPC client for SMB service enumeration
nbtscan: NetBIOS name scanner for SMB-enabled systems
SMBMap: Python-based SMB enumeration tool
nullinux: SMB null session enumeration tool
Next Step: Vulnerability Scanning
In this guide, you've learned how to extract detailed information from network services. Network scanning finds open ports. Enumeration discovers what's actually running on those ports and how it's configured.
This intelligence prepares you for vulnerability scanning, the final step in Phase 2. You'll take the service versions and configuration details and match them against known security flaws.
Once you complete vulnerability scanning, you move into Phase 3: Gaining Access. The vulnerabilities you find become your entry points into the target systems. That's when you can finally put on the mask and start the real hacking!
Stay tuned for the next post on vulnerability scanning.
Great post!
It’s great how you describe how the NTP works! That’s actually something I couldn’t figure out for a while for the CISSP exam. I wish I had found this article sooner.