
The Complete Guide to Network Scanning (Ethical Hacking)

Scanning is the second phase in ethical hacking, where you scan machines discovered in the previous phase (footprinting and reconnaissance) for ports and services that may be vulnerable to attack, which you can use to gain access to a system.
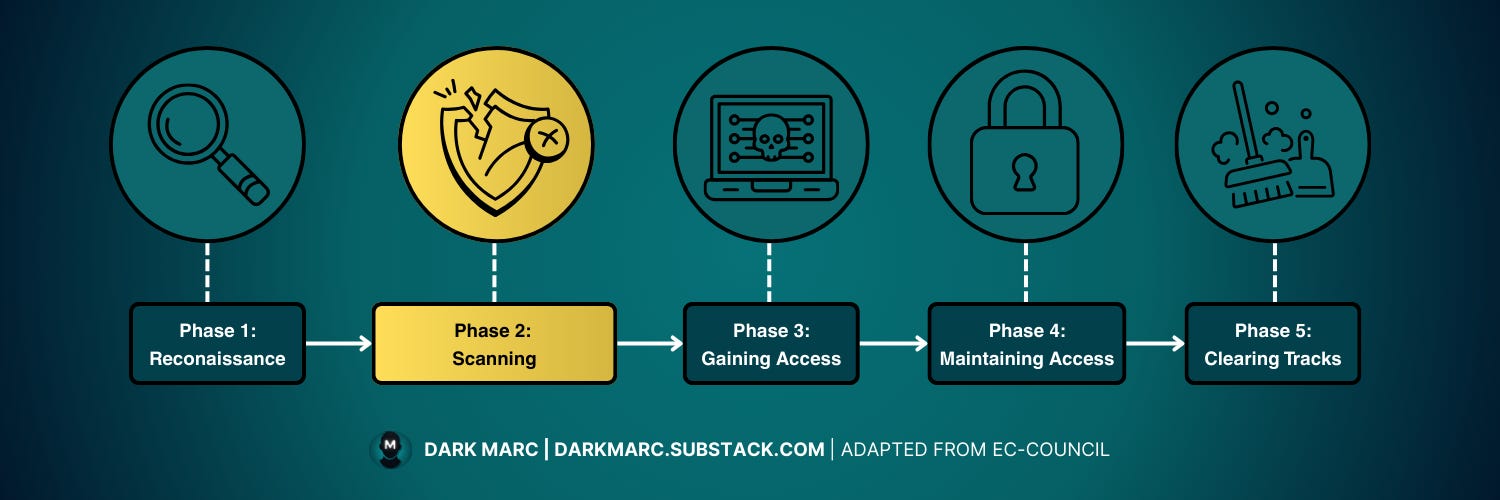
This phase targets specific hosts to identify weaknesses in their operating systems, services, or applications, guided by the client’s scope and Rules of Engagement (RoE).
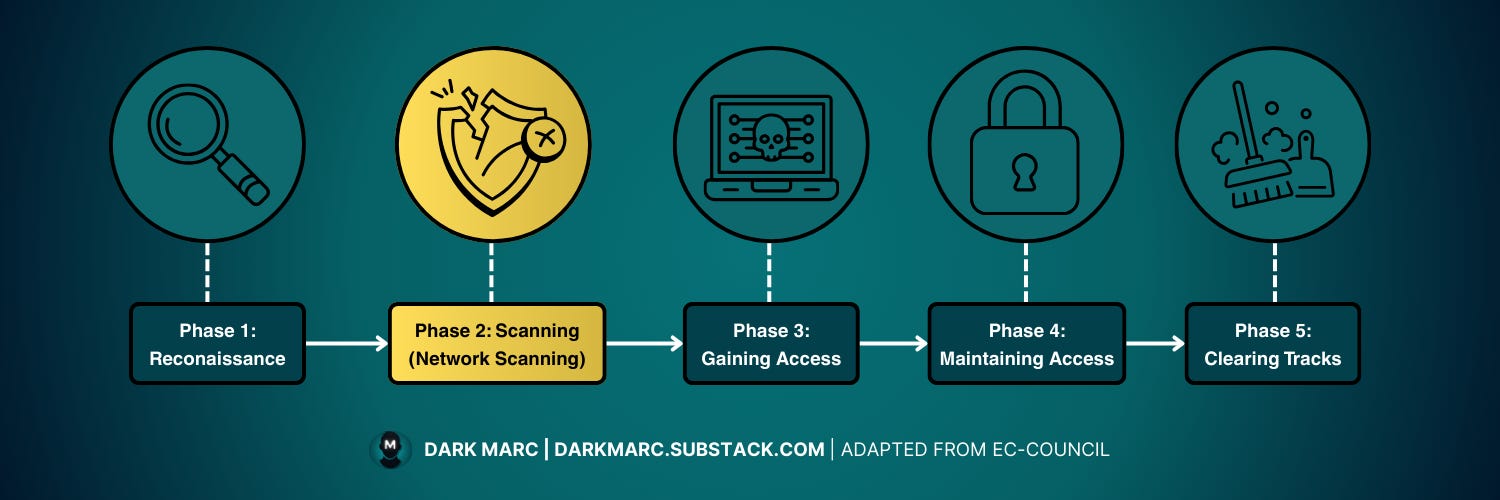
Phase 2: Scanning - Three Step Process
Phase 2: Scanning is made up of three steps that work together:
» Network Scanning (current step) - We discover live hosts, open ports, and running services using tools like Nmap. This gives us a broad view of what's available on the network.
Enumeration - We go beyond basic discovery by establishing active connections with target systems. We perform directed queries to extract detailed information like user accounts, network shares, and service configurations.
Vulnerability Scanning - We identify specific security weaknesses in the services we've discovered and enumerated, preparing us for the actual exploitation phase.
In this guide, we’ll go over Network Scanning in detail then, in following guides, we’ll go deeper on enumeration and vulnerability scanning.
In this guide, you will learn:
Basic network scanning concepts include the role of scanning, TCP/IP stack mechanics, and goals like identifying hosts, ports, and vulnerabilities.
Scanning techniques for host and service discovery cover methods like ICMP Ping, ARP, TCP SYN, and UDP scans to detect live systems and services.
Advanced scanning and evasion techniques use tools like Nmap, packet crafting, and AI-driven analysis to bypass firewalls and IDS stealthily.
Countermeasures and ethical considerations ensure scans align with RoE while understanding defenses like ICMP blocking and spoofing detection.
This guide equips you with practical techniques to conduct network scanning on target systems you want to gain access to.
What is Network Scanning?
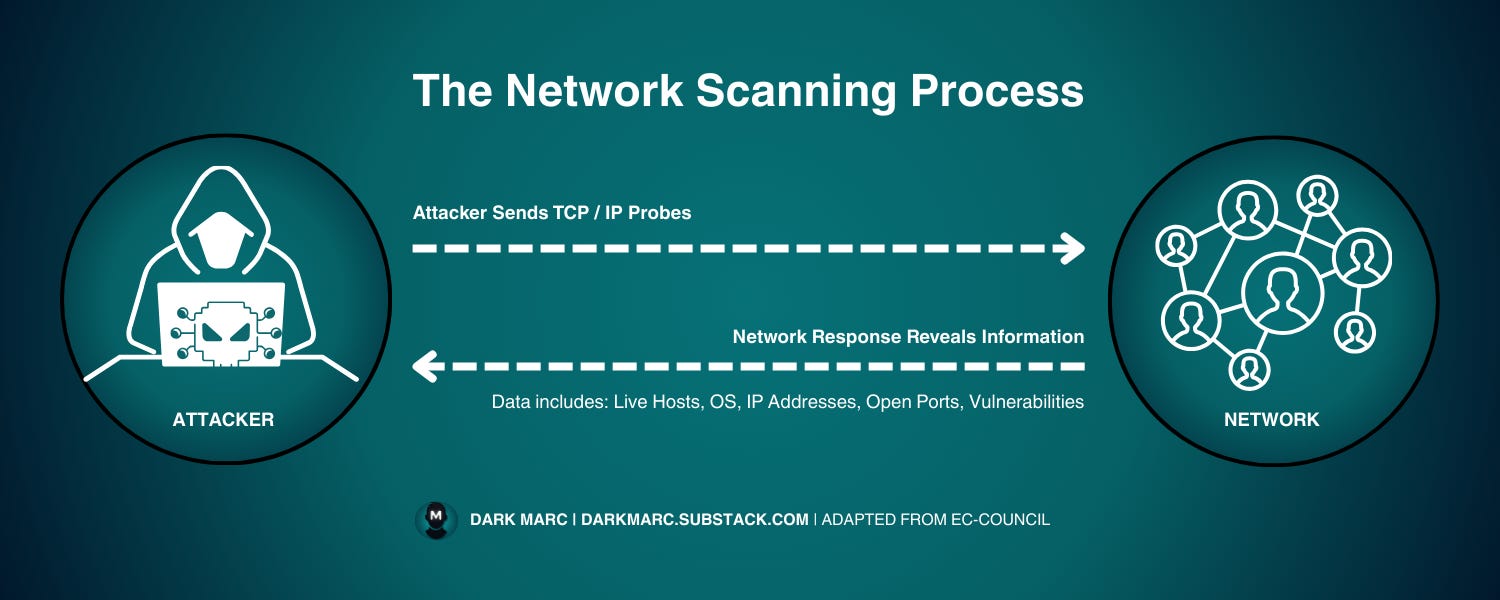
In ethical hacking, network scanning is the methodical process of sending specially crafted packets to a network and analyzing the responses. The goal is to identify live hosts, open ports, and services running on those hosts.
This phase builds directly on the footprinting and reconnaissance stage you completed earlier. These scans can be external (uncredentialed, from the internet) or internal (credentialed or uncredentialed), depending on the agreed objectives.
While reconnaissance maps out possible targets, scanning narrows in on the systems you’ve already discovered, looking for potential entry points in much greater detail.
Put simply:
Reconnaissance = “Where might the doors be?”
Scanning = “Which doors are unlocked, and what’s behind them?”
By uncovering open ports and the services bound to them, you can begin identifying weaknesses that might later be exploited.
Fingerprinting the Target
Once scanning confirms which hosts are alive and responsive, the next step is fingerprinting, gathering detailed, host-specific information such as:
The operating system in use.
Services running and their versions.
IP Addresses.
Applications or frameworks installed.
Vulnerabilities of services, OS, and applications.
Fingerprinting is different from earlier footprinting:
Footprinting paints a wide map of all potential targets.
Fingerprinting zooms in on a single host to extract precise technical details that could reveal vulnerabilities.
The information gathered here is the bridge between discovery and exploitation.To choose an effective exploit, or to confirm whether a vulnerability exists, you must know exactly what OS, service versions, and applications you’re dealing with.
Without this methodical approach, you risk missing exploitable weaknesses or wasting time chasing false leads.
Network Communication Basics
To understand network scanning, we need to know two key concepts: the OSI Model and the TCP/IP Model. Together, these models explain how data moves between devices during network communication.
The OSI Model is a theoretical framework that divides network communication into seven layers, each with a specific role. It’s like a blueprint for understanding the process conceptually.
The TCP/IP Model is a practical set of protocols used in real-world networks, like the internet, to enable communication. It’s directly implemented in devices and software. Knowing both clarifies what happens when we scan a network or its devices.
The OSI Model
The OSI (Open Systems Interconnection) Model is a conceptual guide that organizes network communication into seven layers. It’s theoretical because it’s not built into software or hardware but serves as a universal way to analyze and design network systems. Each layer has a specific function:

Application Layer: Where user-facing software (e.g., browsers, email clients) interacts with the network using protocols like HTTP or SMTP. Scanning this layer identifies specific services or versions running on open ports, often to find vulnerabilities.
Presentation Layer: Formats, encrypts, or compresses data for the receiving system. Example: HTTPS uses TLS to encrypt web traffic. Scans may detect encryption protocols (e.g., TLS version) to assess security.
Session Layer: Maintains ongoing communication sessions between devices. Example: a remote desktop session stays active for continuous interaction. While not directly scanned, this layer affects how long scanned connections persist.
Transport Layer: Ensures data reaches the correct application, using TCP for reliable delivery or UDP for faster, less reliable transfer. Example: a web browser connects to port 443 for HTTPS. Port scanning tests which ports are open to reveal available services.
Network Layer: Manages IP addresses and routes data between networks. Example: the “ping” command sends an ICMP echo request to check if a device is online. A “ping sweep” scans multiple IPs to discover active devices.
Data Link Layer: Enables devices on the same local network to communicate using unique MAC addresses. Example: an ARP request (“Who has IP 192.168.1.10?”) maps an IP to a MAC address. Scanning here can identify all devices on a local network.
Physical Layer: Handles the transmission of raw bits (0s and 1s) over physical media like Ethernet cables or Wi-Fi signals. Example: a router’s blinking lights indicate active data transfer. If this layer fails (e.g., unplugged cable), no scanning is possible since data can’t move.
The OSI Model offers a theoretical lens for understanding network communication, while the TCP/IP Stack provides the practical protocols used in real-world networks.
The TCP / IP Model
The TCP/IP Model is a framework that powers real-world network communication, like the internet. It has five layers and uses protocols built into devices and software to ensure data transfer.
It’s more practical than the OSI Model because it’s directly implemented in systems like operating systems and routers.
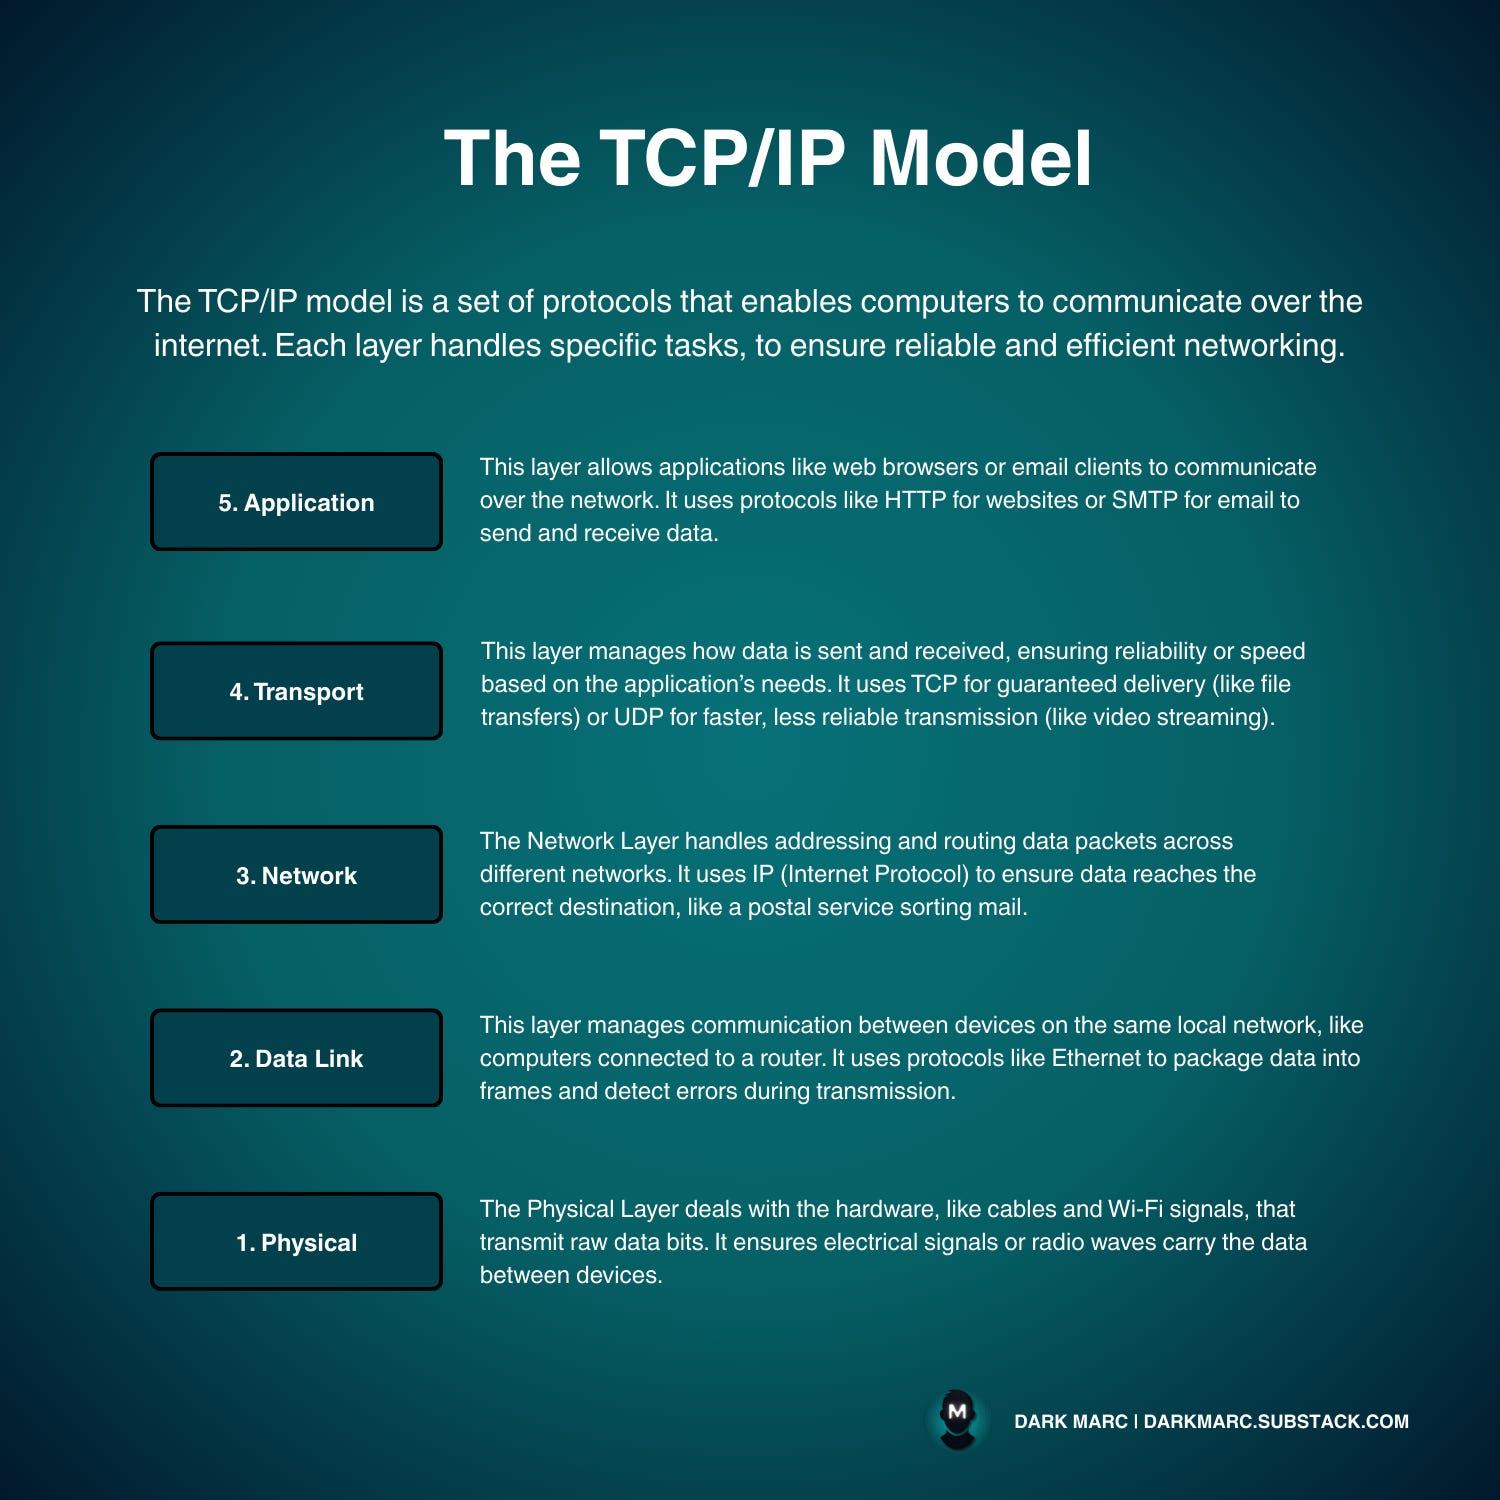
Application - This layer allows applications like web browsers or email clients to communicate over the network. It uses protocols like HTTP for websites or SMTP for email to send and receive data.
Transport - This layer manages how data is sent and received, ensuring reliability or speed based on the application’s needs. It uses TCP for guaranteed delivery (like file transfers) or UDP for faster, less reliable transmission (like video streaming).
Network - The Network Layer handles addressing and routing data packets across different networks. It uses IP (Internet Protocol) to ensure data reaches the correct destination, like a postal service sorting mail.
Data Link - This layer manages communication between devices on the same local network, like computers connected to a router. It uses protocols like Ethernet to package data into frames and detect errors during transmission.
Physical - The Physical Layer deals with the hardware, like cables and Wi-Fi signals, that transmit raw data bits. It ensures electrical signals or radio waves carry the data between devices.
The TCP/IP Model’s protocols (like TCP, IP, and HTTP) are used in actual networks, making it directly relevant to scanning.
Understanding both models helps explain how data flows during network scans, from detecting active devices to identifying services.
The Role of TCP/IP Stack in Scanning
Network scanning primarily involves the Application, Transport, and Network layers of the TCP/IP Model, though the Data Link layer can also be relevant in specific cases. Here’s how scanning relates to each layer:
Application Layer: Scanning targets services running on this layer, such as web servers (HTTP) or email servers (SMTP). Tools like vulnerability scanners probe open ports to identify specific applications or their versions, often to detect potential weaknesses.
Transport Layer: Port scanning, a core part of network scanning, operates here. It checks for open ports using protocols like TCP (e.g., checking port 443 for HTTPS) or UDP to determine which services are available on a device.
Network Layer: Scanning techniques like ping sweeps or traceroutes use IP and protocols like ICMP to discover active devices or map network paths. This layer helps identify which hosts are reachable on a network.
Data Link Layer: In local network scanning, tools like ARP scans map IP addresses to MAC addresses to identify devices on the same network. This is less common but relevant for local network discovery.
Physical Layer: Is NOT directly involved in scanning machines on a network, as it handles hardware-level data transmission (e.g., cables, Wi-Fi signals), which is assumed to be functional for scanning to occur.
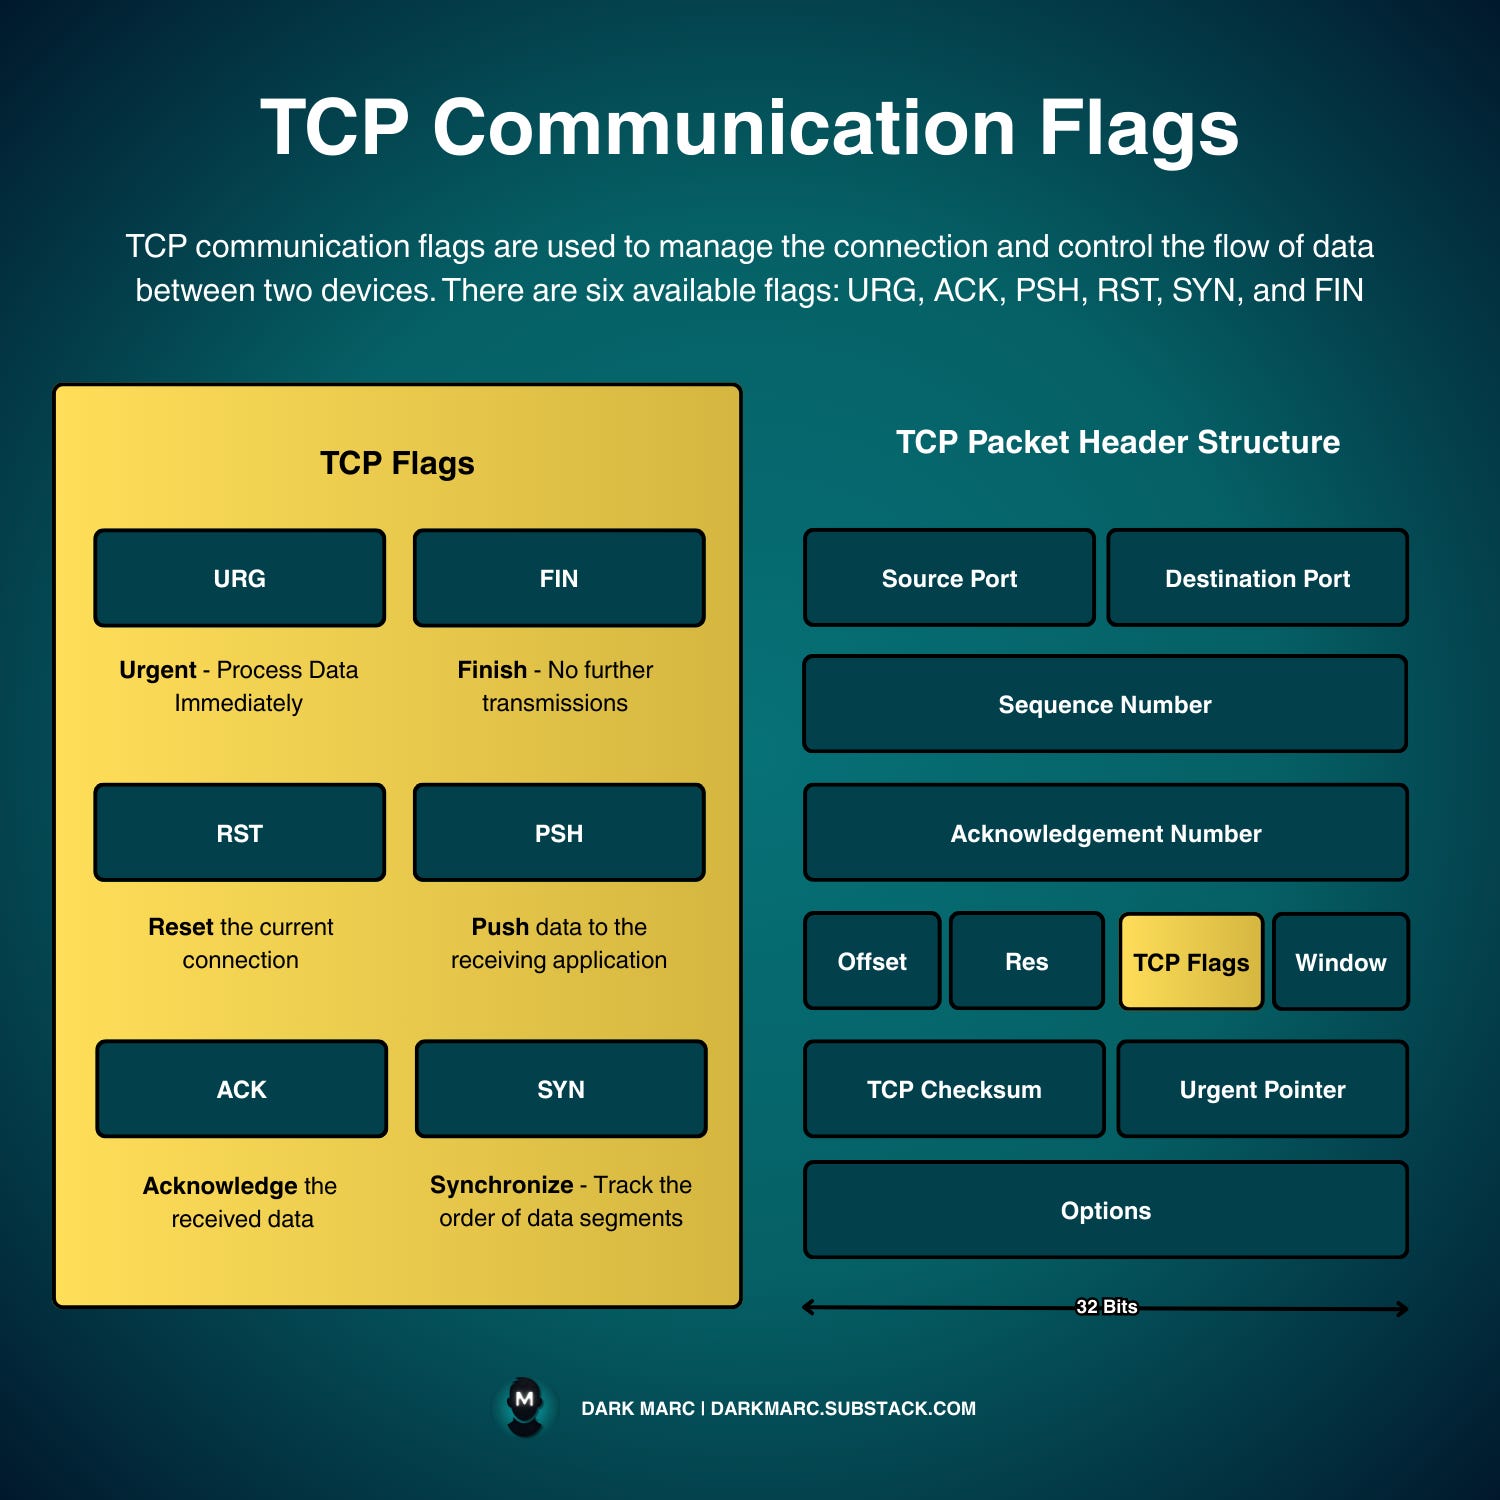
TCP Communication Flags
TCP flags enable reliable, ordered data delivery across unreliable networks like the internet. They ensure data arrives intact, in order, and that both sides coordinate.
TCP Flags
Each TCP segment includes a TCP header, which contains a flags field with six control signals: URG, ACK, PSH, RST, SYN, and FIN. These flags manage data flow, connection establishment, and termination as follows:
URG: Marks urgent data for immediate processing.
ACK: Confirms receipt of a segment with a sequence number.
PSH: Pushes buffered data to the application without delay.
RST: Resets the connection due to an error or invalid state.
SYN: Initiates a connection by synchronizing sequence numbers.
FIN: Signals the end of data transmission, closing the connection.
TCP flags are single-bit fields in the TCP header that act like switches - they're either "on" (1) or "off" (0). These flags tell the receiving computer how to handle the incoming packet and what state the connection should be in.
TCP Header Structure
The TCP packet header layout includes fields like:
Source/Destination Port: Which applications are communicating
Sequence Number: Keeps track of data order
Acknowledgment Number: Confirms what data was received
TCP Flags: The control bits we just discussed
Window: How much data can be sent before waiting for acknowledgment
Checksum: Error detection
Options: Additional TCP features
Next we’ll talk about how they’re used to establish a connection between two machines using the TCP 3-Way Handshake.
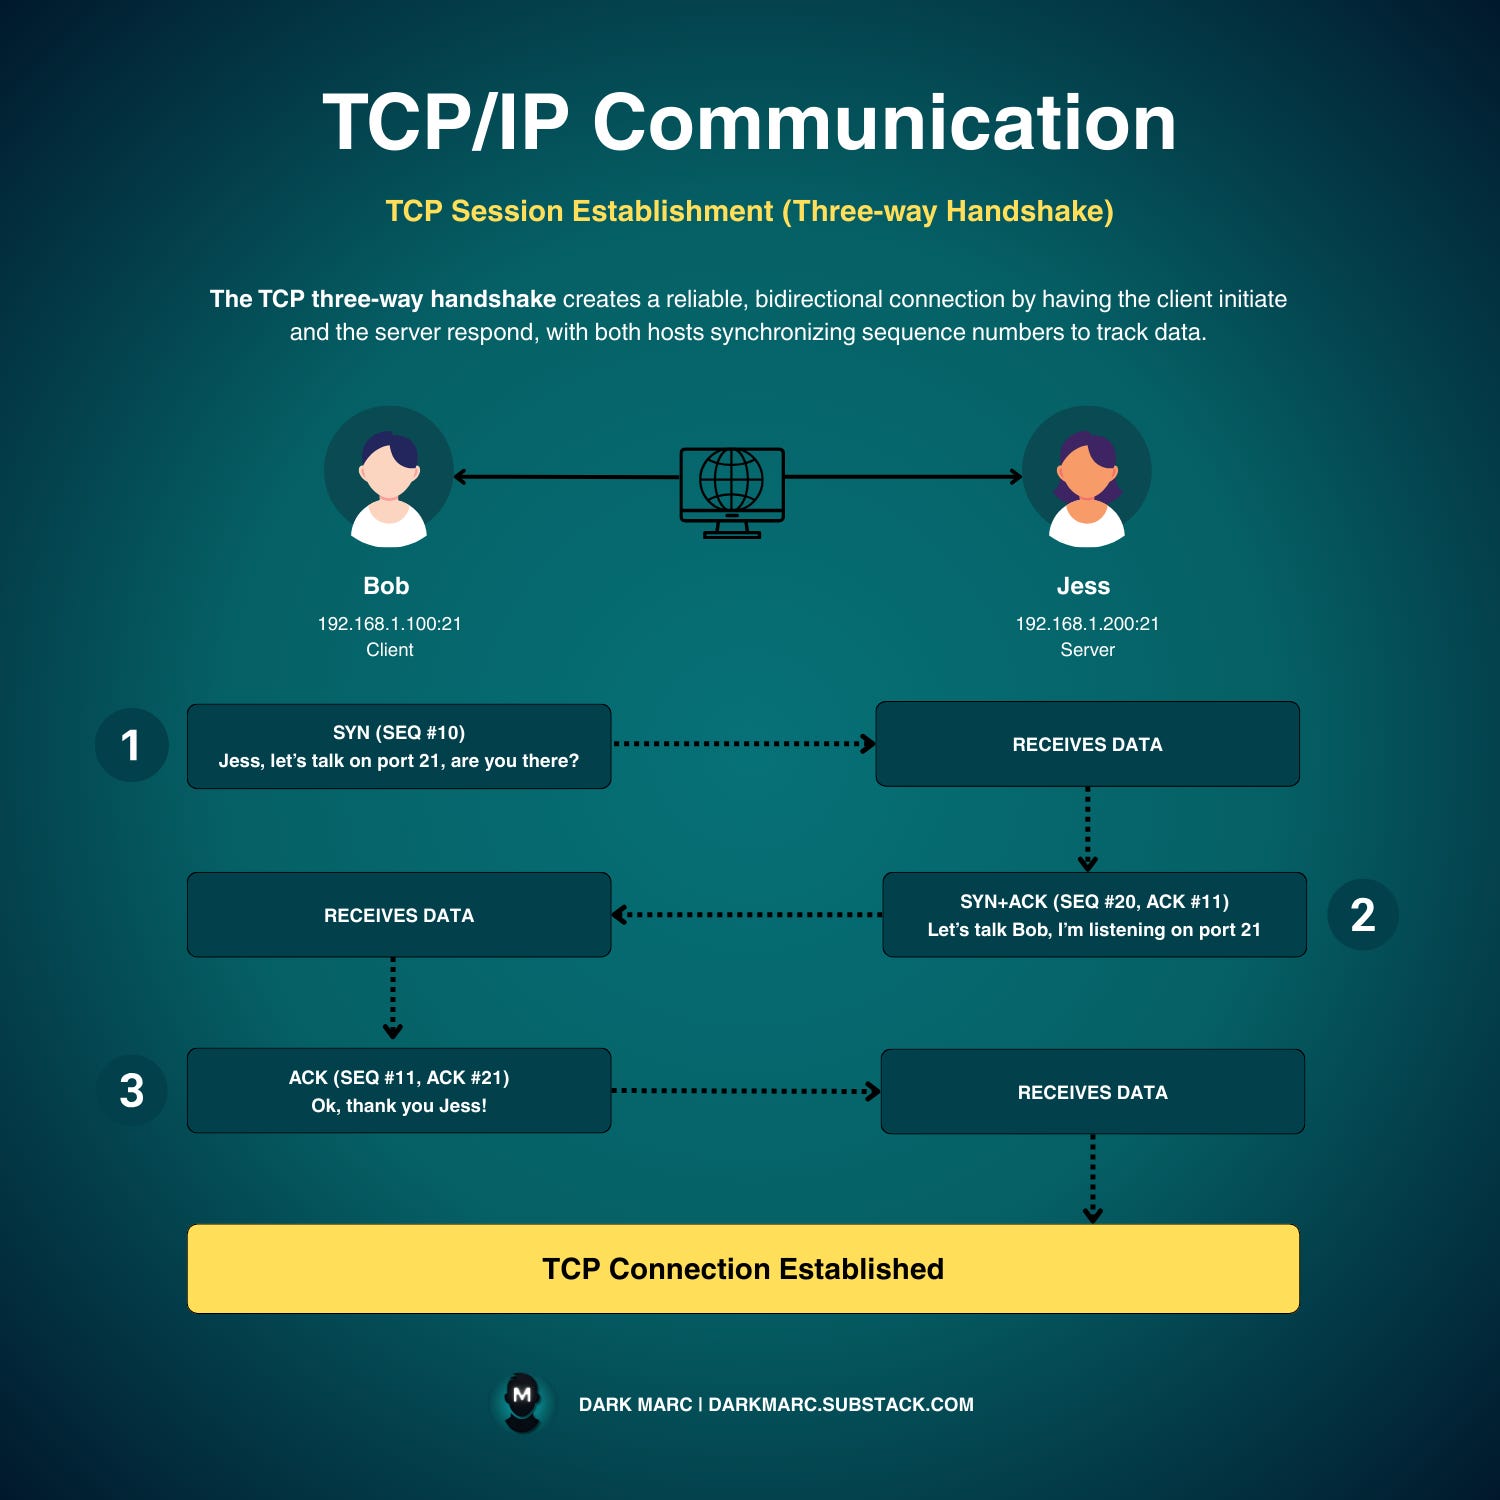
TCP 3-Way Handshake
The TCP 3-way handshake is how two hosts agree to talk. The host that initiates the connection is called the client, and the host that receives the connection request is called the server. It goes like this:
The client sends a SYN to a server, asking, "Can we connect?"
If the server is listening, it replies with a SYN-ACK, saying, "Yes, let's talk."
The client sends an ACK, confirming, "We're connected."
After this handshake, both sides know each other's starting point for tracking data. Random sequence numbers prevent attackers from guessing and hijacking the connection.
In scanning, one host will act as the client and probe target hosts in different ways. The most common approach is a SYN scan, where the scanner sends SYN packets to multiple ports but doesn't complete the full handshake.
A SYN-ACK response means the port is open, an RST means it's closed, and no response usually means it's filtered. Other scan types include TCP connect scans that do complete the full three-way handshake, and various stealth techniques that manipulate different parts of the TCP process.
Host Discovery Techniques
Host discovery techniques identify active systems on a network. These methods help map which devices are online before conducting detailed scans.
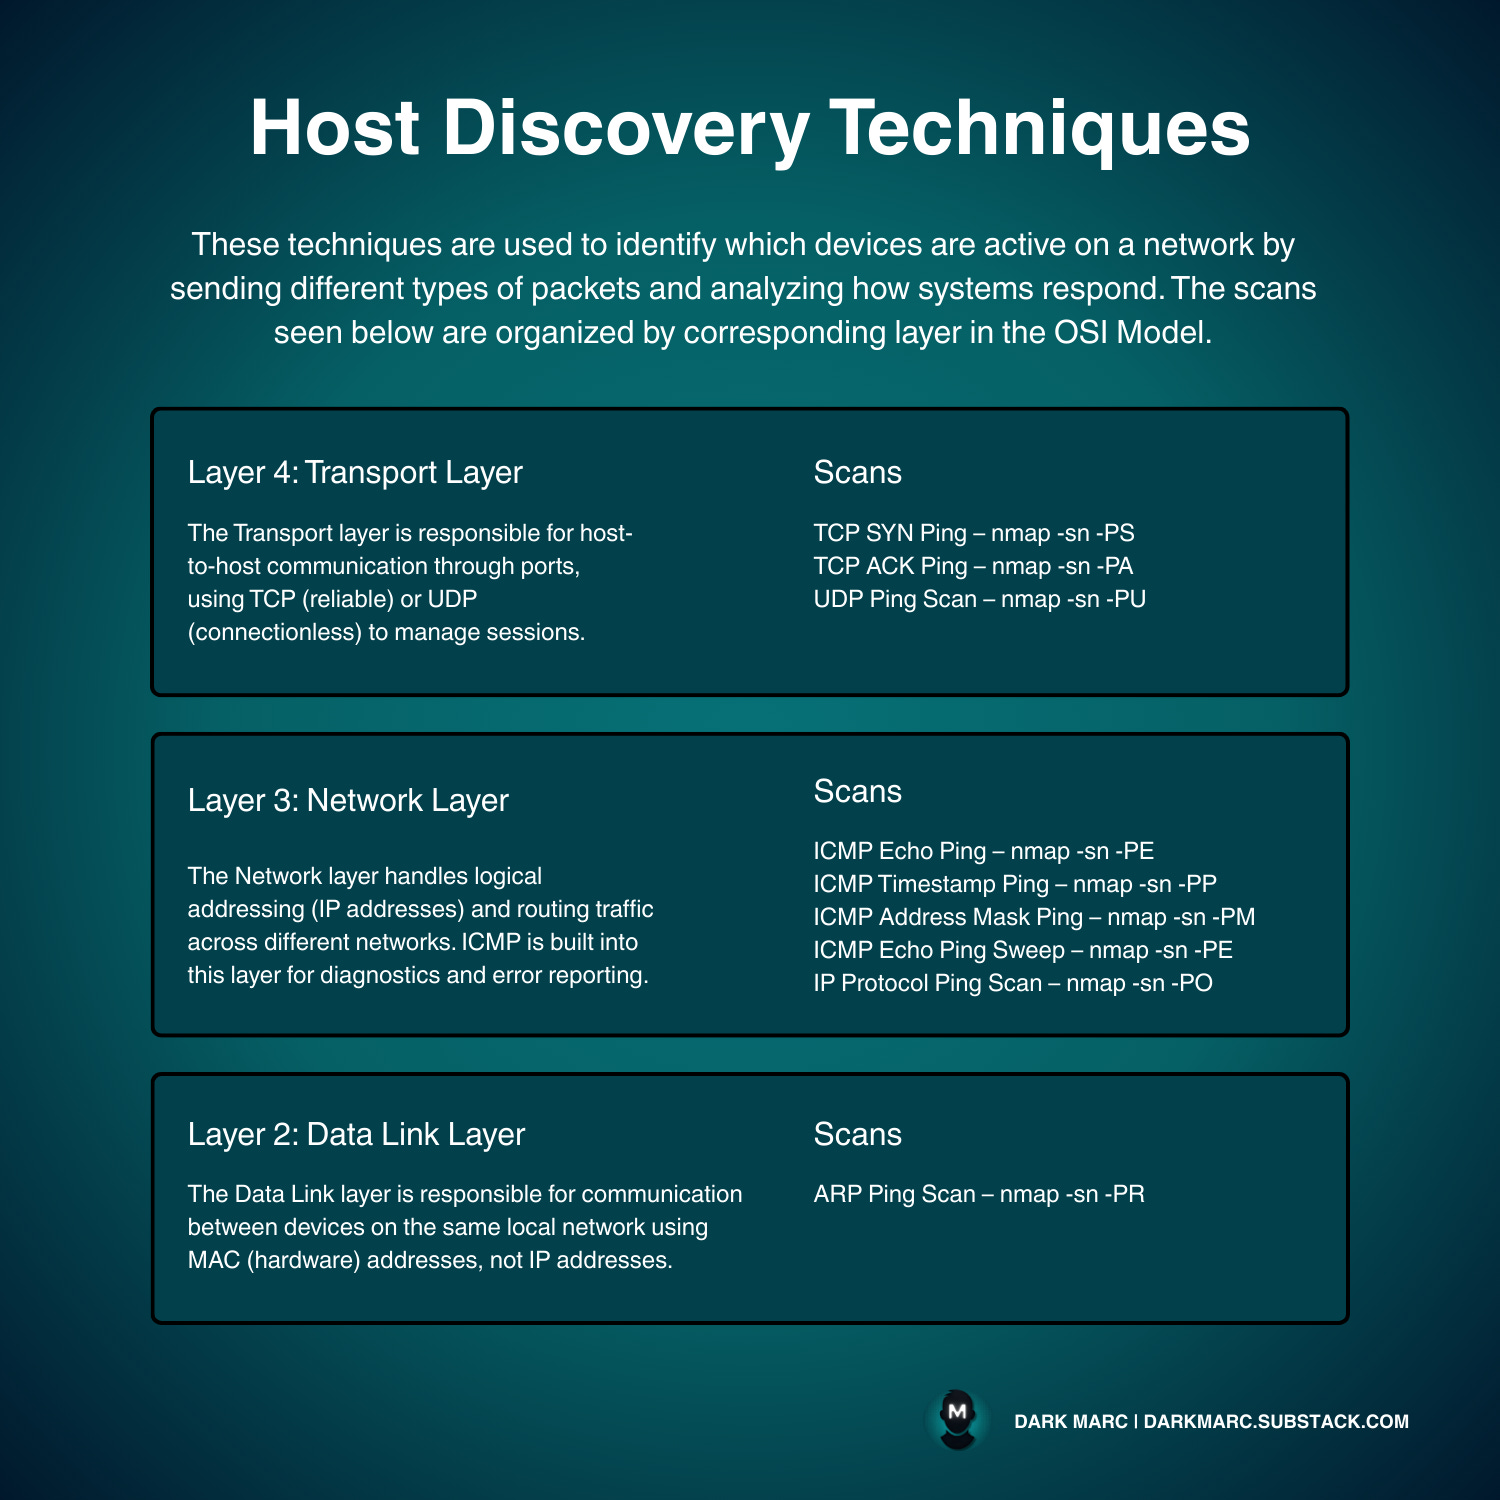
ICMP-Based Scans
Internet Control Message Protocol (ICMP) is a network protocol used for error reporting and network diagnostics. It's what the standard "ping" command uses.
ICMP Echo Ping (nmap -sn -PE <Target IP>) sends standard ping requests to hosts. The target responds if it's active and allows ICMP traffic.
ICMP Timestamp Ping (nmap -sn -PP <Target IP>) uses timestamp requests instead of echo requests, which may work when regular pings are blocked by firewalls.
ICMP Address Mask Ping (nmap -sn -PM <Target IP>) sends address mask queries as another way to detect active hosts.
ICMP Echo Ping Sweep (nmap -sn -PE <IP Range>) scans multiple IP addresses at once (like 192.168.1.1-254) to quickly find active hosts across an entire subnet.
ARP Scans
Address Resolution Protocol (ARP) translates IP addresses to MAC (physical) addresses on local networks.
ARP Ping Scan (nmap -sn -PR <Target IP>) asks "who has this IP address?" and gets responses from active devices. This works very well on local networks since ARP operates below the IP level and bypasses most filtering.
UDP Scans
User Datagram Protocol (UDP) is a connectionless network protocol.
UDP Ping Scan (nmap -sn -PU <Target IP>) sends UDP packets to closed ports. Active hosts typically respond with "port unreachable" error messages, revealing they're online.
IP Protocol Scans
IP Protocol Ping Scan (nmap -sn -PO <Target IP>) tests different IP protocols to see which ones get responses.
TCP Scans
Transmission Control Protocol (TCP) is a connection-oriented protocol that establishes reliable connections between devices.
TCP SYN Ping (nmap -sn -PS <Target IP>) sends SYN packets (connection requests) to common ports. Active hosts respond with either SYN/ACK (port is open) or RST (port is closed but host is active).
TCP ACK Ping (nmap -sn -PA <Target IP>) sends ACK packets (acknowledgment packets), which can bypass some firewalls that expect established connections.
Host Discovery Tools
Popular alternatives include Angry IP Scanner, SolarWinds Engineer's Toolset, NetScanTools Pro, Colasoft Ping Tool, Advanced IP Scanner, and OpUtils. These provide graphical interfaces and additional features for network discovery.
Finding Live Hosts with Open Ports and Services
After identifying live hosts through discovery techniques, the next critical step is determining which ports are open and what services are running on them.
This information reveals potential entry points and attack vectors that can be exploited in later phases of ethical hacking.
You can think of ports as numbered doorways on a computer. Each service (application or process) listens on specific port numbers to communicate with other systems. Common services and their default ports include:
FTP (Port 21): File Transfer Protocol for uploading and downloading files
SSH (Port 22): Secure Shell for encrypted remote access
Telnet (Port 23): Unencrypted remote terminal access
SMTP (Port 25): Simple Mail Transfer Protocol for sending email
DNS (Port 53): Domain Name System for resolving domain names
HTTP (Port 80): Hypertext Transfer Protocol for web traffic
POP3 (Port 110): Post Office Protocol for retrieving email
HTTPS (Port 443): Secure HTTP with SSL/TLS encryption
SMB (Port 445): Server Message Block for file sharing
Identifying these services helps determine which vulnerabilities might exist and what exploitation techniques could be effective.
Port Scanning
Port scanning involves sending specially crafted packets to target ports and analyzing the responses. The responses tell us three possible states:
Open: The port is actively listening and accepting connections
Closed: The port is not listening but the host responded
Filtered: The port may be open but a firewall is blocking access
Types of Port Scans
Port scanning techniques are categorized according to the type of protocol used for communication and their approach to network reconnaissance.
The scans we’ll cover in depth below include:
TCP Scanning
Open TCP Scanning Methods
TCP Connect / Full Open Scan
Stealth TCP Scanning Methods
Half-open Scan
Inverse TCP Flag Scan
Xmas Scan
FIN Scan
NULL Scan
Maimon Scan
ACK Flag Probe Scan
TTL-based Scan
Window Scan
Third Party and Spoofed TCP Scanning Methods
IDLE APID Header Scan
UDP Scanning
UDP Scanning
SCTP Scanning
SCTP INIT Scanning
SCTP COOKIE ECHO Scanning
SSDP Scanning
IPv6 Scanning
TCP Scanning
Open TCP Scanning Methods
TCP Connect / Full Open Scan - Complete three-way handshake connection to determine port status. This is the most reliable scanning method but is easily logged and detected by security systems. A full scan completes the TCP 3-way handshake, leaving a clear trace in logs and connection records.
nmap -sT -v <Target IP>Stealth TCP Scanning Methods
Half-open Scan - A half-open scan, also known as a SYN scan, is a stealth scanning technique that doesn't complete the full TCP connection process.
Instead of performing the complete three-way handshake (SYN → SYN-ACK → ACK), it performs only the first two steps: sends SYN, receives SYN-ACK from open ports, then immediately drops the connection without sending the final ACK.
This leaves the connection in a "half-open" state. To stay unnoticed, prefer a half open scan over a full open scan. A half open scan is also faster than a full open scan, saving milliseconds per IP, making it ideal for scanning large networks stealthily.
nmap -sS -v <Target IP>Inverse TCP Flag Scans
A sub-category of stealth scanning techniques that uses non-standard TCP flag combinations to evade detection and identify port states by exploiting RFC compliance variations in different operating systems.
Xmas Scan - Sends packets with FIN, PSH, and URG flags set simultaneously to bypass certain firewall configurations.
nmap -sX -v <Target IP>FIN Scan - Sends packets with only FIN flag set. Closed ports respond with RST packets while open ports typically ignore.
nmap -sF -v <Target IP>NULL Scan - Sends packets with no TCP flags set to identify port states based on response patterns.
nmap -sN -v <Target IP>Maimon Scan - Sends FIN/ACK packets to exploit specific TCP stack implementations for port detection.
nmap -sM -v <Target IP>ACK Flag Probe Scans
A sub-category of stealth scanning techniques that sends packets with ACK flag set to map firewall rules and determine packet filtering behavior.
TTL-based Scan - Manipulates Time-To-Live values to analyze network topology and firewall behavior patterns.
nmap -sA -ttl 100 -v <Target IP>Window Scan - Examines TCP window size in RST responses to differentiate between open and closed ports on certain systems.
nmap -sW -v <Target IP>Third Party and Spoofed TCP Scanning Methods
IDLE APID Header Scan - Uses idle host as intermediary to perform stealth scanning while hiding the actual source address.
nmap -Pn -p- -sl <Zombie><Target>UDP Scanning
UDP Scanning - Scans UDP ports by sending UDP packets and analyzing ICMP responses to determine port states.
nmap -sU <Target IP>SCTP Scanning
SCTP INIT Scanning - Uses SCTP INIT chunks to scan Stream Control Transmission Protocol ports, commonly found in telecom systems.
nmap -sY -v <Target IP>SCTP COOKIE ECHO Scanning - Employs SCTP COOKIE ECHO chunks for more stealthy SCTP port scanning than INIT method.
nmap -sZ -v <Target IP>SSDP Scanning
SSDP Scanning - Simple Service Discovery Protocol scanning to identify UPnP devices and services on the network.
nmap -sU -v <Target IP>IPv6 Scanning
IPv6 Scanning - Performs port scanning on IPv6 addresses to discover services on next-generation IP implementations.
nmap -6 <Target IP/Domain>Scan Aggressiveness
Scan aggressiveness refers to how quickly and intensively nmap sends packets during a scan. The timing templates control several factors:
Packet transmission rate - How fast packets are sent
Parallelization - How many simultaneous probes are sent
Timeout values - How long to wait for responses
Retry attempts - How many times to retry failed probes
You can control the aggressiveness of the scan by using the timing parameter -T flag which goes from 1-5. A 1 is the stealthiest, with 5 being most aggressive and less stealthy.
Lower -T values are more stealthy because they send packets slowly with longer delays, blending into normal network traffic patterns and reducing detection probability. However, they take significantly longer to complete.
Higher -T values send packets more frequently and in parallel, completing scans faster but creating more network noise that firewalls and intrusion detection systems can easily spot.
For stealth operations:
nmap -sS -T1 <target>For internal network assessments where speed matters more:
nmap -sS -T4 <target>The SYN scan (-sS) is particularly effective because it's both stealthier and faster than full TCP handshake scans (-sT).
Service Version Detection Techniques
A service is a binary or application running in the background. On Linux, these are often called daemons. Knowing what services are running on a host enables us to identify vulnerabilities in those services for use in later phases of ethical hacking.
Service Version Discovery with NMAP
For service version discovery, we run -sV (service version) against an IP address using tools like Nmap. This command probes open ports to determine the service and its version (e.g., Apache 2.4.18 or OpenSSH 7.6).
nmap -sV <target_ip>This scan performs advanced service fingerprinting that includes banner analysis plus additional probes and signature matching for more accurate identification.
Identifying the Target OS
Knowing the operating system (e.g., Windows, Linux) helps identify possible exploit choices and attack vectors. Below, you’ll find the most common OS discovery methods.
Banner Grabbing
A banner is a message that a service sends when a connection is established. It typically contains information about the service name, version, and sometimes the underlying operating system.
Banner grabbing is the technique of capturing these banners to gather information about services and systems during the reconnaissance phase of penetration testing or security assessment.
Active Banner Grabbing:
Active banner grabbing involves directly connecting to target services and requesting banner information. This method is more detectable but provides immediate results. Packets are sent to the target machine, and the response varies based on the OS used, due to differences in the TCP/IP stack implementation.
Different operating systems implement TCP/IP stacks with slight variations in default values, packet structure, and response timing, making it possible to fingerprint the OS through banner analysis.
Banner Grabbing with Telnet
Telnet command opens a connection and displays any banner the service sends.
telnet <target_ip> <port>Banner Grabbing with Netcat:
This establishes a raw connection to the service and displays any banner text it sends upon connection.
nc <target_ip> <port>Banner Grabbing with NMAP:
nmap -sC target_ip
nmap --script=banner target_ip
Passive Banner Grabbing:
Passive banner grabbing involves collecting information without directly interacting with the target system, making it less detectable. It does not require direct interaction with the target system.
Banner Grabbing from Error Messages
Error messages provide information such as the type of server, type of OS, and SSL tool used by the target remote system.
Common error message sources:
404 Not Found pages revealing web server versions
SSL/TLS certificate errors showing server software
Database connection errors exposing database types
Application errors revealing framework versions
Sniffing Network Traffic
Banner grabbing by sniffing network traffic involves capturing and analyzing network packets to extract banner information from legitimate connections without initiating direct contact with the target.
sudo tcpdump -A host <target_ip> | grep -i "server:"Banner Grabbing from Page Extensions
Looking for file extensions in URLs may assist in determining the application's version and underlying technology. Page extension banner grabbing is only for web servers (port 80/443) because it relies on HTML content and URLs.
curl -s <target_url> | grep -o 'href="[^"]*\.[a-zA-Z]*"'Common indicators:
.aspx→ IIS server and Windows platform.php→ PHP and likely Apache/Nginx.jsp→ Java application server.cfm→ ColdFusion server
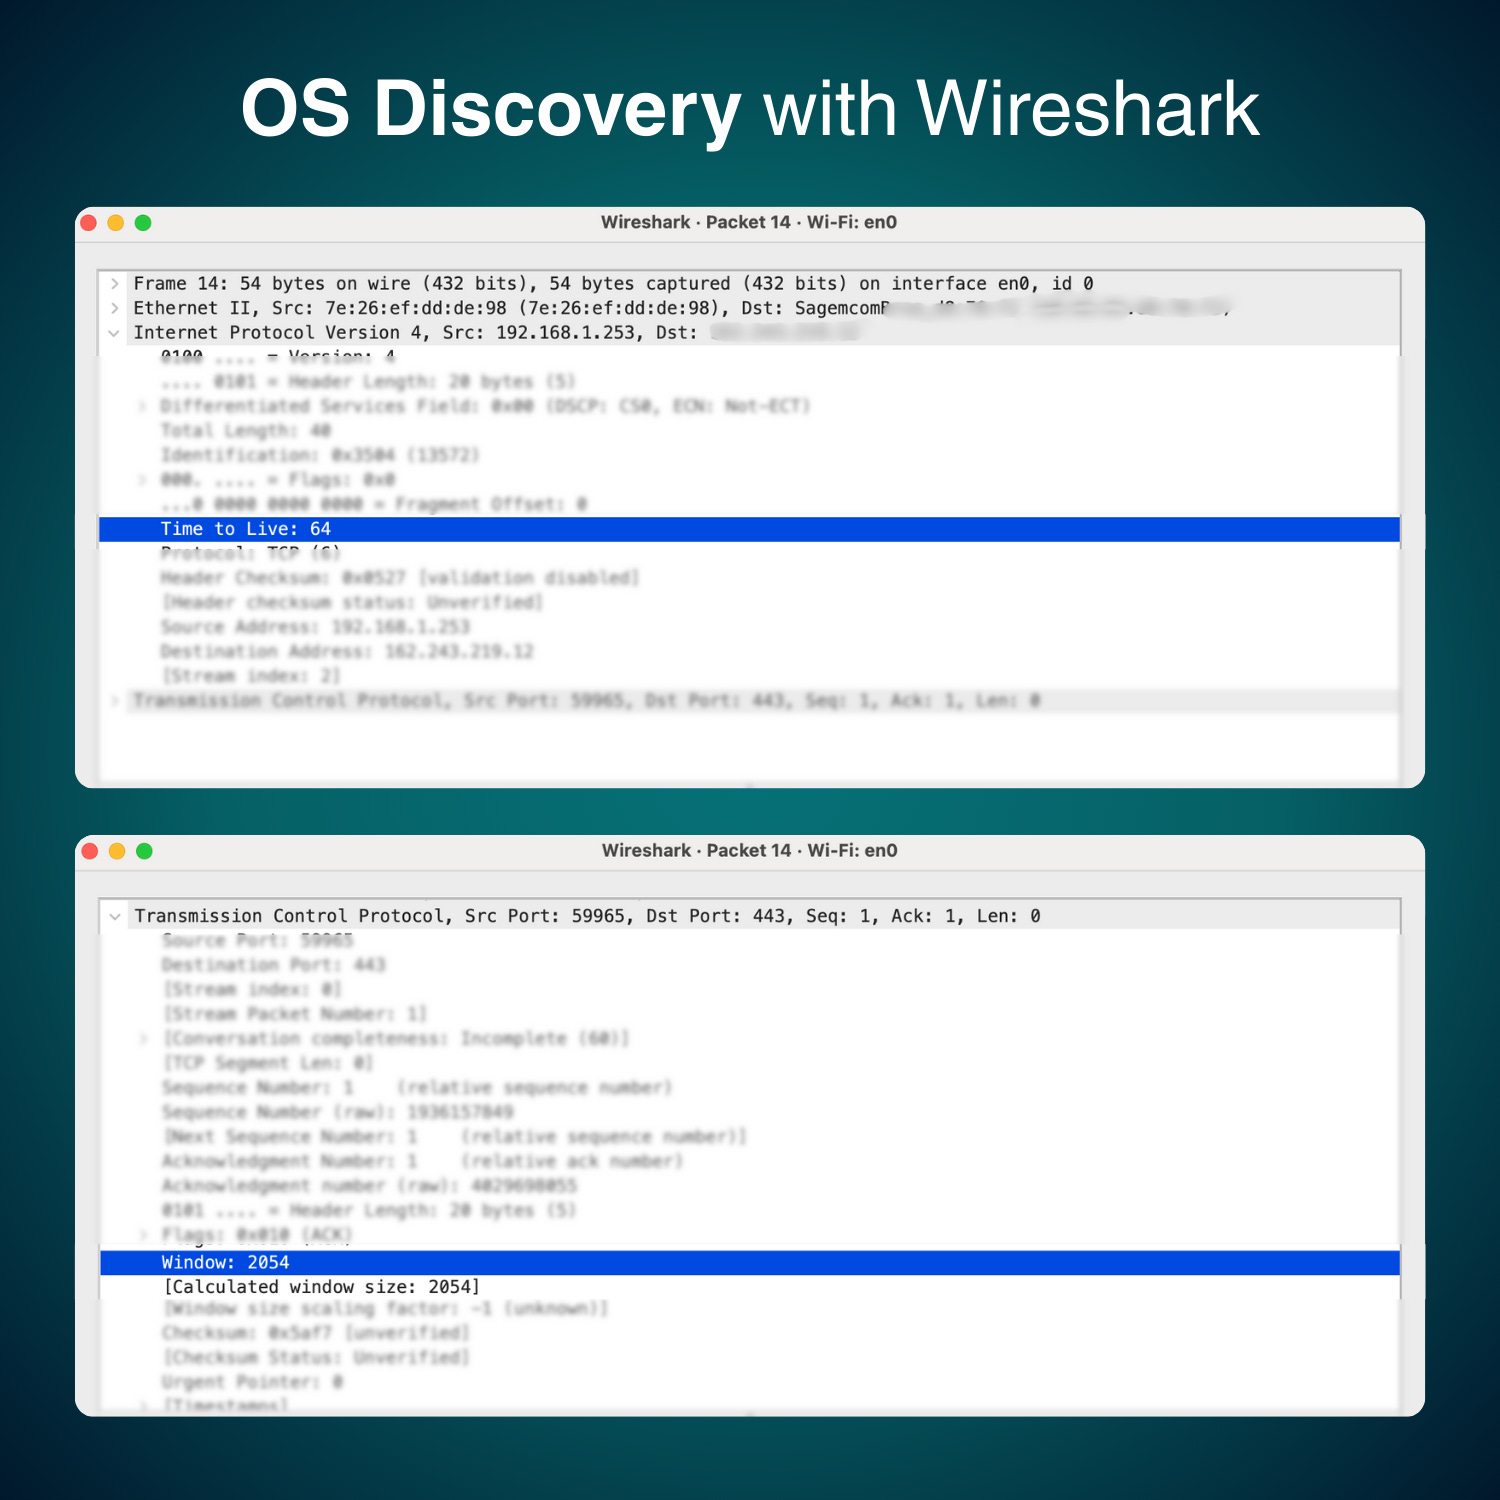
OS Discovery with Wireshark (TTL & TCP Window Size)
The Time to Live (TTL) value in IP packets indicates how many hops a packet can traverse before being discarded.
Attackers can leverage this value, along with the TCP window size, found in the IP header or the first packet of a TCP session, to identify the operating system of a machine.
To begin, use Wireshark to capture the response generated by the target machine. This packet-sniffing tool enables you to analyze the TTL and TCP window size fields, which are critical for OS identification.
This method proves most reliable on local networks where there are fewer hops between the client and server. Fewer hops mean the observed TTL is closer to the original value set by the operating system.
It’s important to note that network configurations can impact the accuracy of this method. Firewalls, NAT devices, and load balancers can alter or normalize TTL values, skewing your results. Large websites and content delivery networks (CDNs), such as Cloudflare or Akamai, often use load balancers.
As a result, the TTL and TCP window size you observe may reflect the characteristics of their edge servers rather than the true operating system of the host machine.
Different operating systems employ default values for TTL and TCP window sizes, which can be summarized as follows:
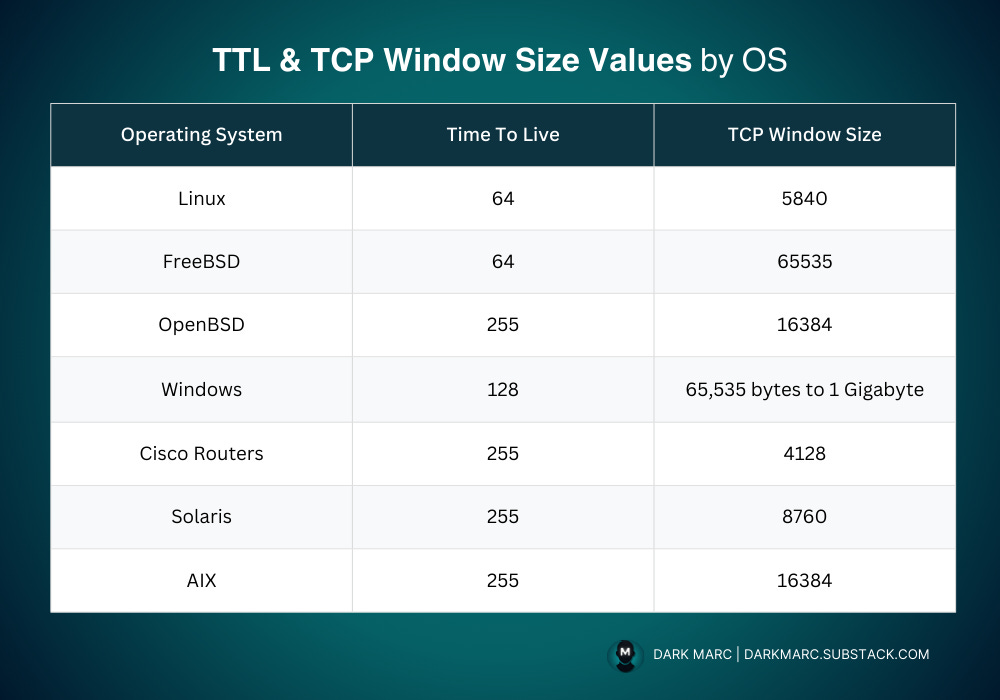
Linux: TTL 64, TCP Window Size 5840
FreeBSD: TTL 64, TCP Window Size 65335
OpenBSD: TTL 255, TCP Window Size 16384
Windows: TTL 128, TCP Window Size 65,535 bytes to 1 Gigabyte
Cisco Routers: TTL 255, TCP Window Size 128
Solaris: TTL 255, TCP Window Size 8760
AIX: TTL 255, TCP Window Size 16384
*These values are estimates and can be affected by a variety of factors*
Follow these steps to use the method:
Step 1: Start Wireshark
Open Wireshark.
Select your active network interface (e.g., Wi-Fi, Ethernet).
Step 2) Set a Capture Filter (optional)
To focus only on TCP connections initiated from the target machine (192.168.1.253), enter this in the Capture Filter field before starting capture:
ip.src == 192.168.1.253 && tcpStep 3) Start the Capture
Click the shark fin icon to begin capturing packets.
Step 4) Stop the Capture
After a few packets are collected, click the red square (Stop button).
Step 5) Locate a TCP Packet
5A. Inspect TTL
Click the packet.
Expand the Internet Protocol Version 4 (IPv4) section in the middle pane.
Look for Time to live (TTL) → this shows the remaining TTL value.
On a local LAN, this is usually very close to the system’s default (since there are few or no hops).
5B. Inspect TCP Window Size
Expand the Transmission Control Protocol section.
Look for Window size value.
This is the advertised TCP receive window, which varies by OS.
Step 6) Compare Values
Finally, compare the recorded TTL and TCP window size against the reference chart that outlines the default values for various operating systems. This comparison will guide you in inferring the likely operating system running on the target machine.
In our example, the target machine shows:
TTL: 64
Window: 2054
These values are not an exact match for any of the known TTL and TCP window size values; however, we can estimate that it could be Linux based on the TTL of 64 and the closest window size, which is within range considering factors like TCP window scaling, network conditions, and variations in system configurations.
Other influence factors such as latency, the Maximum Segment Size (MSS), or adjustments made by network interference can lead to observed deviations in the expected values.
Nmap OS Detection
Nmap analyzes TCP/IP stack behavior and compares it against a database of known OS signatures:
nmap -O <target_ip>Scanning with Artificial Intelligence
SGPT is a command-line tool that integrates OpenAI’s GPT AI models directly in your terminal. If you aren’t familiar with SGPT yet, check out the full guide:

Run a Basic Scan with AI
To run a scan with SGPT, use SGPT’s ‘shell’ flag (-s) that will provide you with the option to run the command after it’s generated and write an SGPT prompt to specify the command and tool you want to use:
sgpt -s "run an nmap scan to get services and versions on localhost"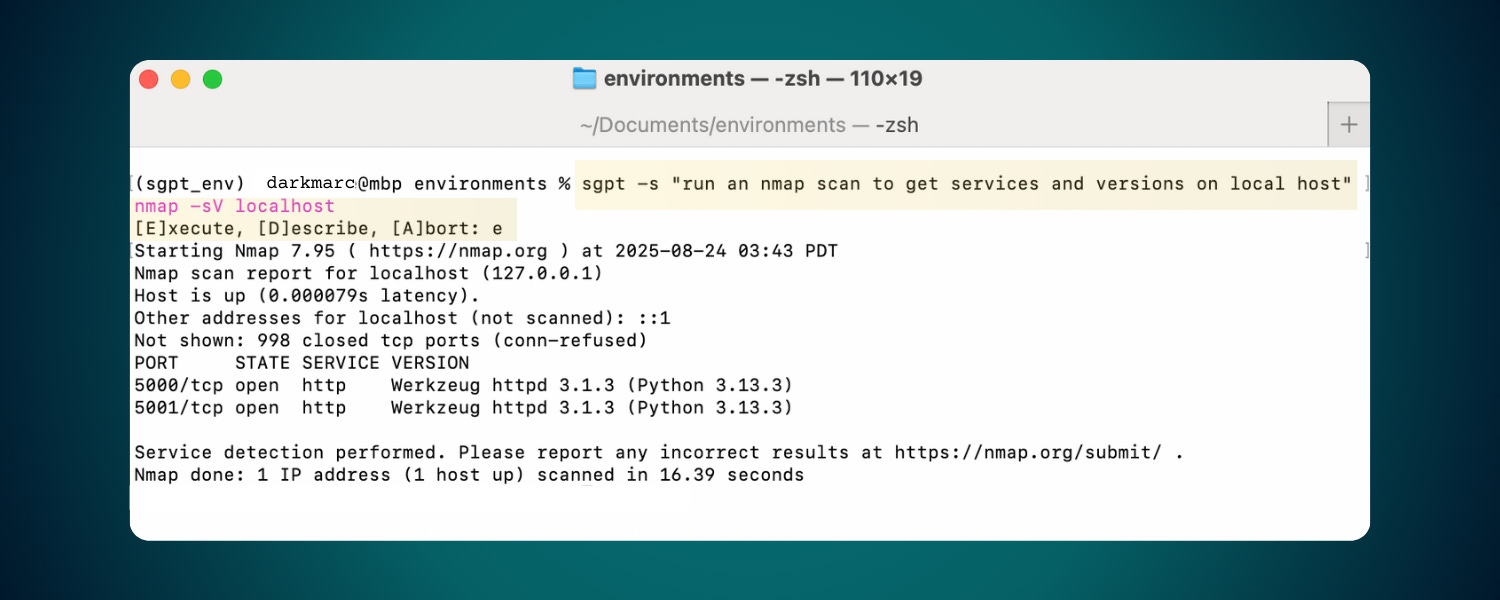
Advanced SGPT Commands
SGPT can be used to create advanced operations by chaining together multiple commands, using the output from one command as input for the next.
Generate Your Own Advanced Commands:
You can use SGPT to generate advanced commands, by specifying the actions you want it to take. Here’s an example:
sgpt -s "Write a terminal command that: is one line, and chain commands together. Scan localhost for open ports and services, output to a text file, then use sgpt to create a table of the data output in terminal"Example: Scan Local Network for Live Hosts, Display Results in HTML File
In the following example, we will:
Get the local subnet. Save to subnet to a variable named ‘CIDR’.
Use SGPT to run a fast scan to discover list hosts on the network. Use the ‘—no-interaction- flag to skip the interaction prompt (Execute, Describe, Abort).
Use SGPT to generate an HTML file displaying the results from the scan.
Note: You may need to specify that you only want the HTML without additional text to avoid an overly verbose response.Open the HTML file.
CIDR=$(ifconfig en0 | awk '/inet / {split($2,a,"."); print a[1] "." a[2] "." a[3] ".0/24"}') && CMD=$(sgpt -s --no-interaction "Write a fast nmap command to scan for live hosts on the network: $CIDR and save output to scan.txt") && eval "$CMD" && cat scan.txt | sgpt "Write an HTML to convert this Nmap output into a HTML file with a table of hosts and their status (cols: host, hostname, status). Include a short header, one sentence description, table of results. Return only the HTML no other text before or after. Use CSS in header to center and stylize the content in a professional design." > scan.html && open scan.html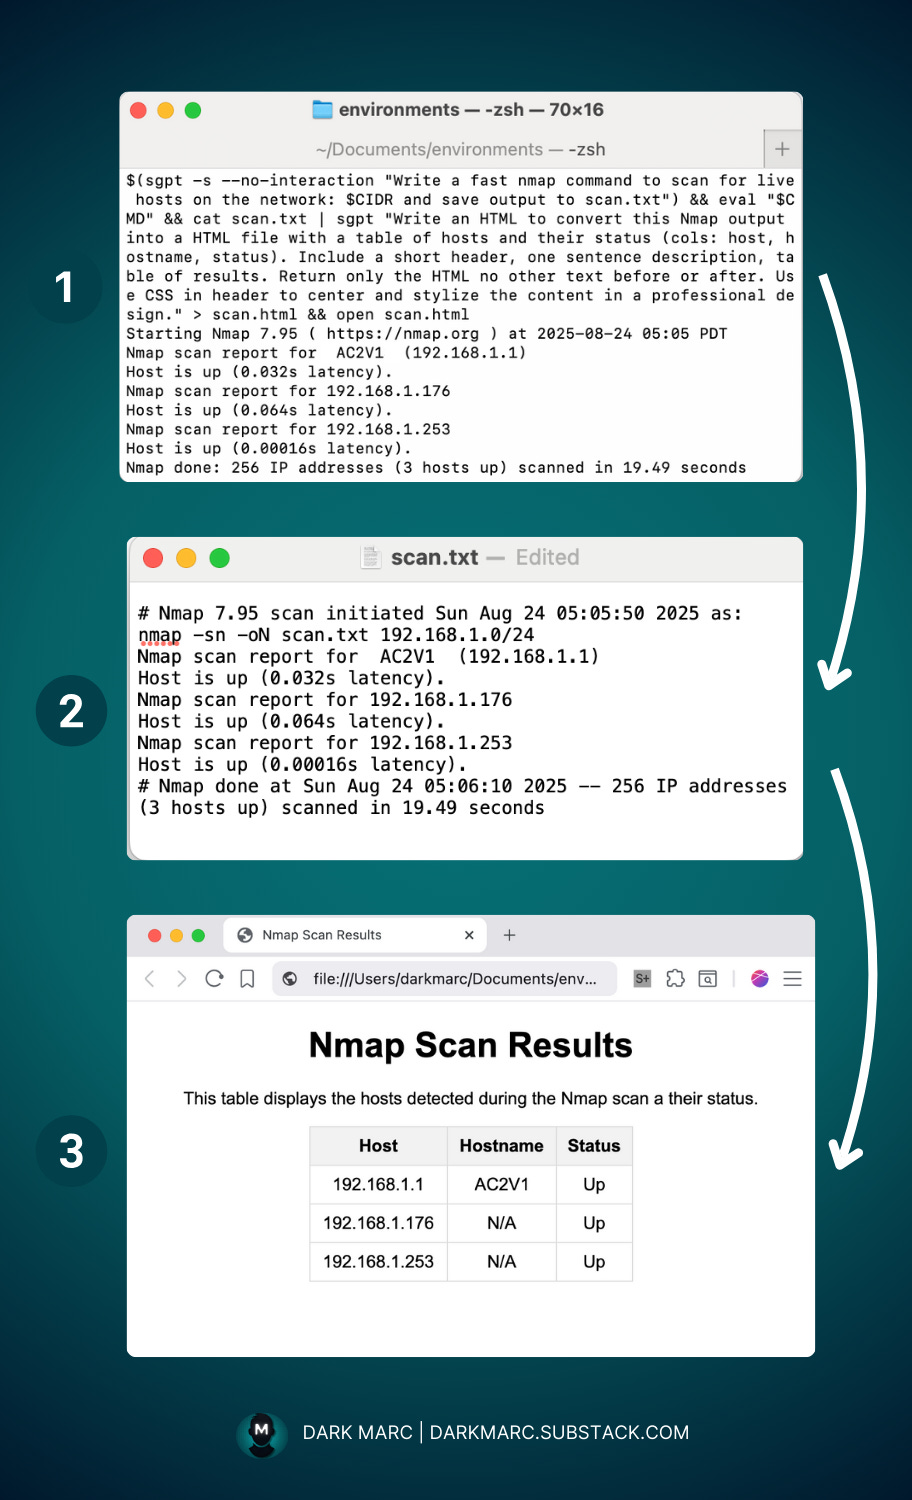
Scanning Beyond the IDS and Firewall
If scans aren’t working, a firewall may be interfering. This includes host firewalls and network edge firewalls (e.g., routers, VLANs, or subnet edges), as well as Intrusion Detection Systems (IDS) and Intrusion Prevention Systems (IPS).
These strategies are beneficial not only for conducting scans from beyond the firewall but also for identifying pathways to exfiltrate data after a successful exploitation.
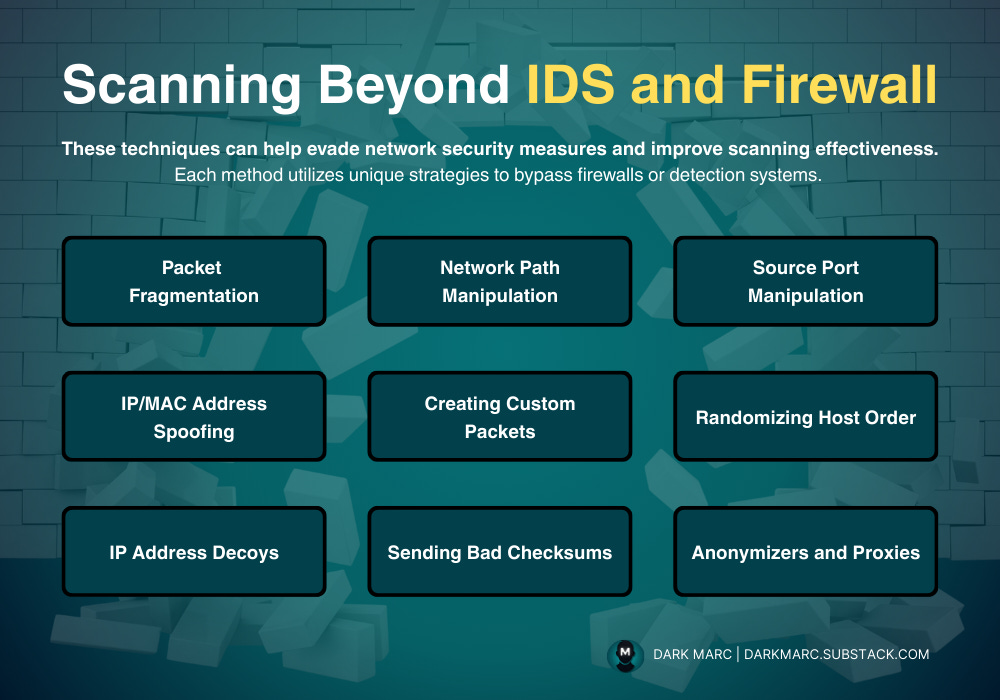
Strategies to avoid detection by IDS, IPS and Firewalls include:
Packet Fragmentation: Splits packets into smaller pieces, reassembled at the destination. Use nmap -f <target> to fragment and confuse filters.
Network Path Manipulation: Defines a custom route (e.g., via router rules) to avoid secure paths. Requires network mapping.
Source Port Manipulation: Sets a specific source port (e.g., nmap -g 53 <target>) using whitelisted ports like 53 (DNS) or 443 (HTTPS). Check target documentation for allowed ports.
IP Address Decoys: Adds fake IPs with nmap -D <decoy1,decoy2> <target> to mask the real source.
IP/MAC Spoofing: Fakes IP (--spoof-ip) or MAC (--spoof-mac) to mimic trusted devices. MAC spoofing needs local network access.
Creating Custom Packets: Craft packets with tools like Colasoft Packet Builder, Nmap, HPING, or NetScanTools Pro to manipulate flags or fragment data.
Randomizing Host Order: Scans in random order with nmap --randomize-hosts 10.10.1.0/24 to avoid sequential detection.
Sending Bad Checksums: Sends invalid checksums with nmap --badsum 10.10.1.11 to test if filters drop packets (ignored by some systems).
Proxy Servers: Uses proxies (e.g., chains) to hide the source or access blocked sites. Configure via proxy tools or VPNs.
Packet Fragmentation
Packet fragmentation is the process of splitting a single probe packet into several smaller packets (fragments) before sending it across a network. These fragments are later reassembled by the receiving system in order to reconstruct the original packet.
In TCP/IP communication, if a packet is too large for the network’s maximum transmission unit (MTU), it must be broken down into fragments.
Each fragment carries a portion of the data along with sequence information, so the receiver can acknowledge and reassemble them into the original message. The fragments keep filling up the TCP window (a buffer space that defines how much data can be sent) before requiring an acknowledgment from the receiver.
# Basic SYN scan with packet fragmentation
nmap -sS -f <Target IP>

# Combine fragmentation with OS detection and version scanning
nmap -sS -O -sV -f <Target IP>

# Increase fragment size (default is 8 bytes)
nmap -sS --mtu 24 <Target IP>
Network Path Manipulation (Source Routing)
Normally, packets traveling across the internet take the fastest or most efficient route determined by the routers they pass through. Each router along the way inspects the packet’s destination IP address and chooses the next hop to forward it toward the destination.
However, attackers can override this behavior using a technique called source routing. Instead of letting routers automatically decide the path, the sender (attacker) specifies a custom path through the network.
This can be used to avoid security controls like firewalls, intrusion detection systems (IDS), or monitoring points at the edge of the network.
Why Attackers Use Source Routing
To bypass firewalls by forcing packets to travel through less-secure routers.
To evade IDS/IPS systems that monitor only the default path.
To probe hidden routes in a network that would not normally be used.
Router Advertisement & Path Definition
Routers periodically send out Router Advertisements (RAs), which are messages that announce themselves as available gateways and describe paths through the network (part of the IPv6 Neighbor Discovery Protocol, or ICMPv6). Normally. These help devices automatically configure their default routes.
Example: Forcing a Custom Route with Scapy
# Import necessary modules from Scapy
from scapy.all import IP, ICMP, send


# Define a packet with Loose Source Routing (LSRR)
# Create an IP packet destined for 192.168.1.50 with LSRR options
# specifying route through 192.168.1.1 and 192.168.1.2.

pkt = IP(dst="192.168.1.50", options=[('LSRR', ['192.168.1.1', '192.168.1.2'])]) / ICMP()

# Send the packet
send(pkt)  # Transmit the constructed packet over the network
Source Port Manipulation
When sending traffic across a network, the operating system usually chooses a random source port for outbound packets. The destination service listens on a fixed port (e.g., port 80 for HTTP), but the source port can vary.
Many firewalls and intrusion prevention systems are configured to block traffic coming from random or unusual ports, while allowing traffic from well-known service ports (like 80 for HTTP, 53 for DNS, or 443 for HTTPS).
Attackers can exploit this by manipulating the source port number of their packets to make them look like legitimate traffic. This technique allows them to bypass firewall rules and reach targets even when their true source port would normally be blocked.
Example with Nmap
# Force nmap to use source port 80 (commonly allowed HTTP traffic)
nmap -sS -g 80 10.10.1.11

# Use DNS port 53 as the source port
nmap -sS -g 53 10.10.1.11

# Use SMB/Windows file sharing port 445
nmap -sS -g 445 10.10.1.11
Which Ports Are Commonly Whitelisted?
Firewalls usually allow outbound and inbound packets from well-known service ports because blocking them would break common network services. The most frequently whitelisted include:
80 → HTTP (web browsing)
443 → HTTPS (secure web traffic)
53 → DNS (domain name lookups)
20, 21 → FTP (file transfer)
25, 110, 143 → Email protocols (SMTP, POP3, IMAP)
445 → SMB (Windows file sharing, often open on corporate networks)
Attackers typically try 80, 443, 53, 445 first, as these are the most likely to be allowed through strict firewalls.
IP Address Decoys
IP address decoy is a network reconnaissance technique that involves generating false source IP addresses to mask the true origin of network scans.
This method creates confusion for intrusion detection systems (IDS) and firewalls by making it appear as though multiple hosts are simultaneously scanning the target network.
How IP Address Decoy Works
When implementing IP address decoy, the scanning tool generates multiple fake IP addresses alongside the real source address.
To the target system, it appears that numerous different hosts are conducting network reconnaissance simultaneously. This obfuscation technique makes it significantly more challenging for security devices to identify the actual source of the scan and distinguish between legitimate decoy addresses and the genuine attacker's IP.
The effectiveness of this technique lies in its ability to create noise in security logs and alerts. Network defenders must analyze multiple potential source addresses, making it difficult to pinpoint the true threat and potentially causing them to investigate false leads.
Implementing Decoy Scanning with Nmap
Nmap provides two primary methods for implementing IP address decoy scanning:
Random Decoy Generation
nmap -D RND:10 [target]This command instructs Nmap to generate 10 random IP addresses to use as decoys. The tool automatically creates these addresses, simplifying the process for the user while maintaining the obfuscation effect.
Manual Decoy Specification
nmap -D decoy1,decoy2,decoy3,ME [target]This approach allows you to manually specify the decoy IP addresses. The "ME" parameter represents your actual IP address and can be positioned anywhere in the list to further obscure your true location among the decoys.
IP/MAC Spoofing
Address spoofing involves modifying network identifiers to impersonate legitimate devices or users on a network.
These techniques operate at different layers of the network stack and serve as fundamental evasion methods for bypassing security controls that rely on address-based filtering and access control mechanisms.
IP Address Spoofing
IP address spoofing is a technique that involves modifying the source IP address in packet headers to make network traffic appear as though it originates from a different host. This method is particularly useful when target networks implement IP-based access controls or filtering mechanisms that restrict communication to specific authorized addresses.
When implementing IP spoofing, attackers modify the source address field in the IP packet header before transmission. The target system receives these packets and believes they originated from the spoofed IP address rather than the attacker's actual location. However, any response packets from the target will be sent back to the spoofed address, not the attacker's real IP address.
This technique proves especially valuable when edge devices such as firewalls or routers maintain allow-lists of permitted IP addresses. By spoofing an authorized IP address, attackers can potentially bypass these restrictions and gain access to otherwise protected network segments.
Implementing IP Spoofing with Hping3
One tool for IP spoofing is Hping3, which allows control over packet construction:
hping3 www.google.com -a 7.7.7.7MAC Address Spoofing
MAC (Media Access Control) addresses operate at the data link layer (Layer 2) of the network stack and serve as unique hardware identifiers for network interfaces. Unlike IP addresses, which can change based on network configuration, MAC addresses are typically burned into network hardware and remain constant.
MAC addresses consist of 48 bits (6 bytes) typically displayed in hexadecimal format, such as 00:1B:44:11:3A:B7. The first three bytes identify the manufacturer (Organizationally Unique Identifier), while the last three bytes represent the specific device identifier assigned by that manufacturer.
MAC address spoofing involves changing the MAC address of a network interface to impersonate another device on the local network.
This technique can be particularly effective for bypassing network access controls that rely on MAC address filtering or device authentication. Many networks implement MAC-based access control lists (ACLs) that only permit specific, pre-approved devices to access network resources.
MAC Spoofing with Nmap
Nmap provides built-in support for MAC address spoofing through the --spoof-mac option:
nmap --spoof-mac 0:1:2:3:4:5 [target]This command instructs Nmap to use the specified MAC address when sending packets during the scan. The tool can also generate random MAC addresses or use MAC addresses from specific vendors:
nmap --spoof-mac Dell [target]
nmap --spoof-mac 0 [target]  # Generates random MAC
Creating Custom Packets
Packet crafting involves manually constructing and manipulating network packets by modifying headers, flags, fragmentation patterns, and payload data.
This technique enables bypassing firewalls, IPS, and IDS systems that rely on standard packet patterns and signature-based detection.
Packet Crafting Techniques
Common manipulation methods include IP fragmentation to split packets into smaller pieces that bypass size-based filters, TCP flag manipulation to create unusual flag combinations that confuse stateful inspection, and header field modification to trigger different processing paths in target systems.
Timing attacks control packet transmission rates to exploit timing-based security mechanisms, while protocol encapsulation wraps packets in unexpected protocol layers.
Packet Crafting Tools
Colasoft (Recommended)
Provides a comprehensive graphical interface for packet construction with precise control over all header fields and payload data. The visual approach makes it accessible while maintaining granular control for advanced manipulation.
NMAP
Includes built-in packet crafting capabilities through various scan techniques like SYN, ACK, and NULL scans. Can be combined with its scripting engine for automated packet manipulation tasks.
HPING
Command-line tool offering extensive control over TCP, UDP, ICMP, and raw IP packet creation. Supports customizable header fields, timing controls, and payload options for both simple and complex crafting scenarios.
Packet Builder
Specialized environment for constructing custom packets with detailed protocol layer control. Provides templates for common packet types while allowing complete customization of all components.
NetScanTools Pro
Integrated network analysis suite combining packet crafting with scanning and analysis functions. Supports multiple protocols with both template-based and custom packet construction options.
Randomizing Host Order
Sequential host scanning creates predictable patterns that security systems can easily detect and block. When scanning hosts in numerical order (e.g., 10.10.1.1, 10.10.1.2, 10.10.1.3), firewalls and IDS systems can quickly identify the scanning activity through pattern recognition algorithms.
Host order randomization addresses this detection issue by scanning all target hosts in a random sequence rather than following predictable numerical patterns. This technique maintains complete network coverage while making the scanning activity appear less systematic and harder to correlate as a coordinated attack.
Implementation with Nmap
nmap --randomize-hosts 10.10.1.0/24This command scans all hosts in the 10.10.1.0/24 network subnet but randomizes the order in which individual hosts are contacted. Instead of scanning 10.10.1.1 first, then 10.10.1.2, the tool might scan 10.10.1.47, then 10.10.1.12, then 10.10.1.203, making the activity appear more like normal network traffic patterns.
The randomization helps evade time-based detection mechanisms that look for sequential access patterns. Security systems monitoring for systematic scanning often trigger alerts when they detect consecutive IP addresses being probed within short time frames.
Sending Bad Checksums
TCP and UDP protocols include checksum fields in their headers to ensure data integrity during transmission.
Network devices and firewalls often perform checksum validation as part of their packet processing routines. However, some security devices may handle packets with invalid checksums differently than properly formed packets.
Sending packets with intentionally incorrect checksums can help bypass certain firewall rulesets that don't properly validate these fields or that process malformed packets through different code paths.
Some firewalls may skip deeper inspection of packets with bad checksums, assuming they will be discarded by the destination host anyway.
Nmap Bad Checksum Implementation
nmap --badsum <target>This option instructs Nmap to send packets with deliberately incorrect TCP/UDP checksums. While most properly configured systems will discard these packets, some security devices may still process them or respond in ways that reveal information about the target network infrastructure.
The technique proves particularly useful for identifying systems that don't perform proper checksum validation or for discovering security devices that handle malformed packets inconsistently. Any responses received from bad checksum packets indicate potential security weaknesses or misconfigurations in the target environment.
Proxy Servers
A proxy server acts as an intermediary application that routes connections between clients and target systems.
This technology provides both anonymity for external scanning activities and access control bypass capabilities for internal network restrictions.
External Scanning and Anonymity
When scanning from outside a target network, proxy servers hide the scanner's true IP address by presenting the proxy's address to target systems.
Proxy chains create multiple layers of indirection by routing traffic through sequential proxy servers, making it extremely difficult to trace scanning activity back to its source.
Each proxy in a chain only knows the previous and next hop, preventing any single point from revealing the complete communication path.
Advanced configurations can rotate between different proxies automatically, further obscuring scanning patterns and avoiding rate-limiting mechanisms.
Security logs on target systems will show proxy IP addresses rather than the actual scanner location, complicating incident response and forensic investigations. This protection is essential for maintaining anonymity during reconnaissance activities.
Internal Access Control Bypass
For users within restrictive network environments, proxy servers bypass content filtering and access control policies. Organizations often block specific websites, services, or protocols based on destination addresses or content categories.
When internal policies block social media sites, file sharing services, or other restricted content, users can access these resources through proxy servers not included in organizational block lists. By connecting to an allowed proxy, users indirectly access blocked resources through the proxy's connection.
Implementation Methods
Web-based proxies provide simple browser-based access to blocked sites through proxy web interfaces requiring no configuration changes.
Browser proxy settings allow routing all browser traffic through external proxy servers with minimal setup.
SOCKS proxies offer protocol-agnostic tunneling, supporting any network application beyond just web traffic, making them valuable for bypassing restrictions on SSH, FTP, or custom protocols.
Proxy Types
HTTP proxies handle web traffic efficiently but only support HTTP/HTTPS protocols.
Anonymous proxies strip identifying headers from requests for enhanced privacy.
Residential proxies use home internet connection IP addresses, appearing more legitimate to detection systems.
Datacenter proxies offer higher performance and reliability but may be more easily identified as proxy traffic.
Example: Scanning from Outside
In this example, we’ll demonstrate how to combine evasion techniques for external network reconnaissance. The command provided maximizes the chances of bypassing security controls while ensuring scan effectiveness.
In the command, the options work together to obscure the scan’s origin, fragment packets for stealth, and utilize a commonly permitted source port to avoid detection:
nmap -f -D RND:10 -S 192.168.1.100 --source-port 53 -T2 -sS 10.10.1.0/24Breaking down the command:
nmap: The tool used for network scanning.-f: Fragments packets into smaller pieces, making it harder for security devices to detect and analyze the scan.-D RND:10: Utilizes decoy scanning by sending packets from 10 random IP addresses, which masks the actual source of the scan and complicates detection efforts.-S 192.168.1.100: Specifies a source IP address for the packets, which helps in manipulating responses from the target network.--source-port 53: Uses the well-known DNS port (53), which is often allowed through firewalls, to disguise the scan and minimize the chances of being blocked.-T2: Sets a slower scan timing, reducing the likelihood of detection by avoiding spikes in network traffic that could signal a scan.-sS: Initiates a stealth SYN scan, which establishes half-open TCP connections to identify open ports without completing the handshake, helping maintain stealth.
Network Scanning Countermeasures
For every attack technique, corresponding defensive measures exist. Understanding these countermeasures is essential for both attackers seeking to evade detection and defenders implementing robust network security.
Ping Sweep Countermeasures
Block ICMP Traffic: Configure firewalls to block incoming ICMP echo requests from unknown or untrusted sources, preventing basic ping sweep reconnaissance.
Deploy IDS/IPS Systems: Implement intrusion detection and prevention systems like Snort to identify and block ping sweep attempts through pattern recognition and rate limiting.
ICMP Traffic Analysis: Carefully evaluate ICMP traffic patterns flowing through enterprise networks to identify abnormal scanning behavior.
Rate Limiting: Terminate connections with hosts sending more than 10 ICMP ECHO requests within a specified timeframe to prevent systematic scanning.
DMZ Restrictions: Use demilitarized zones allowing only specific ICMP commands such as ECHO_REPLY, HOST UNREACHABLE, and TIME EXCEEDED.
Access Control Lists: Limit ICMP traffic using ACLs restricted to ISP-specific IP addresses and known legitimate sources.
Port Scanning Countermeasures
Firewall and IDS Configuration: Configure firewall and IDS rules to detect and block port scanning probes based on connection patterns and frequency analysis.
Validation Testing: Run port scanning tools against network hosts to verify that security systems properly detect and respond to scanning activity.
Routing and Filtering Security: Ensure routing and filtering mechanisms cannot be bypassed using specific source ports or alternative routing methods.
Firmware Updates: Maintain current router, IDS, and firewall firmware versions to protect against known bypass techniques and vulnerabilities.
Custom Rule Sets: Implement restrictive firewall rules that lock down networks and block unnecessary ports at the perimeter.
ICMP Message Filtering: Filter inbound ICMP message types and outbound ICMP type 3 unreachable messages at firewalls and routers.
Comprehensive Scanning: Perform TCP and UDP scanning combined with ICMP probes against organizational IP address space to validate network configuration.
Anti-Scanning Rules: Ensure anti-scanning and anti-spoofing rules are properly configured and actively monitored.
Banner Grabbing Countermeasures
Disable or Modify Banners: Display false banners to mislead attackers or turn off unnecessary services to limit information disclosure.
Server Masking Tools: Use specialized tools to disable or alter banner information revealed during service enumeration.
Apache Configuration: For Apache 2.x servers with mod_headers module, use httpd.conf directives to change banner headers and set custom server names. Alternatively, set ServerSignature Off to disable version disclosure.
Hide File Extensions: Mask web technologies by hiding file extensions that reveal server information. Replace application mappings like .asp with .htm or .foo to disguise server identities.
Apache Module Configuration: Apache users can implement mod_negotiation directives for additional banner obfuscation.
Eliminate File Extensions: The most effective approach involves not using file extensions at all to completely mask underlying technologies.
IP Spoofing Detection and Countermeasures
Detection Techniques
TTL Analysis: Detect spoofing by analyzing Time-to-Live values in packet headers. External attackers typically have longer TTL values due to greater network distance from edge devices, allowing identification of spoofed internal addresses through TTL differential analysis.
TCP Flow Control Monitoring: Implement custom TCP sliding window configurations for internal networks. Since external attackers cannot match internal flow control settings, mismatched window sizes indicate potential IP spoofing attempts.
Prevention Measures
Traffic Encryption: Encrypt network traffic using cryptographic protocols including IPsec, TLS, SSH, and HTTPS to protect against interception and manipulation.
Multi-Layered Firewalls: Deploy multiple firewall layers providing defense-in-depth protection against spoofing attacks.
Avoid IP-Based Authentication: Do not rely solely on IP addresses for authentication, as these can be easily spoofed by determined attackers.
Sequence Number Randomization: Use random initial sequence numbers to prevent spoofing attacks based on sequence number prediction.
Ingress Filtering: Configure routers and firewalls at network perimeters to filter incoming packets appearing to originate from internal IP addresses.
Egress Filtering: Filter outgoing packets with invalid local IP addresses as source addresses to prevent internal systems from participating in spoofing attacks.
Next Step: Enumeration
In the network scanning phase of the ethical hacking process, we the identify live hosts, open ports, running services, and operating systems using tools like Nmap, Wireshark, and specialized scanners.
Stealth techniques and packet crafting can bypass defenses, and scans must adhere to the client’s Rules of Engagement (RoE). The intelligence gathered during this phase directly feeds into the following enumeration process, where detailed service information and potential vulnerabilities are systematically cataloged.
Having identified live systems and accessible services, the next step involves detailed enumeration to extract specific configuration details, user accounts, system information, and potential security weaknesses from discovered targets.
Another superb recap. Kudos!